
(Note: this is part of my ongoing series on cheaply selfhosting)
I spent a few days last week setting up a cheap home server which now serves my family as:
- a media server — stores and streams media to phones, tablets, computers, and internet-connected TVs (even when I’m out of the house!)
- network-attached storage (NAS) — lets computers connected to my home network store and share files
- VPN — lets me connect to my storage and media server when I’m outside of my home
Until about a week ago, I had run a Plex media server on my aging (8 years old!) NVIDIA SHIELD TV. While I loved the device, it was starting to show it’s age – it would sometimes overheat and not boot for several days. My home technology setup had also shifted. I bought the SHIELD all those years ago to put Android TV functionality onto my “dumb” TV.
But, about a year ago, I upgraded to a newer Sony TV which had it built-in. Now, the SHIELD felt “extra” and the media server felt increasingly constrained by what it could not do (e.g., slow network access speeds, can only run services that are Android apps, etc.)
I considered buying a high-end consumer NAS from Synology or QNAP (which would have been much simpler!), but decided to build my own to both get better hardware for less money but also as a fun project which would teach me more about servers and let me configure everything to my heart’s content.
If you’re interested in doing something similar, let me walk you through my hardware choices and the steps I took to get to my current home server setup.
Note: on the recommendation of a friend, I’ve since reconfigured how external access works to not rely on a VPN with an open port and Dynamic DNS and instead use Twingate. For more information, refer to my post on Setting Up Pihole, Nginx Proxy, and Twingate with OpenMediaVault
Hardware
I purchased a Beelink EQ12 Mini, a “mini PC” (fits in your hand, power-efficient, but still capable of handling a web browser, office applications, or a media server), during Amazon’s Prime Day sale for just under $200.
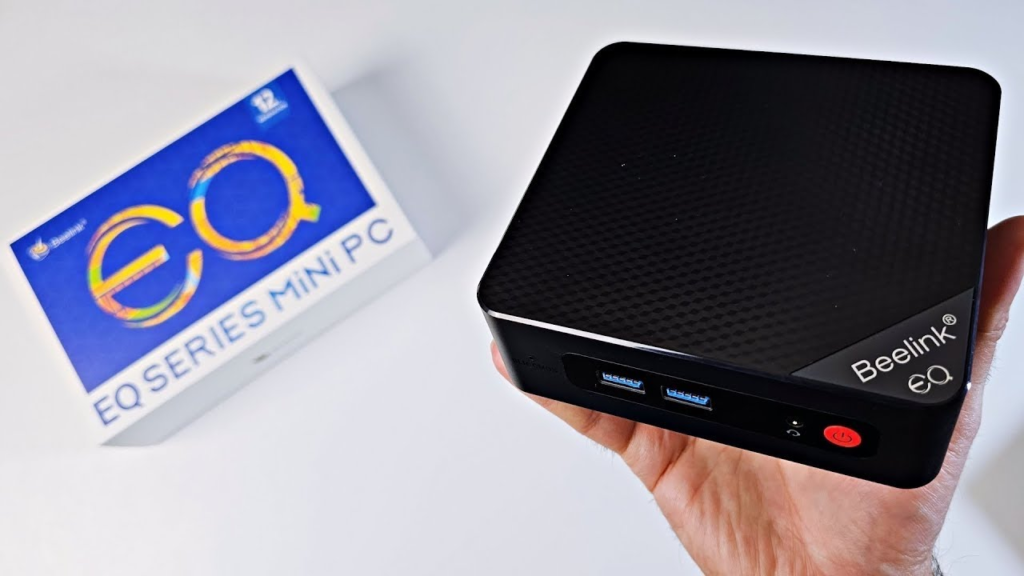
While I’m very happy with the choice I made, for those of you contemplating something similar, the exact machine isn’t important. Many of the mini PC brands ultimately produce very similar hardware, and by the time you read this, there will probably be a newer and better product. But, I chose this particular model because:
- It was from one of the more reputable Mini PC brands which gave me more confidence in its build quality (and my ability to return it if something went wrong). Other reputable vendors beyond Beelink include Geekom, Minisforum, Chuwi, etc.
- It had a USB-C port which helps with futureproofing, and the option to convert this into something else useful if this server experiment doesn’t work out.
- It had an Intel CPU. While AMD makes excellent CPUs, the benefit of going with Intel is support for Intel Quick Sync, which allows for hardware accelerated video transcode (converting video and audio streams to different formats and resolutions – so that other devices can play them – without overwhelming the system or needing a beefy graphics card). Many popular media servers support Intel Quick Sync-powered transcode.
- It was not a i3/5/7/9 chip. Intel’s higher end chips have names that include “i3” or “i5” or “i7”. Those are generally overkill on performance, power consumption, and price for a simple file and media server. All I needed for my purposes was a lower-end Celeron-type device.
- It was the most advanced Intel architecture I could find for ≤$200. While I didn’t need the best performance, there was no reason to avoid more advanced technology. Thankfully, the N100 chip in the EQ12 Mini uses Intel’s 12th Generation Core architecture (Alder Lake). Many of the other mini-PCs at this price range had older (10th and 11th generation) CPUs.
- I went with the smallest RAM and onboard storage option. I wasn’t planning on putting much on the included storage (because you want to isolate the operating system for the server away from the data) nor did I expect to tax the computer memory for my use case.
I also considered purchasing a Raspberry Pi, a <$100 low-power device popular with hobbyists, but the lack of transcode and the non-x86 architecture (Raspberry Pi’s use ARM CPUs and won’t be compatible with all server software) pushed me towards an Intel-based mini PC.
In addition to the mini-PC, I also needed:
- Storage: a media server / NAS without storage is not very useful. I had a 4 TB USB hard drive (previously connected to my SHIELD TV) which I used here, and I also bought a 4 TB SATA SSD (for ~$150) to mount inside the mini-PC.
- Note 1: if you decide to go with OpenMediaVault as I have, install the Linux distribution before you install the SATA drive. The installer (foolishly) tries to install itself to the first drive it finds, so don’t give it any bad options.
- Note 2: most Mini PC manufacturers say their systems only support additional drives up to 2 TB. This appears to be mainly the manufacturers being overly conservative. My 4 TB SATA SSD works like a charm.
- A USB stick: Most Linux distributions (especially those that power open source NAS solutions) are installed from a bootable USB stick. I used one that was lying around that had 2 GB on it.
- Ethernet cables and a “dumb” switch: I use Google Wifi in my home and I wanted to connect both my TV and my new media server to the router in my living room. To do that, I bought a simple Ethernet switch (you don’t need anything fancy because it’s just bridging several devices) and 3 Ethernet cables to tie it all together (one to connect the router to the switch, one to connect the TV to the switch, and one to connect the server to the switch). Depending on your home configuration, you may want something different.
- A Monitor & Keyboard: if you decide to go with OpenMediaVault as I have, you’ll only need this during the installation phase as the server itself is controllable through a web interface. So, I used an old keyboard and monitor (that I’ve since given away).
OpenMediaVault
There are a number of open source home server / NAS solutions you can use. But I chose to go with OpenMediaVault because it’s:
- built on Debian (a well-supported, widely used flavor of Linux)
- still being actively developed (last update as of this writing was literally today)
- considered easy to use
- lightweight enough to be able to run on a Raspberry Pi
- backed by a solid community forum and subreddit (something I knew I would need!)
To install OpenMediaVault on the mini PC, you just need to:
- Download the installation image ISO and burn it to a bootable USB stick (if you use Windows, you can use Rufus to do so)
- Plug the USB stick into the mini PC (and make sure to connect the monitor and keyboard) and then turn the machine on. If it goes to Windows (i.e. it doesn’t boot from your USB stick), you’ll need to restart and go into BIOS (you can usually do this by pressing
DeleteorF2orF7after turning on the machine) to configure the machine to boot from a USB drive. - Follow the on-screen instructions.
- You should pick a good root password and write it down (it gates administrative access to the machine, and you’ll need it to make some of the changes below).
- You can pick pretty much any name you want for the hostname and domain name (it shouldn’t affect anything but it will be what your machine calls itself).
- Make sure to select the right drive for installation
- And that should be it! After you complete the installation, you will be prompted to enter the root password you created to login.
Unfortunately for me, OpenMediaVault did not recognize my mini PC’s ethernet ports or wireless card. If it detects your network adapter just fine, you can skip this next block of steps. But, if you run into this, select the “does not have network card” option and “minimal setup” options during install. You should still be able to get the end of the process. Then, once the OpenMediaVault operating system installs and reboots:
- Login by entering the root password you picked during the installation and make sure your system is plugged in to your router via ethernet. Note: Linux is known to have issues recognizing some wireless cards and it’s considered best practice to run a media server off of Ethernet rather than WiFi.
- In the command line, enter
omv-firstaid. This is a gateway to a series of commonly used tools to fix an OpenMediaVault install. In this case, select theConfigure Network Interfaceoption and say yes to all the IPv4 DHCP options (you can decide if you want to set up IPv6). - Step 2 should fix the issue where OpenMediaVault could not see your internet connection. To prove this, you should try two things:
- Enter
ping google.com -c 3in the command line. You should see 3 lines with something like64 bytes from random-url.blahurl.netshowing that your system could reach Google (and thus the internet). If it doesn’t work, try again in a few minutes (sometimes it takes some time for your router to register a new system). - Enter
ip addrin the command line. Somewhere on the screen, you should see something that probably looks likeinet 192.168.xx.xx/xx. That is your local IP address and it’s a sign that the mini PC has connected to your router.
- Enter
- Now you need to update the Linux operating system so that it knows where to look for updates to Debian. As of this writing, the latest version of OpenMediaVault (6) is based on Debian 11 (codenamed Bullseye), so you may need to replace
bullseyewith<name of Debian codename that your OpenMediaVault is based on>in the text below if your version is based on a different version of Debian (i.e. Bookworm, Trixie, etc.).
In the command line, enternano /etc/apt/sources.list. This will let you edit the file that contains all the information on where your Linux operating system will find valid software updates. Enter the text below underneath all the lines that start with#(replacingbullseyewith the name of the Debian version that underlies your version of OpenMediaVault if needed).
Then pressdeb http://deb.debian.org/debian bullseye main
deb-src http://deb.debian.org/debian bullseye main
deb http://deb.debian.org/debian-security/ bullseye-security main
deb-src http://deb.debian.org/debian-security/ bullseye-security main
deb http://deb.debian.org/debian bullseye-updates main
deb-src http://deb.debian.org/debian bullseye-updates mainCtrl+Xto exit, pressYwhen asked if you want to save your changes, and finallyEnterto confirm that you want to overwrite the existing file. - To prove that this worked, in the command line enter
apt-get updateand you should see some text fly by that includes some of the URLs you entered intosources.list. Next enterapt-get upgrade -y, and this should install all the updates the system found.
Congratulations, you’ve installed OpenMediaVault!
Setting up the File Server
You should now connect any storage (internal or USB) that you want to use for your server. You can turn off the machine if you need to by pulling the plug, or holding the physical power button down for a few seconds, or by entering shutdown now in the command line. After connecting the storage, turn the system back on.
Once setup is complete, OpenMediaVault can generally be completely controlled and managed from the web. But to do this, you need your server’s local IP address. Log in (if you haven’t already) using the root password you set up during the installation process. Enter ip addr in the command line. Somewhere on the screen, you should see something that looks like inet 192.168.xx.xx/xx. That set of numbers connected by decimal points but before the slash (for example: 192.168.444.23) is your local IP address. Write that down.
Now, go into any other computer connected to the same network (i.e. on WiFi or plugged into the router) as the media server and enter the local IP address you wrote down into the address bar of a browser. If you configured everything correctly, you should see something like this (you may have to change the language to English by clicking on the globe icon in the upper right):
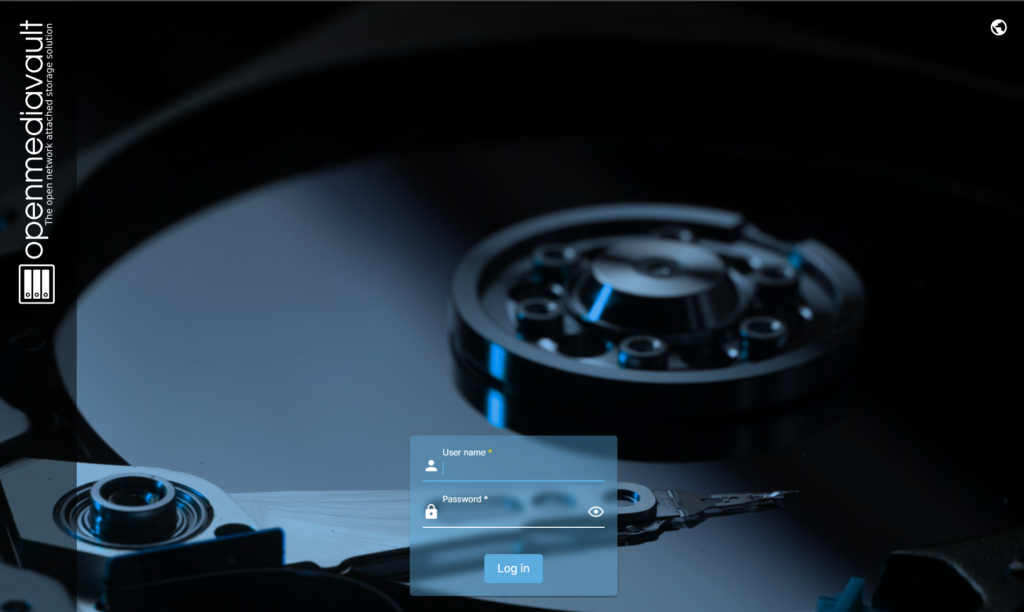
Congratulations, you no longer need to connect a keyboard or mouse to your server, because you can manage it from any other computer on the network!
Login using the default username admin and default password openmediavault. Below are the key things to do first. (Note: after hitting Save on a major change, as an annoying extra precaution, OpenMediaVault will ask you to confirm the change again with a bright yellow confirmation banner at the top. You can wait until you have several changes, but you need to make sure you hit the check mark at least once or your changes won’t be reflected):
- Change your password: This panel controls the configuration for your system, so it’s best not to let it be the default. You can do this by clicking on the
 (user settings) icon in the upper-right and selecting
 Change Password - Some useful odds & ends:
- Make auto logout (time before the panel logs you out automatically) longer. You can do this by going to
[System>Workbench] in the menu and changingAuto logoutto something like60 minutes - Set the system timezone. You can do this by going to [
System>Date & Time] and changing the Time zone field.
- Make auto logout (time before the panel logs you out automatically) longer. You can do this by going to
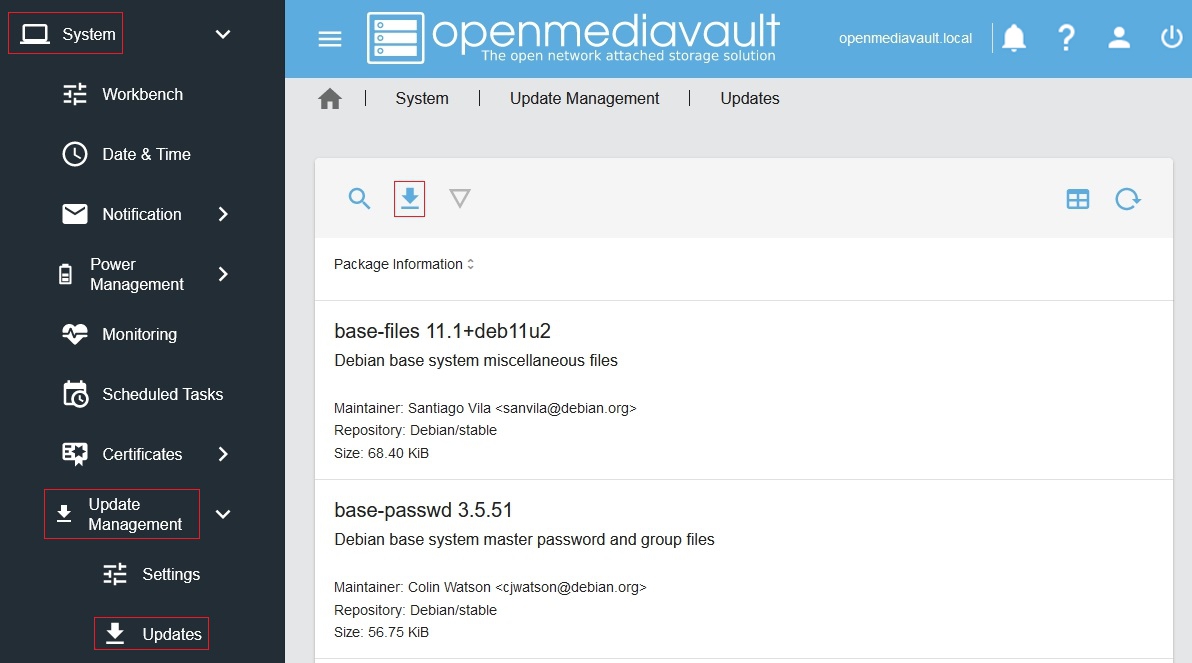
- Update the software: On the left-hand side, select [
System>Update Management>Updates]. Press the button to search for new updates. If any show up press the
  button to install everything on the list that it can. (see below, Image credit: OMV-extras Wiki)
- Mount your storage:
- From the menu, select [
Storage>Disks]. The table that results (see below) shows everything OpenMediaVault sees connected to your server. If you’re missing anything, time to troubleshoot (check the connection and then make sure the storage works on another computer).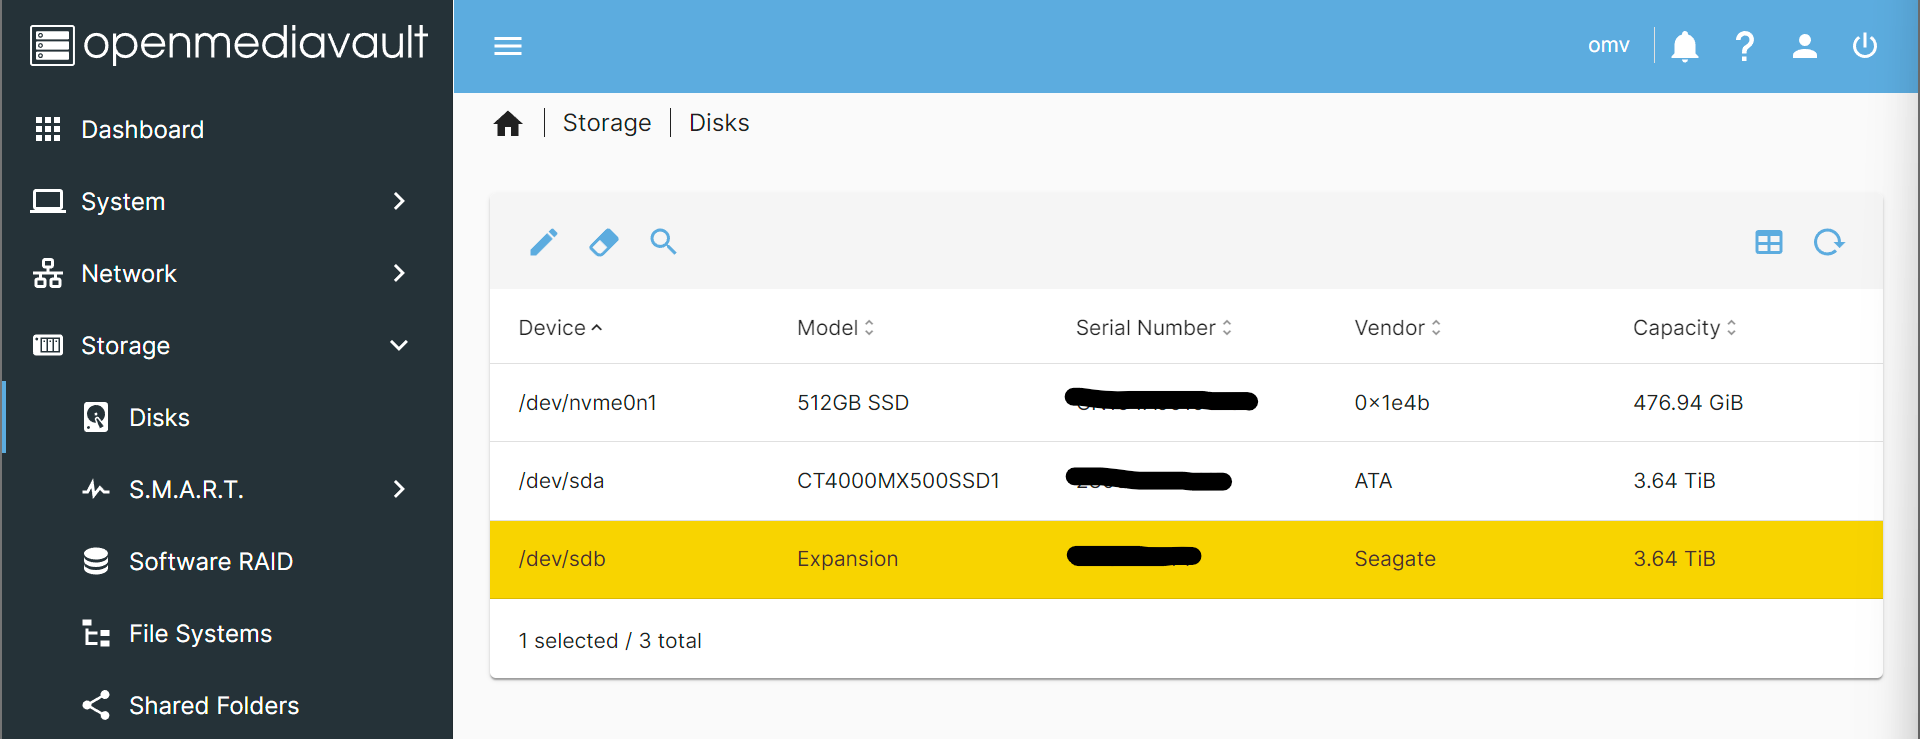
- It’s a good idea (although not strictly necessary) to reformat any un-empty disks before using them with OpenMediaVault for performance. You can do this by selecting the disk entry (marking it yellow) and then pressing the
 (Wipe) button
 - Go to [
Storage>File Systems]. This shows what drives (and what file systems) are accessible to OpenMediaVault. To properly mount your storage:- Press the
 button for every unformatted drive added you may want to mount to OpenMediaVault. This will add a disk with an existing file system to the purview of your file server.
 - Press the
 button in the upper-left (just to the right of the triangular button) to add a drive that’s just been formatted. Of the file system options that come up, I would choose
 EXT4(it’s what modern Linux operating systems tend to use). This will result in your chosen file system being added to the drive before it’s ultimately mounted.
- Press the
- From the menu, select [
- Set up your File Server: Ok, you’ve got storage! Now you want to make it available for the computers on your network. To do this, you need to do three things:
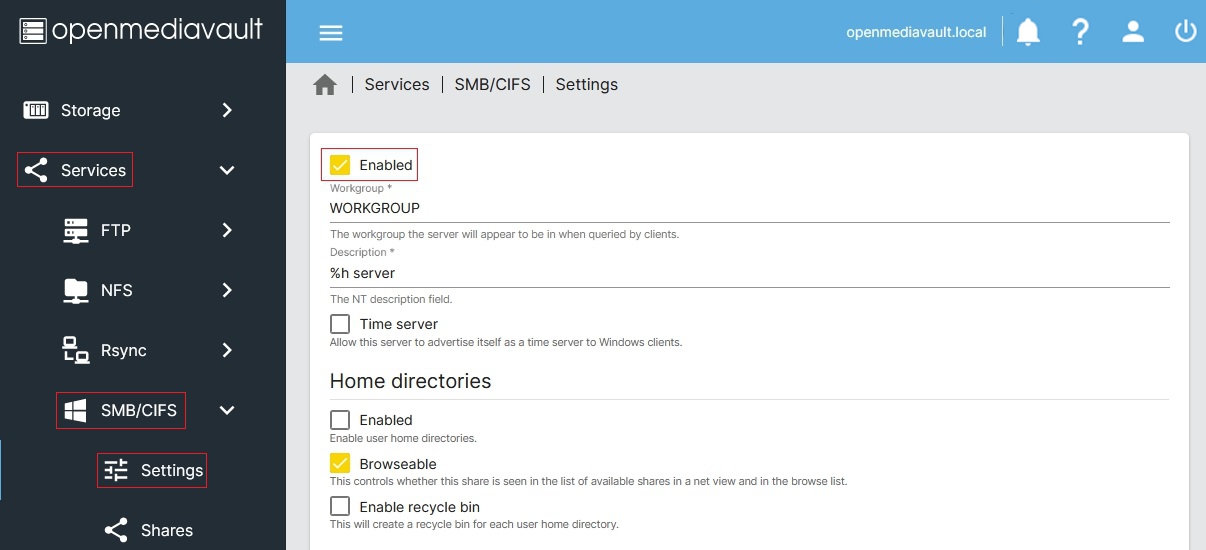
- Enabling SMB/CIFS: Windows, Mac OS, and Linux systems tend to work pretty well with SMB/CIFS for network file shares. From the menu, select [
Services>SMB/CIFS>Settings].
Check theEnabledbox. If your LAN workgroup is something other than the defaultWORKGROUPyou should enter it. Now any device on your network that supports SMB/CIFS will be able to see the folders that OpenMediaVault shares. (see below, Image credit: OMV-extras Wiki)
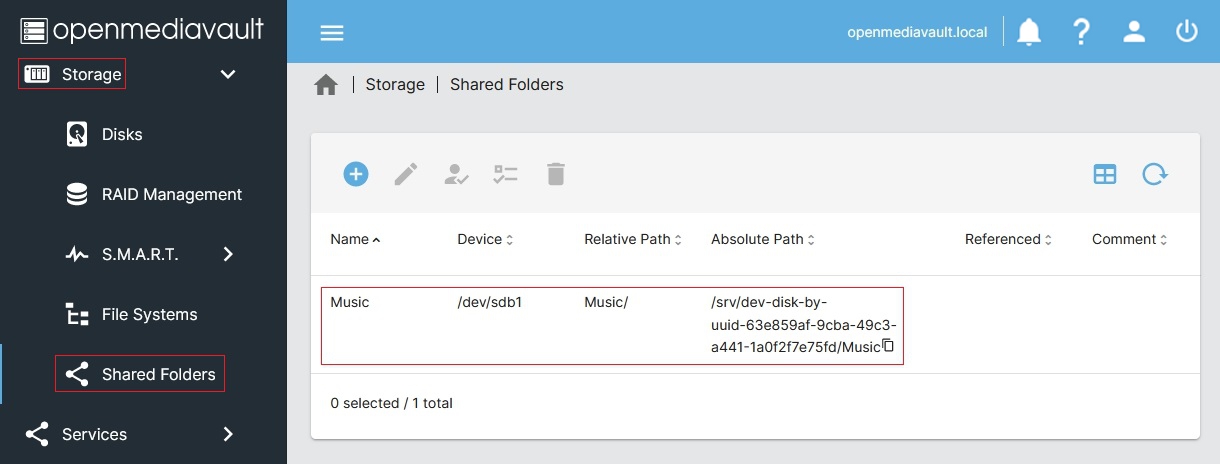
- Selecting folders to share: On the left-hand-side of the administrative panel, select [
Storage>Shared Folders]. This will list all the folders that can be shared.
To make a folder available to your network, select the button in the upper-left, and fill out the Name(what you want the folder to be called when other’s access it) and select theFile Systemyou’ve previously mounted that the folder will connect to. You can write out the name of the directory you want to share and/or use the directory folder icon to the right of theRelative Pathfield to help select the right folder. UnderPermissions, for simplicity I would assignEveryone: read/write. (see below, Image credit: OMV-extras Wiki)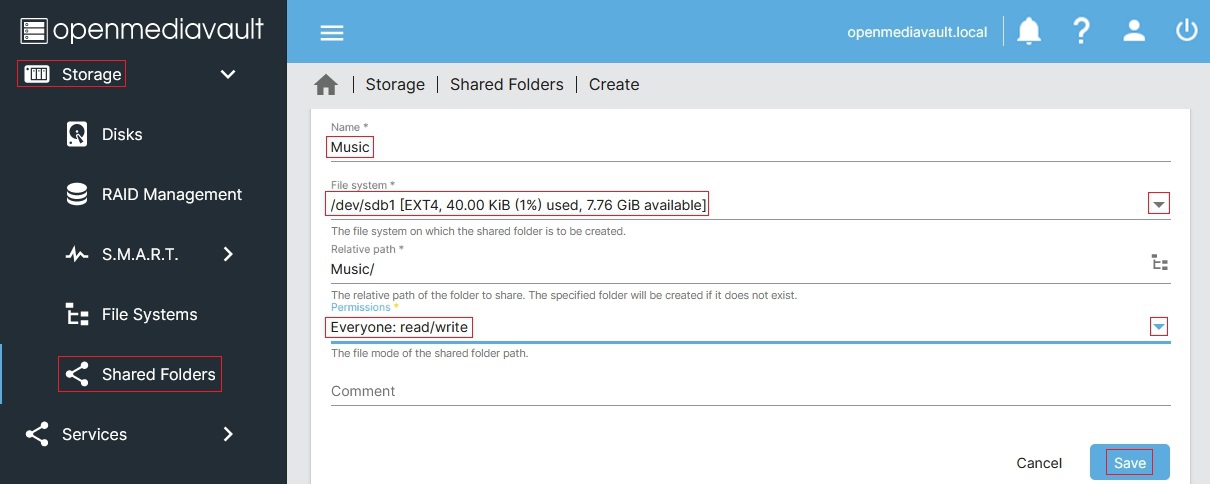
HitSaveto return to the list of folder shares (see below for what a completed entry looks like, Image credit: OMV-extras Wiki). Repeat the process to add as many Shared Folders as you’d like.
- Make the shared folders available to SMB/CIFS: To do this go to [
Services>SMB/CIFS>Shares]. Hit the button and, in, Shared Folder, select the Shared Folder you configured from the dropdown. UnderPublic, selectGuests allowed– this will allow users on the network to access the folder without supplying a username or password. Check theInherit Permissions,Extended attributes, andStore DOS attributesboxes as well and then hitSave. Repeat this for all the shared folders you want to make available. (Image credit: OMV-extras Wiki)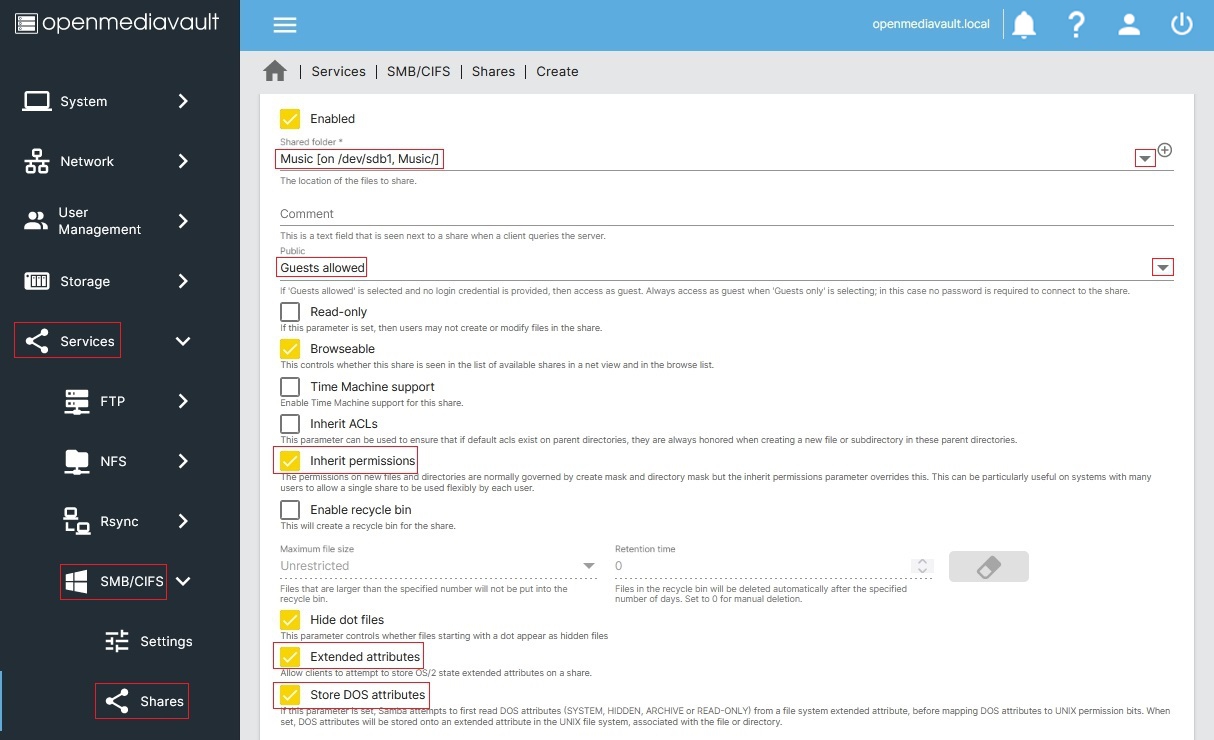
- Enabling SMB/CIFS: Windows, Mac OS, and Linux systems tend to work pretty well with SMB/CIFS for network file shares. From the menu, select [
- Set a static local IP: Home networks typically dynamically assign IP addresses to the devices on the network (something called DHCP). As a result, the IP address for your server may suddenly change. To give your server a consistent address to connect to, you should configure your router to assign a static IP to your server. The exact instructions will vary by router so you’ll need to consult your router’s documentation. In my household, we use Google Wifi and, if you do too, here are the instructions for doing so. (Make sure to write down the static IP you assign to the server as you will need it later. If you change the IP from what it already was, make sure to log into the OpenMediaVault panel from that new address before proceeding.)
- Check that the shared folders show up on your network: Linux, Mac OS, and Windows all have separate ways of mounting a SMB/CIFS file share. The steps above hopefully simplify this by:
- letting users connect as a Guest (no extra authentication needed)
- providing a Static IP address for the file share


Docker and OMV-Extras
Once upon a time, setting up other software you might want to run on your home server required a lot of command line work. While efficient, it made worse the consequences of entering the wrong command or having two applications with conflicting dependencies. After all, a certain blogger accidentally deleted his entire blog because he didn’t understand what he was doing.
Enter containers. Containers are “portable environments” for software, first popularized by the company Docker, that gives software a predictable background to run on. This makes it easier to run applications reliably, regardless of machine (because the application only sees what the container shows it). It also means a greatly reduced risk of a misconfigured app affecting another since the application “lives” in its own container.
While this has tremendous implications for software in general, for our purposes, this just makes it a lot easier to install software … provided you have Docker installed. For OpenMediaVault, the best way to get Docker is to install OMV-extras.
If you know how to use ssh, go ahead and use it to access your server’s IP address, login as the root user, and skip to Step 4. But, if you don’t, the easiest way to proceed is to set up WeTTY (Steps 1-3):
- Install WeTTY: Go to [
System > Plugins] and search or scroll until you find the row foropenmediavault-wetty. Click on it to mark it yellow and then press the button to install it. WeTTY is a web-based terminal which will let you access the server command line from a browser.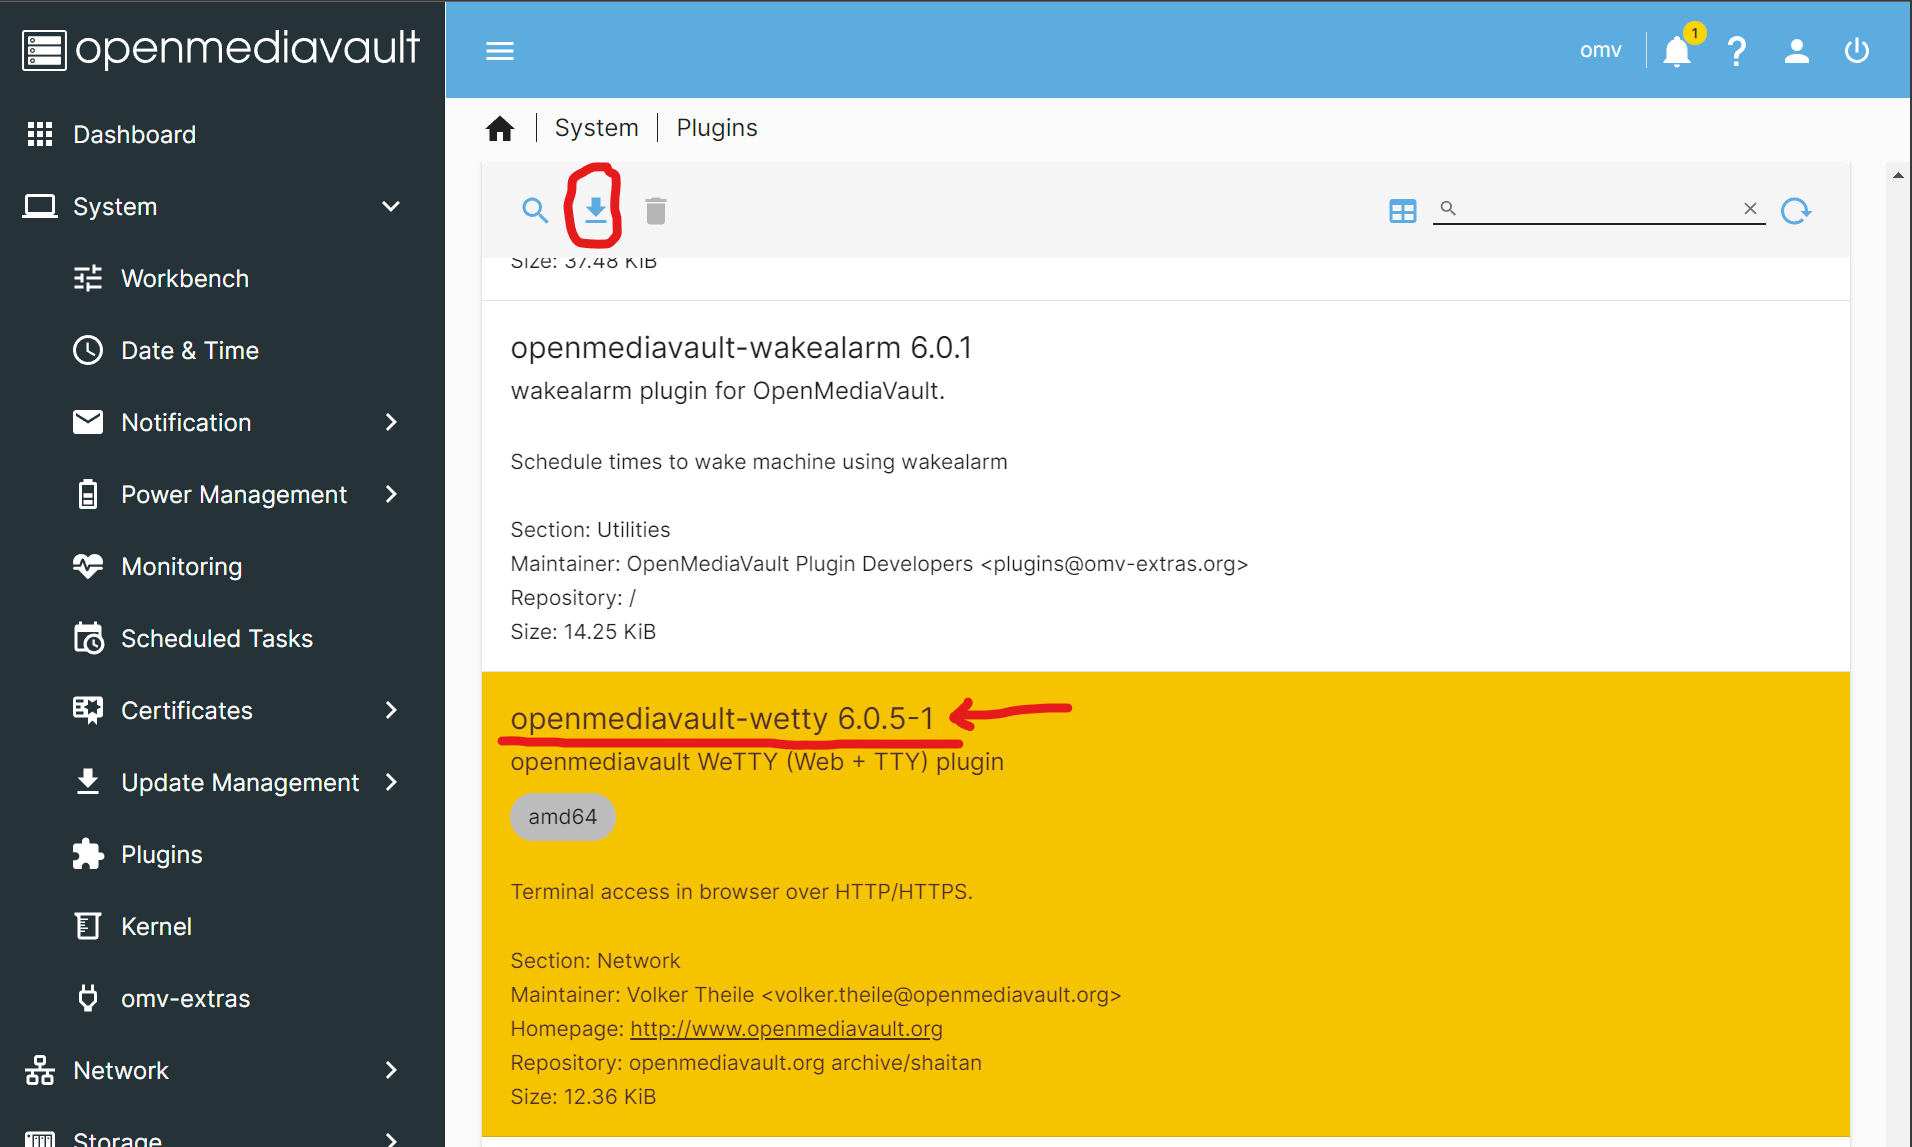
- Enable WeTTY: Once the install is complete, go to
[Services>WeTTY], check theEnabledbox, and hitSave. You’ll be prompted by OpenMediaVault to confirm the pending change. - Press
Open UIbutton on the page to access WeTTY: It should open up a new tab that takes you toyour-ip-address:2222which should open up a black screen which is basically the command line for your server! Enterrootwhen prompted for your username and then your root password that you configured during installation. - Enter this into the command line:
Installation will take a while but once it’s complete, you can verify it by going back to your administrative panel, refreshing the page, and seeing if there is a new menu item [wget -O - https://github.com/OpenMediaVault-Plugin-Developers/packages/raw/master/install | bashSystem > omv-extras]. - Enable the Docker repo: From the administrative panel, go to
[and check theSystem > omv-extras]Docker repobox. Press theapt cleanbutton once you have. - Install the Docker-compose plugin: Go to
[System>Plugins] and search or scroll down until you find the entry foropenmediavault-compose. Click on it to mark it yellow and then press the button on the upper-left to install it. To confirm that it’s been installed, you should see a new menu item [Services > Compose] - Update the System: As before, select [
System>Update Management>Updates]. Press the button to search for new updates. Press the button which will automatically install everything. - Create three shared folders:
compose,containers, andconfig: Just as with setting up the network folder shares, you can do this by going to [Storage>Shared Folders] and pressing the button in the upper left. You can generally pick any location you’d like, but make sure it’s on a file system with a decent amount of storage as media server applications can store quite a bit of configuration and temporary data (e.g. preview thumbnails). composeandcontainerswill be used by Docker to store the information it needs to set up and operate the containers you’ll want.
I would also recommend sharingconfigon the local network to make it easier to see and change the application configuration files (go to [Services>SMB/CIFS>Shares - Configure Docker Compose: Go to [
Services>Compose>Settings]. Where it saysShared folderunderCompose Files, select thecomposefolder you created in Step 8. Where it saysDocker storageunderDocker, copy the absolute path (not the relative path) for thecontainersfolder (which you can get from [Storage>Shared Folders]). Once that’s all set. PressReinstall Docker. - Set up a User for Docker: You’ll need to create a separate user for Docker as it is dangerous to give any application full access to your
rootuser. Go to [Users>Users] (yes, that is Users twice). Press the button to create a new user. You can give it whatever name (i.e. dockeruser) and password you want, but underGroupsmake sure to select bothdockerandusers. HitSaveand once you’re set you should see your new user on the table. Make a note of theUIDandGID(they’ll probably be1000and100, respectively, if this is your first user other than theroot) as you’ll need it when you install applications.
That was a lot! But, now you’ve set up Docker Compose. Now let’s use it to install some applications!
Setting up Media Server(s)
Before you set up the applications that access your data, you should make sure all of that data (i.e. photos you’ve taken, music you’ve downloaded, movies you’ve ripped / bought, PDFs you’d like to make available, etc.) are on your server and organized.
My suggestion is to set up a shared folder accessible to the network (mine is called Media) and have subdirectories in that folder corresponding for the different types of files that you may want your media server(s) to handle (for example: Videos, Photos, Files, etc). Then, use the network to move the files over (you should get comparable, if not faster, speeds as a USB transfer on a local area network).
The two media servers I’ve set up on my system are Plex (to serve videos, photos, and music) and Ubooquity (to serve files and especially ePUB/PDFs). There are other options out there, many of which can be similarly deployed using Docker compose, but I’m just going to cover my setup with Plex and Ubooquity below.
Plex
- Why I chose it:
- I’ve been using Plex for many years now, having set up clients on virtually all of my devices (phones, tablets, computers, and smart TVs).
- I bought a lifetime Plex Pass a few years back which gives me access to even more functionality (including Intel Quick Sync transcode).
- It has a wealth of automatic features (i.e. automatic video detection and tagging, authenticated access through the web without needing to configure a VPN, etc.) that have worked reliably over the years.
- With a for-profit company backing it, (I believe) there’s a better chance that the platform will grow (they built a surprisingly decent free & ad-sponsored Live TV offering a few years ago) and be supported over the long-term
- How to set up Docker Compose: Go to [
Services>Compose>Files] and press the button. Under Nameput downPlexand underFile, paste the following (making sure the number of spaces are consistent)
You need to replaceversion: "2.1"
services:
plex:
image: lscr.io/linuxserver/plex:latest
container_name: plex
network_mode: host
environment:
- PUID=<UID of Docker User>
- PGID=<GID of Docker User>
- TZ=America/Los_Angeles
- VERSION=docker
devices:
- /dev/dri/:/dev/dri/
volumes:
- <absolute path to shared config folder>/plex:/config
- <absolute path to Media folder>:/media
restart: unless-stopped<UID of Docker User>and<GID of Docker User>with the UID and GID of the Docker user you created when you set up Docker Compose (Step 10 above), which will likely be1000and100if you followed the steps I laid out.
You can get the the absolute paths to yourconfigfolder and the location of yourmediafiles by going to [Storage>Shared Folders] in the administrative panel. I added a/plexto theconfigfolder path undervolumes:. This way you can install as many apps through Docker as you want and consolidate all of their configuration files in one place, while still keeping them separate.
If you have an Intel QuickSync CPU, the two lines that start withdevices:and/dev/dri/will allow Plex to use it (provided you also paid for a Plex Pass). If you don’t have a chip with Intel QuickSync, haven’t paid for Plex Pass, or don’t want it, leave out those two lines.
I live in the Bay Area so I set timezoneTZtoAmerica/Los_Angeles. You can find yours here.
Once you’re done, hitSaveand you should be returned to your list of Docker compose files for the next step. Notice that the newPlexentry you created has aDownstatus, showing the container has yet to be initiated. - How to start / update / stop / remove your Plex container: You can manage all of your Docker Compose files by going to [
Services>Compose>Files]. Click on thePlexentry (which should turn it yellow) and press the (up) button. This will create the container, download any files needed, and run it.
And that’s it! To prove it worked, go tohttp://your-ip-address:32400/webin a browser and you should see a login screen (see image below)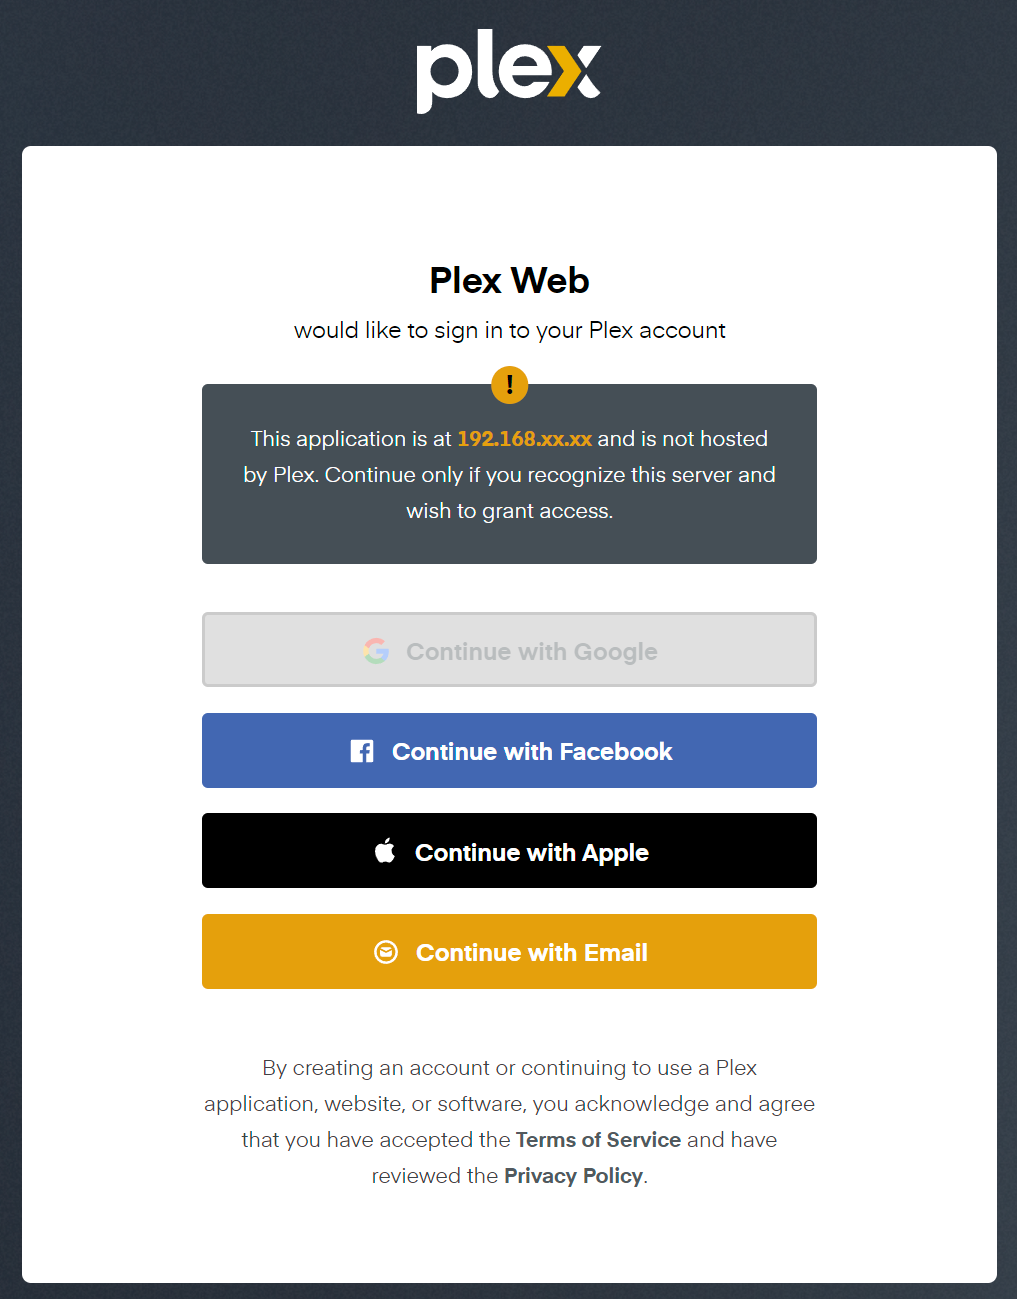
From time to time, you’ll want to update your software. Docker makes this very easy. Because of theimage: lscr.io/linuxserver/plex:latestline, every time you press the (pull) button, Docker will pull the latest version from linuxserver.io (a group that maintains commonly used Linux containers) and, usually, you can get away with an update without needing to stop or restart your container.
Similarly, to stop the Plex container, simply tap the (stop) button. And to delete the container, tap the
  (down) button.
 - Getting started with Plex: There are great guides that have been written on the subject but my main recommendations are:
- Do the setup wizard. It has good default settings (automatic library scans, remote access, etc.) — and I haven’t had to make many tweaks.
- Take advantage of remote access — You can access your Plex server even when you’re not at home just by going to plex.tv and logging in.
- Install Plex clients everywhere — It’s available on pretty much everything (Web, iOS, Android) and, with remote access, becomes a pretty easy way to get access to all of your content
- I hide most of Plex’s default content in the Plex clients I’ve setup. While their ad-sponsored offerings are actually pretty good, I’m rarely consuming those. You can do this by configuring which things are pinned, and I pretty much only leave the things on my media server up.
Ubooquity
- Why I chose it: Ubooquity has, sadly, not been updated in almost 5 years as of this writing. But, I still chose it for two reasons. First, unlike many alternatives, it does not require me to create a new file organization structure or manually tag my old files to work. It simply shows me my folder structure, lets me open the files one page at a time, maintains read location across devices, and lets me have multiple users.
Second, it’s available as a container on linuxserver.io (like Plex) which makes it easy to install and means that the infrastructure (if not the application) will continue to be updated as new container software comes out.
I may choose to switch (and the beauty of Docker is that it’s very easy to just install another content server to try it out) but for now Ubooquity made the most sense. - How to set up the Docker Compose configuration: Like with Plex, go to
[Services>Compose>Files] and press the button. Under Nameput downUbooquityand underFile, paste the following
You need to replace---
version: "2.1"
services:
ubooquity:
image: lscr.io/linuxserver/ubooquity:latest
container_name: ubooquity
environment:
- PUID=<UID of Docker User>
- PGID=<GID of Docker User>
- TZ=America/Los_Angeles
- MAXMEM=512
volumes:
- <absolute path to shared config folder>/ubooquity:/config
- <absolute path to shared Media folder>/Books:/books
- <absolute path to shared Media folder>/Comics:/comics
- <absolute path to shared Media folder>/Files:/files
ports:
- 2202:2202
- 2203:2203
restart: unless-stopped<UID of Docker User>and<GID of Docker User>with the UID and GID of the Docker user you created when you set up Docker Compose (Step 10 above), which will likely be1000and100if you followed the steps I laid out.
You can get the the absolute paths to yourconfigfolder and the location of yourmediafiles by going to [Storage>Shared Folders] in the administrative panel. I added a/ubooquityto theconfigfolder path undervolumes:. This way you can install as many apps through Docker as you want and consolidate all of their configuration files in one place, while still keeping them separate.
I live in the Bay Area so I set timezoneTZtoAmerica/Los_Angeles. You can find yours here.
Once you’re done, hitSaveand you should be returned to your list of Docker compose files for the next step. Notice that theUbooquityentry you created has aDownstatus, showing it has yet to be initiated. - How to start / update / stop / remove your Ubooquity container: You can manage all of your Docker Compose files by going to
[Services>Compose>Files]. Click on theUbooquityentry (which should turn it yellow) and press the (up) button. This will create the container, download any files needed, and run the system.
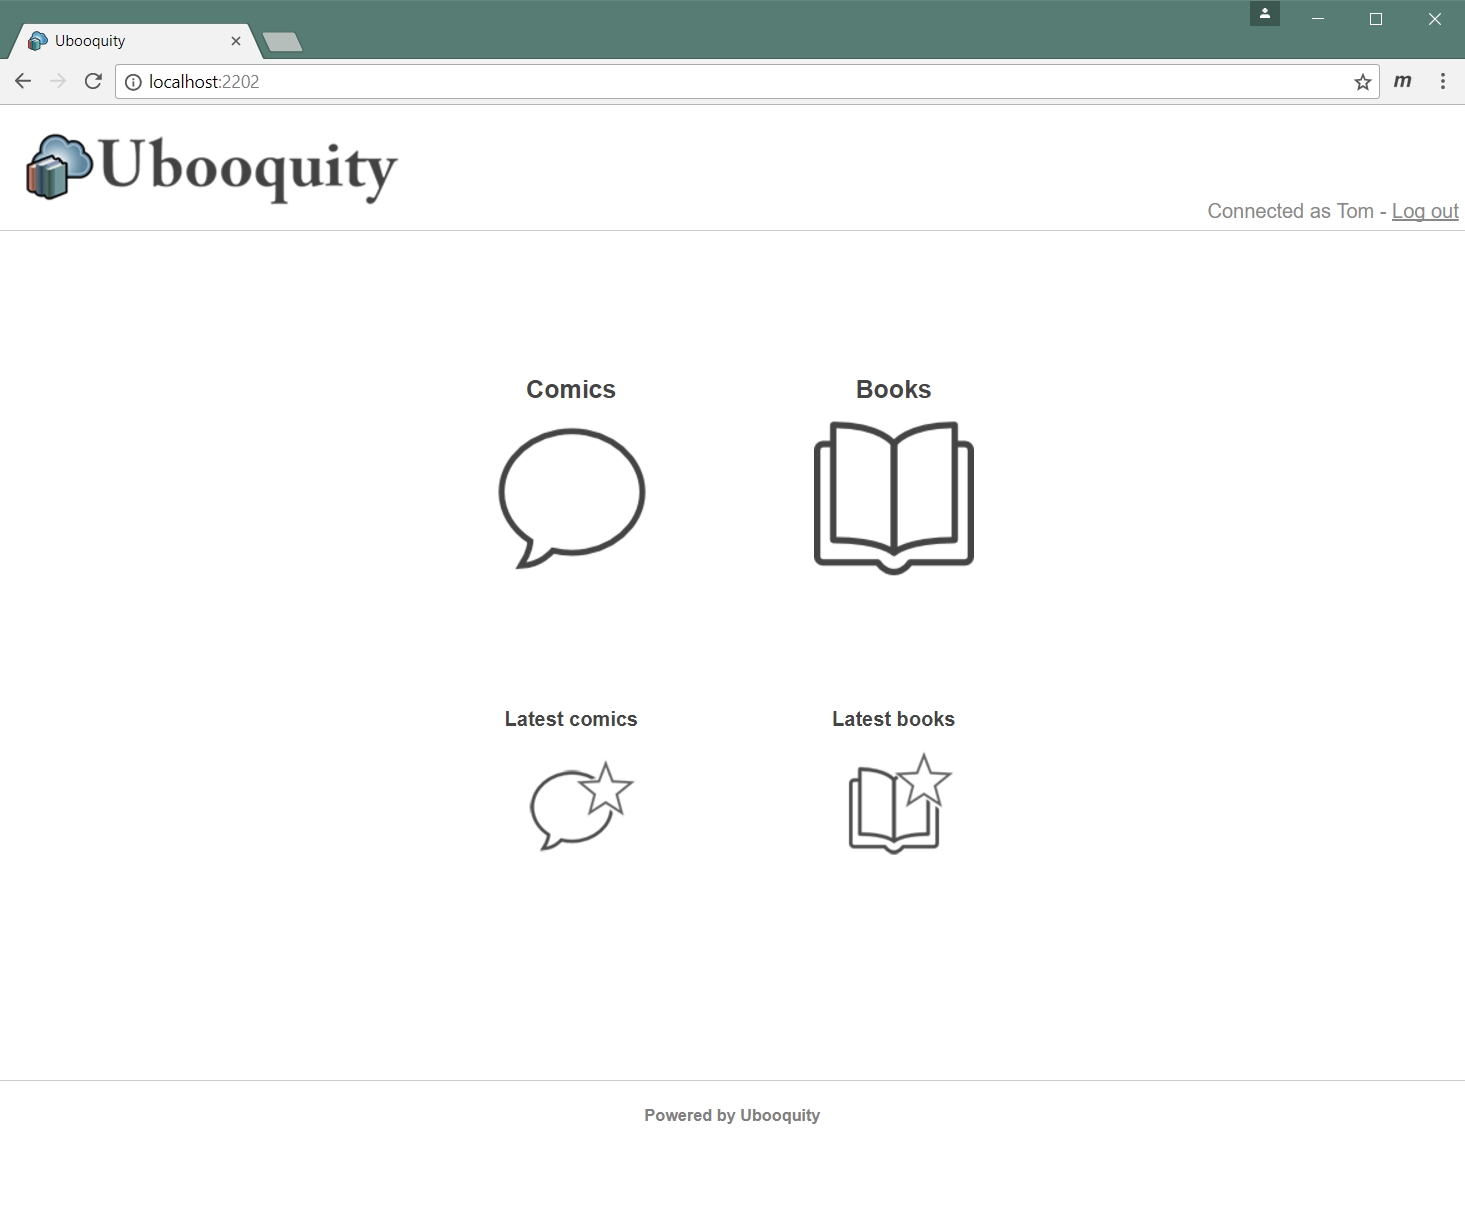
And that’s it! To prove it worked, go toyour-ip-address:2202/ubooquityin a browser and you should see the user interface (image credit: Ubooquity)
From time to time, you’ll want to update your software. Docker makes this very easy. Because of theimage: lscr.io/linuxserver/ubooquity:latestline, every time you press the (pull) button, Docker will pull the latest version from linuxserver.io (a group that maintains commonly used Linux containers) and, usually, you can get away with an update without needing to stop or restart your container.
Similarly, to stop the Ubooquity container, simply tap the (stop) button. And to remove the container, tap the (down) button. - Getting started with Ubooquity: While Ubooquity will more or less work out of the box, if you want to really configure your setup you’ll need to go to the admin panel at
your-ip-address:2203/ubooquity/admin(you will be prompted to create a password the first time)- In the
Generaltab, you can see how many files are tracked in the table at the top, configure how frequently Ubooquity scans your folders for new files underAutomatic scan period, manually launch a scan if you just added files withLaunch New Scan, and select a theme for the interface.
- If you want to create User accounts to have separate read state management or to segment which users can access specific content, you can create these users in the
Securitytab of the administrative panel. By doing so, you’ll need to manually go into the content type tabs (i.e.Comics,Books,Raw Files) and manually configure which users have access to which shared folders. - The base Ubooquity interface is pretty dated so I am using a Plex-inspired theme.
The easiest way to do this is to download the ZIP file at the link I gave. Unzip it on your computer (in this case it will result in the creation of a directory calledplextheme-reading). Then, assuming theconfig/ubooquity/themessubdirectory of theconfig
Lastly, go back to theGeneraltab in Ubooquity admin and, next toCurrent themeselectplextheme-reading - Edit (10-Aug-2023): I’ve since switched to using a Local DNS service powered by Pihole to access Ubooquity using a human readable web address
ubooquity.homethat every device on my network can access. For information on how to do this, refer to my post on Setting Up Pihole, Nginx Proxy, and Twingate with OpenMediaVaultBecause entering in a local ip address and remembering 2202 or 2203 and the folders afterwards is a pain, I created keyword shortcuts for these in Chrome. The instructions for doing this will vary by browser, but to do this in Chrome, go tochrome://settings/searchEngines. There is a section of the page calledSite search. Press theAddbutton next to it. Even though the dialog box saysAdd Search Engine, in practice you can use this to add keywords to any URL, just put a name for the shortcut in theSearch Enginefield, the shortcut you want to use inShortcut(I usedubooquityfor the core application andubooquityadminfor the administrative console) and the URLs inURL with %s in place of query(i.e.http://your-ip-address:2202/ubooquityandhttp://your-ip-address:2203/ubooquity/admin).
Now to get to Ubooquity, I simply type inubooquityin the Chrome address bar rather than a hodge podge of numbers and slashes that I’ll probably forget
- In the
External Access
One of Plex’s best features is making it very easy to access your media server even when you’re not on your home network. Having experienced that, I wanted the same level of access when I was out of the house to my network file share and applications like Ubooquity.
Edit (10-Aug-2023): I’ve since switched my method of granting external access to Twingate. This provides secure access to network resources without needing to configure Dynamic DNS, a VPN, or open up a port. For more information on how to do this, refer to my post on Setting Up Pihole, Nginx Proxy, and Twingate with OpenMediaVault
There are a few ways to do this, but the most secure path is through a VPN (virtual private network). VPNs are secure connections between computers that mimic actually being directly networked together. In our case, it lets a device securely access local network resources (like your server) even when it’s not on the home network.
OpenMediaVault makes it relatively easy to use Wireguard, a fast and popular VPN technology with support for many different types of devices. To set up Wireguard for your server for remote access, you’ll need to do six things:
Get a domain name and enable Dynamic DNS on it Most residential internet customers do not have a static IP. This means that the IP address for your home, as the rest of the world sees it, can change without warning. This makes it difficult to access externally (in much the same way that DHCP makes it hard to access your home server internally).
To address this, many domain providers offer Dynamic DNS, where a domain name (for example: myurl.com) can point to a different IP address depending on when you access it, so long as the domain provider is told what the IP address should be whenever it changes.
The exact instructions for how to do this will vary based on who your domain provider is. I use Namecheap and took an existing domain I owned and followed their instructions for enabling Dynamic DNS on it. I personally configured mine to use myvpn.subdomain, but you should use the setup you’d like, so long as you make a note of it for step 3 below.
If you don’t want to buy your own domain and are comfortable using someone else’s, you can also sign up for Duck DNS which is a free Dynamic DNS service tied to a Duck DNS subdomain.Set up DDClient. To update the IP address your domain provider maps the domain to, you’ll need to run a background service on your server that will regularly check its IP address. One common way to do this is a software package called DDClient.
Thankfully, setting up DDClient is fairly easy thanks (again!) to a linuxserver.io container. Like with Plex & Ubooquity, go to [Services>Compose>Files] and press the button. Under Nameput downDDClientand underFile, paste the following
You need to replace---
version: "2.1"
services:
ddclient:
image: lscr.io/linuxserver/ddclient:latest
container_name: ddclient
environment:
- PUID=<UID of Docker User>
- PGID=<GID of Docker User>
- TZ=America/Los_Angeles
volumes:
- <absolute path to shared config folder>/ddclient:/config
restart: unless-stopped<UID of Docker User>and<GID of Docker User>with the UID and GID of the Docker user you created when you set up Docker Compose (Step 10 above), which will likely be1000and100if you followed the steps I laid out.
You can get the the absolute path to yourconfigfolder by going to [Storage>Shared Folders] in the administrative panel. I added a/ddclientto theconfigfolder path. This way you can install as many apps through Docker as you want and consolidate all of their configuration files in one place, while still keeping them separate.
I live in the Bay Area so I set timezoneTZtoAmerica/Los_Angeles. You can find yours here.
Once you’re done, hitSaveand you should be returned to your list of Docker compose files. Click on theDDCliententry (which should turn it yellow) and press the (up) button. This will create the container, download any files needed, and run DDClient. Now, it is ready for configuration.Configure DDClient to work with your domain provider. While the precise configuration of DDClient will vary by domain provider, the process will always involve editing a text file. To do this, login to your server using SSH or WeTTy (see the section above on Installing OMV-Extras) and enter into the command line:
Remember to substitutenano <absolute path to shared config folder>/ddclient/ddclient.conf<absolute path to shared config folder>with the absolute path to theconfigfolder you set up for your applications (which you can access by going to [Storage>Shared Folders] in the administrative panel).
This will open up Linux’s native text editor. Scroll to the very bottom and enter the configuration information that your domain provider requires for DynamicDNS to work. As I use Namecheap, I followed these instructions. In general, you’ll need to supply some type of information about the protocol, the server, your login / password for the domain provider, and the subdomain you intend to map to your IP address.
Then pressCtrl+Xto exit, pressYwhen asked if you want to save, and finallyEnterto confirm that you want to overwrite the old file.Set up Port Forwarding on your router. Dynamic DNS gives devices outside of your network a consistent “address” to get to your server but it won’t do any good if your router doesn’t pass those external requests through. In this case, you’ll need to tell your router to let incoming UDP requests from port 51820 through to your server to line up with Wireguard’s defaults.
The exact instructions will vary by router so you’ll need to consult your router’s documentation. In my household, we use Google Wifi and, if you do too, here are the instructions for doing so.Enable Wireguard. If you installed OMV-Extras above as I suggested, you’ll have access to a Plugin that turns on Wireguard. Go to [System>Plugins] on the administrative panel and then search or scroll down until you find the entry foropenmediavault-wireguard. Click on it to mark it yellow and then press the button to install it.
Now go to [Services>Wireguard>Tunnels] and press the (create) button to set up a VPN tunnel. You can give it any Nameyou want (i.e.omv-vpn). Select your server’s main network connection forNetwork adapter. But, most importantly, underEndpoint, add the domain you just configured for DynamicDNS/DDClient (for example,vpn.myurl.com). PressSaveSet up Wireguard on your devices. With a Wireguard tunnel configured, your next step is to set up the devices (called clients or peers) to connect. This has two parts.
First, install the Wireguard applications on the devices themselves. Go to wireguard.com/install and download or set up the Wireguard apps. There are apps for Windows, MacOS, Android, iOS, and many flavors of Linux
Then, go back into your administrative panel and go to [Services>Wireguard>Clients] and press the (create) button to create a valid client for the VPN. Check the box next to Enable, select the tunnel you just created underTunnel number, put a name for the device you’re going to connect underName, and assign a unique (or it will not work) client number inClient Number. PressSaveand you’ll be brought back to the Client list. Make sure to approve the change and then press the (client config) button. What you should do next depends on what kind of client device you’re configuring.
If the device you’re configuring is not a smartphone (i.e. a computer), copy the text that shows up in theClient Configpopup that comes up and save that as a.conffile (for example:work_laptop_wireguard.conf). Send that file to the device in question as that file will be used by the Wireguard app on that device to configure and access the VPN. HitClosewhen you’re done
If the device you’re configuring is a smartphone, hitClosebutton on theClient Configpopup that comes up as you will be presented with a QR code that your smartphone Wireguard app can capture to configure the VPN connection.
Now go into your Wireguard app on the client device and use it to either take a picture of the QR code when prompted or load the.conffile. Your device is now configured to connect to your server securely no matter where you are. A good test of this is to disconnect a set up smartphone from your home WiFi and enable the VPN. Since you’re no longer on WiFi you should not be on the same network as your server. If you can enterhttp://your-ip-addressin this mode into a browser and still reach the administrative panel for OpenMediaVault, you’re home free!
One additional note: by default, Wireguard also acts as a proxy, meaning all internet traffic you send from the device will be routed through the server. This can be valuable if you’re trying to access a blocked website or pretend to be from a different location, but it can also be unnecessarily slow (and bandwidth consuming). I have my Wireguard configured to only route traffic that is going to my server’s local IP address through Wireguard. You can do this by configuring your client device’sAllowed IPstoyour-ip-address(for example:192.168.99.99) from the Wireguard app.
Congratulations, you have now configured a file server and media server that you can securely access from anywhere!
Concluding Thoughts
A few concluding thoughts:
- This was probably way too complicated for most people. Believe it or not, what was written above is a shortened version of what I went through. Even holding aside that use of the command line and Docker automatically makes this hard for many consumers, I still had to deal with missing drivers, Linux not recognizing my USB drive through the USB C port (but through the USB A one?), puzzling over different external access configurations (VPN vs Let’s Encrypt SSL on my server vs self-sign certificate), and minimal feedback when my initial attempts to use Wireguard failed. While I learned a great deal, for most people, it makes more sense to go completely third party (i.e. use Google / Amazon / Apple for everything) or, if you have some pain tolerance, with a high-end NAS.
- Docker/containerization is extremely powerful. Prior to this, I had thought of Docker as just a “flavor” of virtual machine, a software technology underlying cloud computing which abstracts server software from server hardware. And, while there is some overlap, I completely misunderstood why containers were so powerful for software deployment. By using 3 fairly simple blocks of text, I was able to deploy 3 complicated applications which needed different levels of hardware and network access (Ubooquity, DDClient, Plex) in minutes without issue.
- I was pleasantly surprised by how helpful the blogs and forums were. While the amount of work needed to find the right advice can be daunting, every time I ran into an issue, I was able to find some guidance online (often in a forum or subreddit). While there were certainly … abrasive personalities, by in large many of the questions being asked were by non-experts and they were answered by experts showing patience and generosity of spirit. Part of the reason I wrote this is to pay this forward for the next set of people who want to experiment with setting up their own server.
- I am excited to try still more applications. Lists about what hobbyists are running on their home servers like this and this and this make me very intrigued by the possibilities. I’m currently considering a network-wide adblocker like Pi-Hole and backup tools like BorgBackup. There is a tremendous amount of creativity out there!
For more help on setting any of this stuff up, here are a few additional resources that proved helpful to me:
- OMV Extras Wiki — probably the single best source of help I turned to in setting up OpenMediaVault, Docker Compose, and Wireguard
- The OpenMediaVault Forum and r/OpenMediaVault have an amazing wealth of information
- linuxserver.io documentation — Nice listing of available images and basics on how to run containers and configure those text files
- Ubooquity website — sadly hasn’t been updated in a while but still useful information
- the Debian SourcesList documentation page — this saved me when I was trying to figure out how to get Debian to update itself
- Plex Support site
- Wireguard website
(If you’re interested in how to setup a home server on OpenMediaVault or how to self-host different services, check out all my posts on the subject)