
Summary
I built an AI-powered news reader (GitHub link) end-to-end tailored to my preferences with the goal of surfacing high quality content (rather than clickbait). It included:
- Data flow architecture encompassing scraping, AI model training & inference, frontend, and backend components.
- Deep neural network model for content rating, integrating a pre-trained language model
- Automated processes for scraping, regular model training, and batch inference using a serverless platform to maintain continuously refreshed and improving data at reasonable cost
- Use of PostgreSQL and the
pgvectorextension for robust data storage & serving and vector-based queries - A FastAPI backend to serve API requests and integrate authentication
- A lightweight frontend using Preact and HTM with features like optimistic rendering and catching unauthenticated API calls
- The code was written in part by ChatGPT and my writeup includes learnings on how to use ChatGPT for this type of work

Update (2024 Nov 21): Since first writing this, I’ve made a number of updates which I have described in this blog post and that have been reflected at the Github
Motivation
I am a knowledge junkie. There are few things as intellectually stimulating to me as reading high quality articles from the internet.
It should come as no surprise that I was an ardent user of Google Reader from its early days. For many years, it would not have been an exaggeration to say that the simple feed-based interface of Google Reader was the most important thing on the entire internet to me. And, consequently, I was incredibly saddened when Google ultimately killed it.
But, as much as I love (and continued to use) RSS readers and other social/algorithmic applications which have since filled the gap, these solutions suffer from a couple of key flaws:
- Many sites today don’t have RSS feeds. Take the essays of Paul Graham. Amazing content. No RSS feed whatsoever.
- RSS feeds have no sense of priority or relevance. In practice, RSS feeds are usually populated with all the content a service has put out. The result is, for many users of RSS readers, a great deal of time spent guessing which articles are worth reading and filtering out those that are less interesting.
- Social/algorithmic feeds optimize for engagement/clicks, not quality. These platforms (i.e. Facebook, Reddit, Twitter) generally reward the controversial clickbait that leads to viral sharing and emotional responses, because that’s what typically drives their business models. I wanted quality (or at least my definition of quality), favoring reading 1 great article over clicking on 10 and starting a flame war on 3 of them.
What I wanted was a service which would:
- Deliver content from sources I care about
- … filtered/ordered based on whether or not they were worthwhile
- … with context (like a summary) so that I would know if something was worthwhile prior to reading it (and why)
- … that would learn from my preferences over time
This project came from a desire to build the service that I wanted.
But, it was also a chance to build something from scratch of moderate complexity end-to-end that would take advantage of my existing AI, Python, and product skills as well as push me to learn some new ones. In some of those new areas (like front-end development), I also wanted to see what it would be like to lean on an LLM (Large Language Model) like ChatGPT to help write the code.
The story of how I did it 👇🏻
Architecture
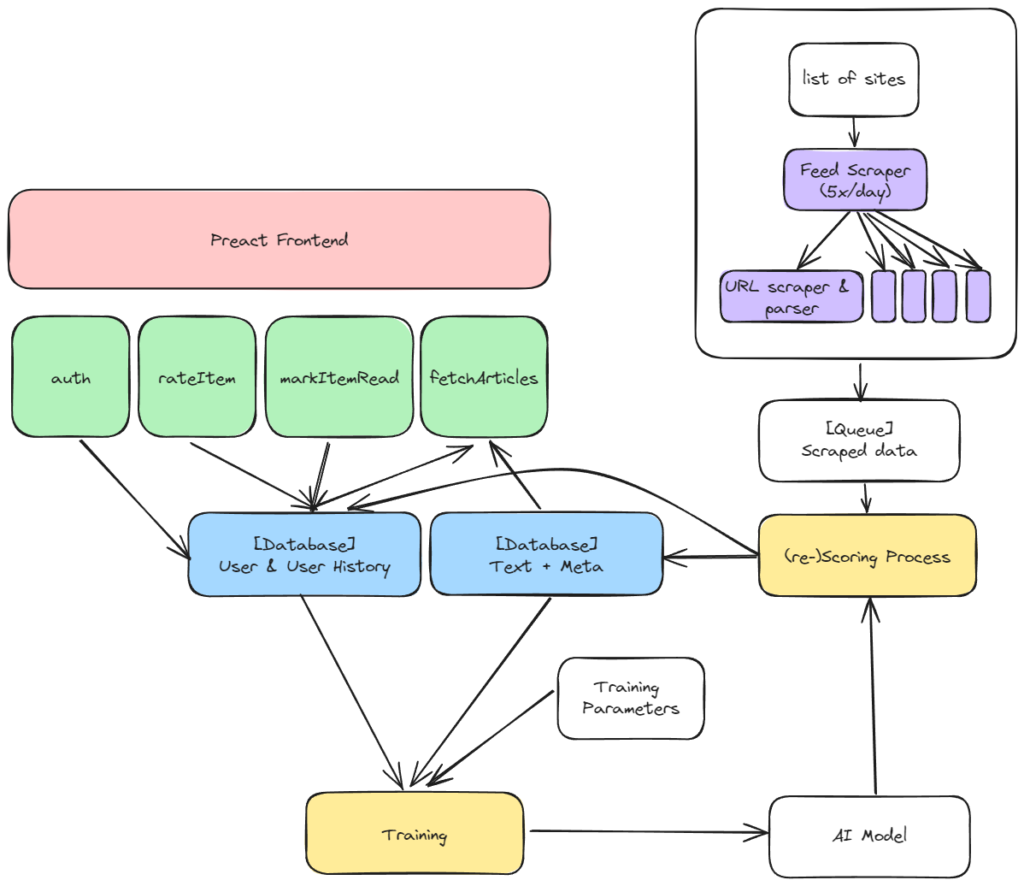
I started by thinking through the data flow that would be needed to make an application like this work:
- Scrapers (purple) — Need to run on a regular basis parsing RSS feeds, sitemaps (which relay to scrapers like Bing/Google everything that is on a webpage), and Google News feeds (which get content sites listed on Google News) for lists of new content. That content would then be parsed by other scrapers ultimately resulting in the core information needed for the algorithm to work stored on a queue.
- AI model inference (yellow) — The queue would then be processed by (1) an AI model to devise scores for the content and (2) an LLM to generate a summary for the user. This information would then be stored in a database (blue) for use by the application.
- Frontend (pink) / Web backend (green) — The web application would, through interfacing with the database (blue), surface the highest ranking content as well as store any of the user’s ratings and read status activity.
- AI model training (yellow) — On a regular basis, new ratings data provided by the user and new articles would be pulled from the database (blue) and used to fine-tune the existing model so that changes in preferences and new data collected could be used to further improve performance. Once fine-tuned, a subset of articles would have their scores revisited to make sure that these new improvements would make it back to the application user.
AI
The heart of the application is the use of AI to rate content on “worthwhileness” and also provide sufficient context to the user to make that judgement.
Why not Just Use an LLM?
With OpenAI, Google, and Anthropic making their LLMs easily accessible via API, early on, I explored the possibility of using LLMs to rate content. However, I quickly realized that, while the LLMs were well-suited at topic categorization and article summarization, the rating problem was not going to be solved easily via LLM.
LLMs work best when there is a clear and precise definition of what they need to do. Because human preferences are difficult to explain precisely (even to the person with the preferences), it was not obvious to me how to perform the prompt engineering needed for such an LLM-centric approach to work across users and time (as preferences change).
Model Architecture
Instead, I took a more “traditional” deep neural network modeling approach to the rating problem. Here, I used the newly released Keras 3. I went with Keras both due to my personal familiarity (having previously used Keras for other projects), but also my view that Keras’s functional approach would make it much easier to experiment with different model architectures and to conduct “model surgery” (cutting and moving around pieces of a model). It also helped that Keras 3 had been re-designed to be multi-backend, meaning it now supported PyTorch and JAX (as well as Tensorflow), making my code potentially more portable and future proof as new tools and libraries emerged.
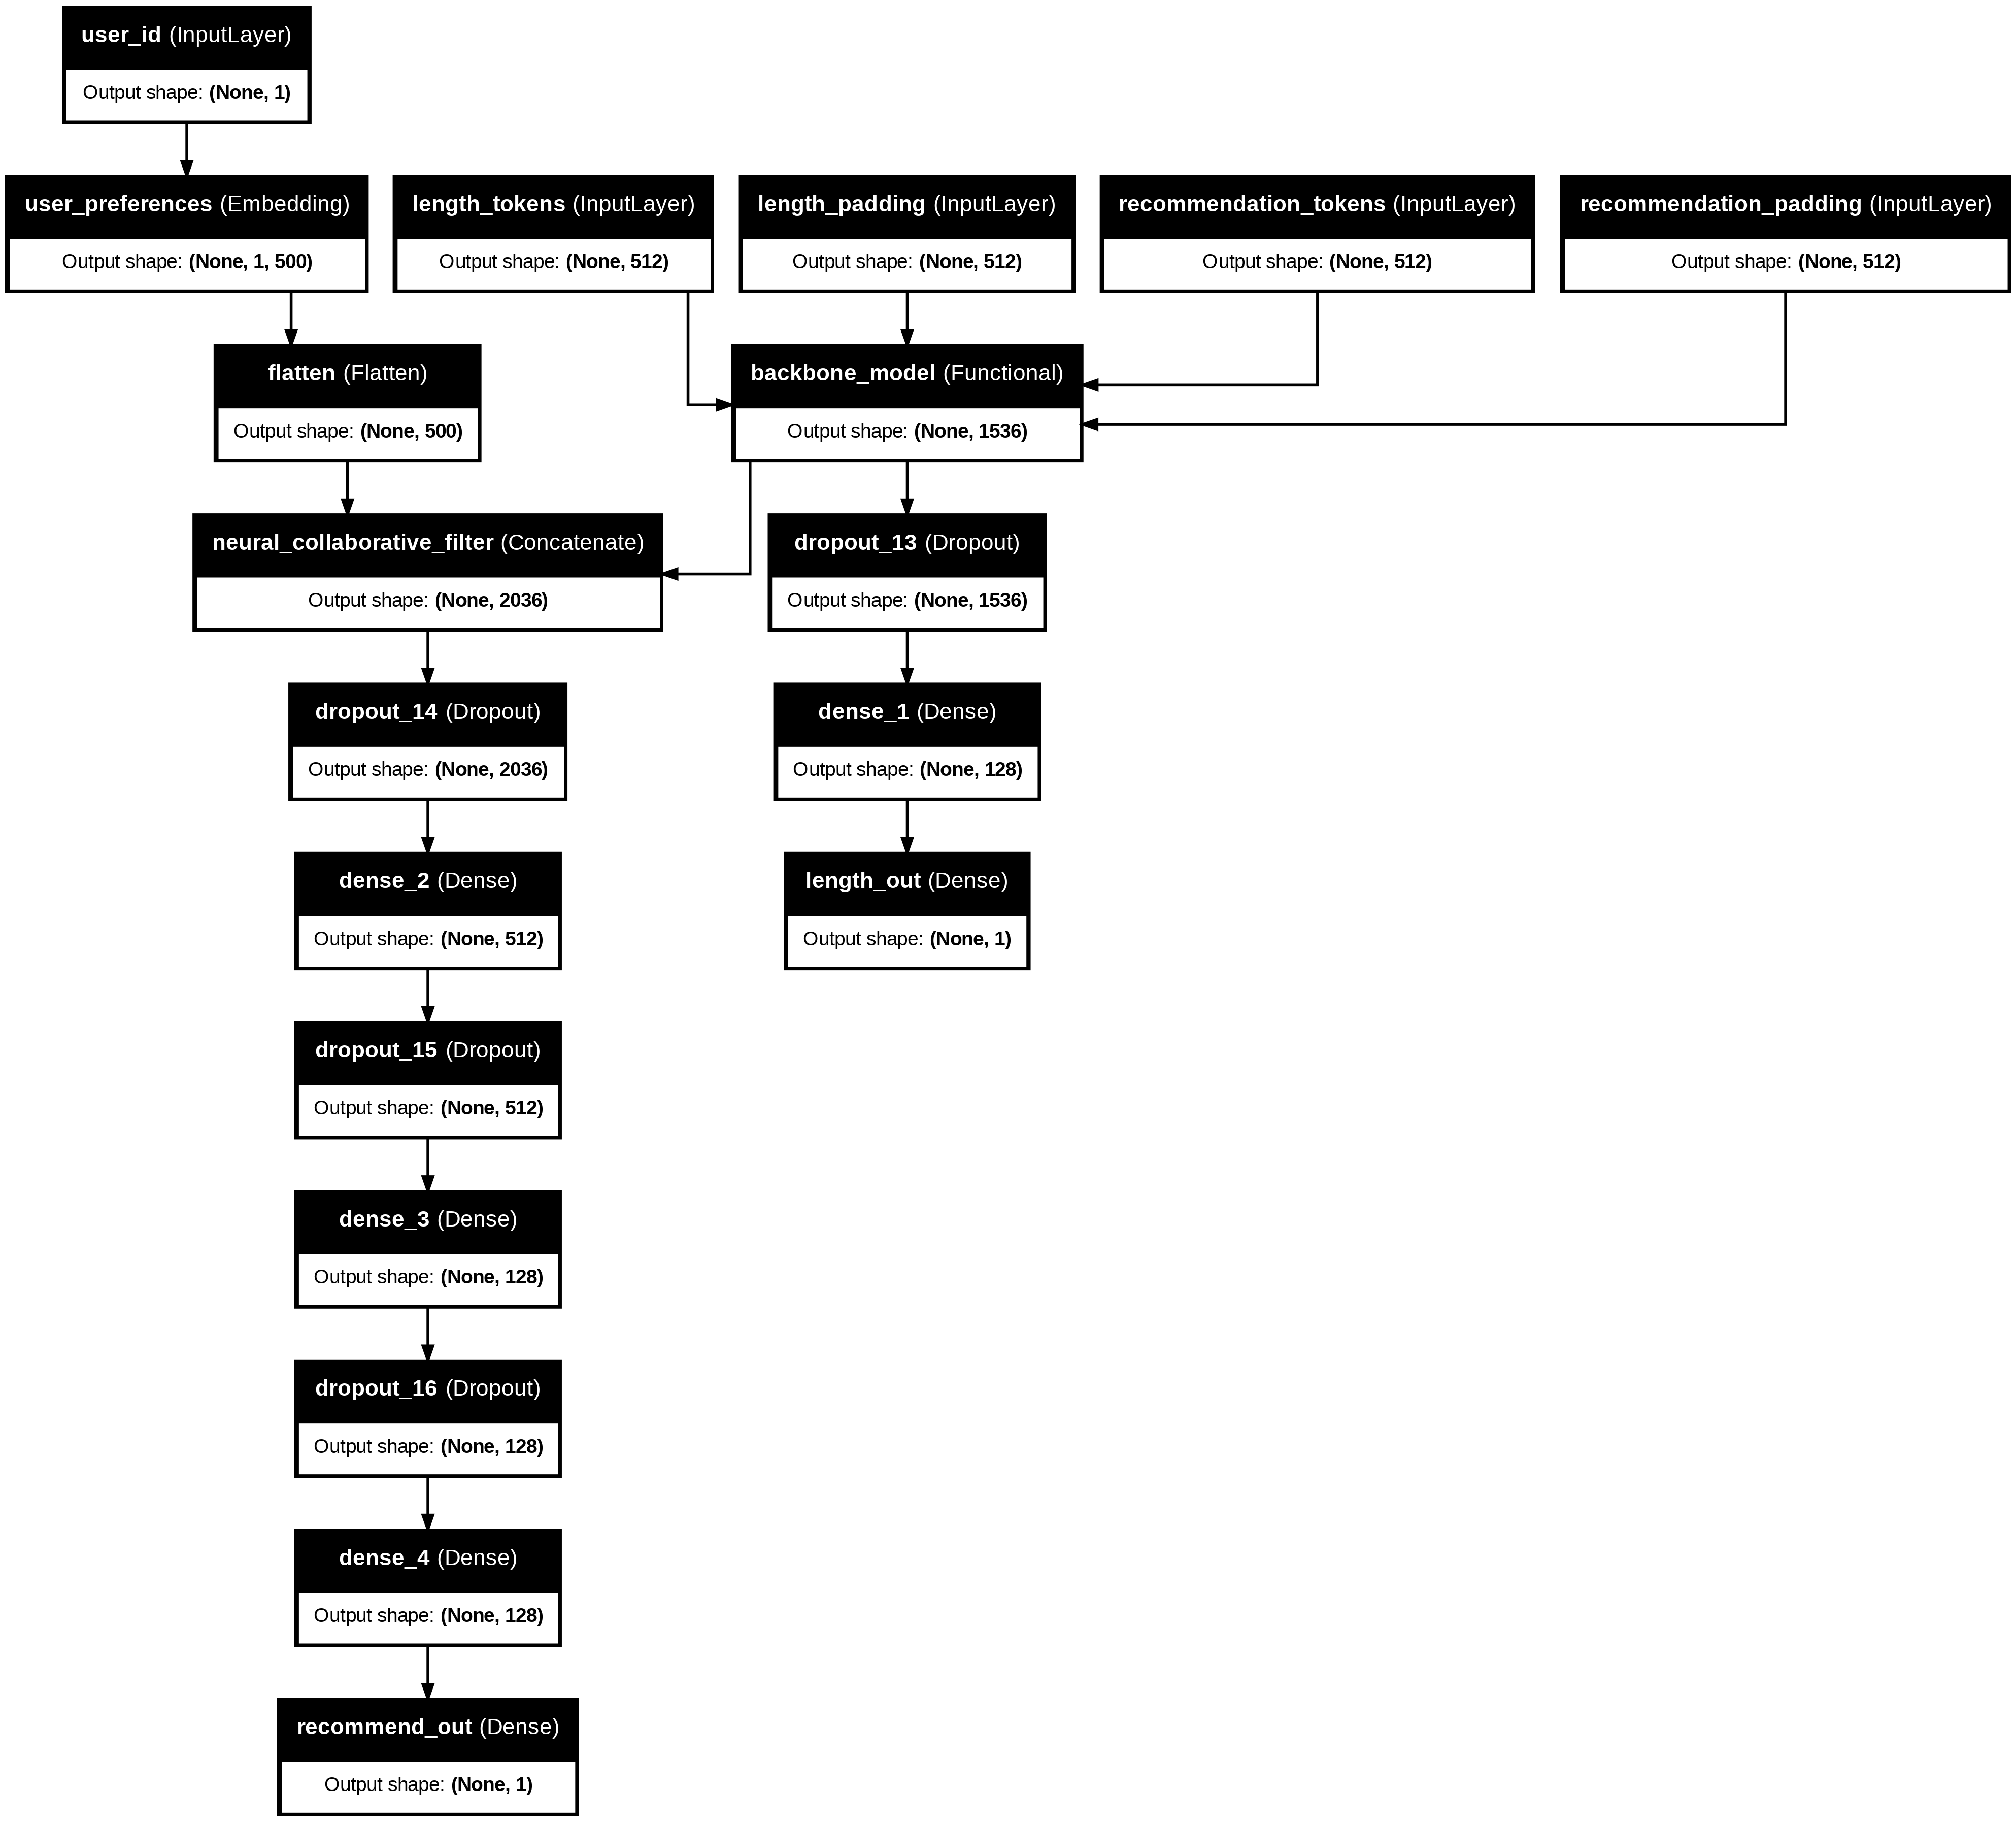
keras.utils.plot_model)The model architecture I arrived at (see above) utilized three strategies to achieve a respectable outcome:
- Neural collaborative filter — While I currently don’t expect this project to be used by many users, I wanted to build a collaborative filter style system where every rating in the system helped improve the ratings for every other user and article. In the architecture I chose, the model simultaneously learns article embeddings (representing the text of the content) and user embeddings (representing the preferences of the user). The combination of the two is then used to make a prediction about a given article for a given user.
While I initially wanted the article embeddings and user embeddings to have the same dimension (so that I could simply yield scores using a dot product), I was ultimately unable to achieve that and went with fully connected deep neural network layers instead to produce the rating. - Taking advantage of an already pretrained language model — To take advantage of previously learned context, I incorporated the pretrained “backbone” of RoBERTa, an effort by Facebook researchers to optimize the BERT model first popularized by Google. This was very easy to do with Keras-NLP and became the key step my architecture used to create article embeddings without needing to try untested architectures on much larger datasets to get to solid predictions.
- Simultaneous training on two tasks — In previous work, I learned that training a model to succeed at two different and only slightly related tasks at the same time can create a model which performs better on both tasks than had two different models been trained on each task individually.
My “head-canon” on why this works is that simultaneously training a model on two different tasks likely pushes the model to find generalizable intermediates which can apply to both tasks.
In the described model architecture above, there are two outputs: one corresponding to the rating prediction task (where the model will evaluate the likely score on a piece of content and compare it with actual user ratings), and, the other, a length prediction task (where the model tries to guess the length of the piece of content in question from just a 512 “token” snippet). The theory being that both tasks are quite different but still related (being able to ascertain the length of a piece from a snippet requires the model to understand aspects of writing style and narrative that are probably related to things like topic, argument, and relevance).
This approach was also something that drew me as it allowed me to start with relatively limited training data (since rating many articles by hand is time consuming) because it’s very easy to assemble the data for the length of an article.
Update (2024 Nov 21): Since first writing this, I’ve made a number of updates which I have described in this blog post, which include migrating the model to a JAX backend while staying on Keras 3; simplifying the overall model architecture (it now uses a dot product for the neural collaborative filter, and it no longer requires separate input data pipelines to train on both tasks simultaneously)
Training & Inference
These models were originated on Google CoLab before being run “in production” on the serverless platform Modal. For training, I utilized CoLab notebooks with V100 and L4 GPUs on their “high-memory” setting during experimentation (and, for later fine-tuning in production, Modal instances with L4 GPUs). To facilitate training, I would extract the relevant scraped information into CSV and/or in-memory data and then used Tensorflow’s tf.data API to build on-CPU data pipelines (to efficiently feed the GPUs) and which are natively supported by Keras’s easy-to-use Model.fit() and Model.evaluate() APIs.
For inference, I carried out some simple “model surgery”, extracting only the rating task / part of the model, and then used Keras’s built-in support for int8 quantization to reduce the memory required and improve the overall performance. I also used Modal’s image initialization and memory snapshot coupled with their performant distributed storage offering to reduce cold start time.
Some relatively simple experimentation showed that running inference on GPUs on Modal was only slightly faster (probably because the cold start and network latency that comes with Modal’s serverless architecture dominates the time needed) but significantly more expensive than running inference on CPU (I used images with access to 8-cores)
Summarization and Topic Extraction
For summarization and topic extraction, I used Anthropic’s new Claude 3 Haiku model. Haiku is known for being fast and cheap, charging only $0.25 per million tokens on input and $1.25 per million tokens on the output, making them very popular for AI uses not needing the capabilities of a much larger LLM.
Automation
Modal provides simple cron type functionality allowing you to schedule different processes to run in advance. For this project, I created two schedules to “run the system on autopilot”:
- A scraper schedule — a scraping “job” is initiated every few hours which starts by reading the RSS feeds / sitemap / Google News feeds of sites of interest to find new articles. This would then trigger individual page scrapers to scrape the new articles in parallel. The output from these scrapers would then be pushed onto a Modal queue and a final inference job would be run to rate each article and push the results onto the database.
- A training schedule — twice a month, user ratings from the database would be pulled to create a training set to fine tune the existing model. If the model’s performance exceeds a certain threshold, the resulting model parameters would be saved so that future inference calls would be directed to the new model. Finally, the model would be rerun on newer and previously highly rated articles to make sure that users are getting the most up to date scores.
While simplistic, these scheduled tasks allow the compute-intensive training and inference functions to be more efficiently run as batch jobs on a regular basis such that the model continuously improves as new data comes in.
Update (2024 Nov 21): Since first writing this, I’ve made a number of updates which I have described in this blog post, which include adding a daily cleanUp routine to re-calculate certain pre-fetched article scores as well as to make sure there are no articles with missing algorithmic ratings or summaries
Database
To store and serve the data necessary for model training, inference, and application serving, I needed a database.
I chose PostgreSQL. It’s known for its performance and stability and is widely used (with battle-tested libraries for deep integration into Python). It also supports complex JOIN operations, something I’d need to be able to surface the right content with the right attributes to a given user (something many “NoSQL” and key-value and vector-based databases can struggle with).
The PostgreSQL community had released the pgvector extension in 2021 which enables native vector operations (like the kind I would want to use with the user embeddings and article embeddings I was working with).
There are many hosted Postgres solutions, but I went with Supabase. They’re a widely used vendor, have many features beyond their core database offering which I might want to use someday, and, at the center of their offerings, is a full (non-serverless) Postgres database with a generous free tier and the ability to enable extensions (like pgvector) and to either connect directly to the underlying Postgres database or use their API. It also helped that they had nice web interface to create and modify tables, compose and run SQL queries, inspect and export query results, and even visualize data schema (see below).
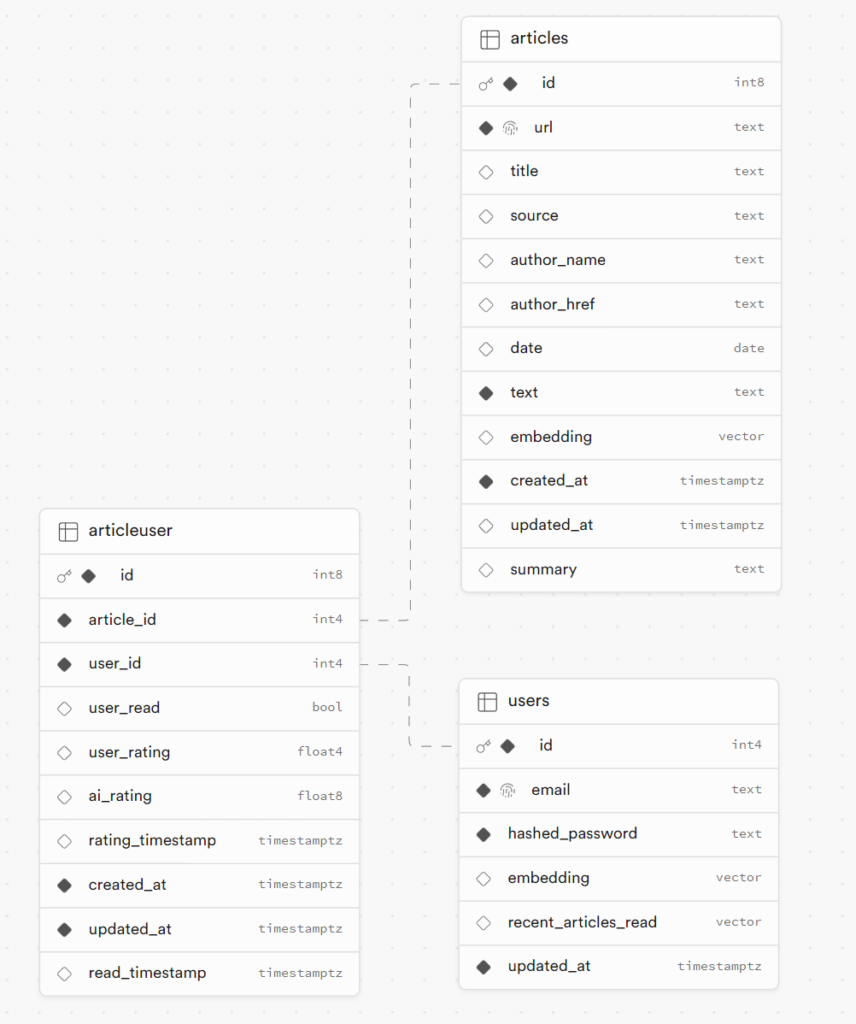
Given the data needs of the application, only three tables were needed (see above):
- One for Users of the service which stores authentication information, the user embedding, and a log of the exponential moving average article embedding that the user has recently read (in order to surface more novel content).
- One for Articles which stores information about an article to surface in the application and during training.
- One for Article-Users — In addition to being linked to rows in the Users table and Articles table, this table stores the information on the algorithm’s ratings for a given user (to sort/filter articles), the user’s own ratings (used for training the model), and the user’s read status on the article in question (used to make sure the application doesn’t serve previously read articles).
Update (2024 Nov 21): Since first writing this, I’ve made a number of updates which I have described in this blog post, which include adding a Sources table to track individual sources and enable source-specific feeds and adding a database index on pre-calculated article ranking scores to speed up article retrieval. The blog post also includes an updated database schema visualization
Backend
To power the application’s backend, I went with FastAPI. It conforms to the ASGI spec that Modal already supports and is a high performance Python framework that can serve both the API the web front-end would use to pull/push data as well as serve the application HTML itself. FastAPI also comes with all the type validation & conversion and native JSON handling needed, reducing the amount of code I’d need to write.
There are four core actions the backend needs to support:
- Authentication: FastAPI has an easy-to-use dependency injection system which makes it easy to require authentication on every API call and make it completely opaque to the function handling the call. I simply tied JSON Web Token creation to the login process and required the backend to see the right access token corresponding to a user when loading pages (as a cookie parameter) or interfacing with the API (as bearer tokens).
- Fetching articles: This is where PostgreSQL’s ability to do more sophisticated JOINs comes in handy. I simply pulled the articles unread by a user sorted by a weighted combination of the AI’s rating, the recency of the article (the older, the worse it does), and how similar the article embedding is to an exponential moving average of the articles the user has just read (the more similar to what the user read, the worse it does). The Fetch API also takes an offset parameter to reduce the likelihood that the API returns pages more than once in a given session.
- Marking an article as read: Setting the flag on the
articleusertable for this is straightforward. What was more complicated was updating the exponential moving average on the user (in an attempt to show fresher topics). - Rating an article: The application allows users to rate an article with one of three ratings: 👍🏻(+1, this was worth the time), 👎🏻(+0, this was not worth the time), and 🤷🏻♂️(+0.5, not so bad I hate it, but not good enough to say it was worth the time).
Update (2024 Nov 21): Since first writing this, I’ve made a number of updates which I have described in this blog post, which include pre-calculating article rankings and adding a database index on the pre-calculated article ranking scores to speed up article retrieval
Frontend
I have always been intimidated by frontend development. The complex build systems, the odd (to me, at least) data flow and syntax of modern Typescript/Node/React, and the need to interface with finicky CSS and design elements all seemed impossibly complex for this Python dabbler.
Looking for the “least painful way” forward, I chose Preact + HTM to give me the right mix of simplicity and power:
- It’s lightweight (Preact is 3 kb, adding HTM adds <1 kb more)
- Does not require any complicated build systems or compilation steps so that it can easily be incorporated into a single HTML page (served by my backend)
- Supports core React semantics around components and virtual DOM to make interactivity and state management easy
How to Get ChatGPT to be your Contract Software Engineer
While I had gone through the (very good) Preact tutorial, one tutorial does not make you an expert frontend developer. I knew I would need help. I took advantage of this opportunity to test out ChatGPT (using GPT 3.5 on an unpaid version) as a “cheap outsourced software engineer”.
The fact that I have code that works at all is a testament to the power of LLMs and the availability of high quality code-related text on the internet on which these LLMs are trained. But, it was not an easy, direct path. In the hopes this helps others who have thought or are thinking about doing something similar, here are some tips:
- Modern LLMs have very long context windows. Use them to provide huge amounts of context. LLMs do not have mindreading abilities, nor do they really have any context on what you’re interested in. But, they have long context windows (the amount of text they “remember” from your conversation). I found out, early on, that starting all of my conversations with ChatGPT (or a similar LLM) with long, precisely written descriptions was key to getting good results as it provided the context necessary for the LLM to ground its responses. Case in point: my starting point consisted of 1-2 paragraphs of introduction, 10+ bullet points on features, and another 1-2 paragraphs explaining exactly what I wanted the LLM to do for me. I found that skimping on this level of detail would result in the LLMs generating overly generic code that would require a great deal of follow-on work to use.
- You should probably only use LLM coding with conventionally popular frameworks that have been around for a while. LLMs only “know” what they’ve been trained on. If there are fewer websites dedicated to a coding framework / language or little content on the problem you’re facing, the LLM will likely be unable to answer your questions. Sadly, this means newer programming tricks and niche tools/frameworks are less reliably handled. This is part of the reason I went with something so React-like, even if some of the newer tools had attractive functionality.
- You should have a basic understanding of the coding you’re asking the LLM to do. While I was impressed with the breadth and quality of the code ChatGPT produced for me, there was no escaping that some 10-20% of the time there were issues with its output. Sometimes, this was as simple to fix as asking ChatGPT to fill out placeholder code it chose to omit. But sometimes this involved painstaking troubleshooting and testing. While ChatGPT was reasonably good at using my reports of error messages and broken behavior to fix its code, there were quite a number of times where it was either stumped or could not identify the right fix. Those times I was happy I had taken the Preact tutorial and had a solid understanding of programming fundamentals as I could fix the issue myself or give a specific command to the LLM on what to do next. Without that, I think I would’ve ultimately faced too many stumbling blocks to have gotten to a functioning application.
- Sometimes you just have to restart the conversation. Because an LLM eventually “runs out” of context memory (especially since its output can be long stretches of code), I found that an ongoing discussion with an LLM would eventually become less productive as the LLM would forgot context I had shared earlier in the discussion. When that happened, I would start over with a new message thread sharing the old context and adding new paragraphs and bullet points that were directly relevant to the task at hand. This seemed to yield better results and is something I’d advise doing for anyone using an LLM for coding.
With this, I was able to have the LLM write at least 90% of the HTML file (including the CSS and Javascript needed for my application). The 10% I had to write myself consisted mainly of:
- fixing a few issues the LLM struggled to handle (for example, it kept passing extra parameters to an event handler function which broke the functionality)
- hand-tuning some of the CSS to achieve the look I wanted (it was faster than explaining to the LLM what I wanted)
- debugging and writing my own Jinja2 templating code to prepopulate the application on initial load (even after repeated Google searching, I couldn’t find examples of people who use a Python backend template to provide initial data to a Javascript frontend)
- debugging the API calls — for some reason, LLM introduced multiple errors in the chained callbacks that I had to ultimately step in to fix
Architecture
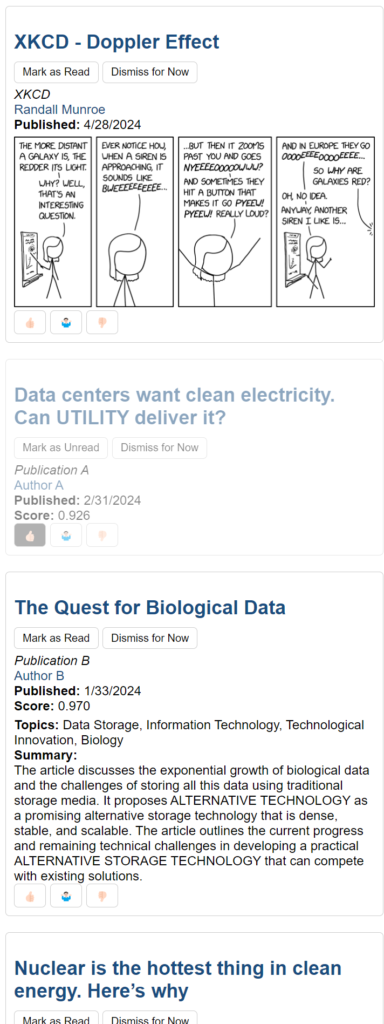
The LLM helped create a relatively straightforward architecture for the code consisting of a feed-container <div> to hold feed-item‘s representing the individual articles. Each feed-item had event handlers to capture when a link or button had been pressed which would initiate an authenticated API call to the backend to mark an article as read or rate an article.
Various elements had state which would be reflected their appearance. A read article would have a grayed out look. The current applied ranking would show up as a pressed button (see right).
Preload / Templating
While the app was initially conceived of as a blank feed which would pull articles from the backend after initializing, I quickly realized during testing that would add a few seconds of latency. As a result, I moved to a model where feed articles would show up upon first load.
I did this by converting fetch results from the database into Javascript objects and fed them directly into the HTML through Python’s Jinja2 templating system (something I didn’t see many references to while searching online; see code below).
This allowed me to keep most of my existing frontend and backend code while still cutting down on the time a user had to wait to see the content.
const initialFeedData = [
  {% for item in fetchItems %}
  {
    articleId: {{ item.articleId }},
    title: "{{ item.title|safe }}",
    articleUrl: "{{ item.articleUrl }}",
    source: "{{ item.source }}",
    author_href: "{{ item.author_href }}",
    author_name: "{{ item.author_name|safe}}",
    date: "{{ item.date }}",
    score: {{ item.score }},
    summary: "{{ item.summary }}",
    rating: null,
    read: false
  }{{ "," if not loop.last }}
  {% endfor %}
];Code language: JavaScript (javascript)
Optimistic Rendering and Catching Unauthenticated API Calls
I also implemented optimistic rendering after some testing revealed that waiting for the backend to confirm an action made the user experience lag significantly. Instead, the frontend now assumes a state change (like marking an article as read or rating it) is instantaneous (happens right after the user action) and is only reversed in the rare case the backend returns an error. This made the app feel much snappier (even if a Modal cold start was delaying the backend response).
Intercepting events in this fashion also allowed me to add 401 response (signifying that a call was not properly authenticated) handling which would result in the session being ended and the user being kicked back to the login page.
onMarkAsRead = async (articleId, status) => {
  try {
      // Optimistically update the item's read state
      this.setState(prevState => ({
          items: prevState.items.map(item => {
              if (item.articleId === articleId) {
                  return { ...item, read: status };
              }
              return item;
          })
      }));
      const response = await fetch('/read', {
          method: 'POST',
          headers: {
              'Content-Type': 'application/json',
              'Authorization': `Bearer ${this.getAccessToken()}`
          },
          body: JSON.stringify({ articleId, status })
      });

      if (!response.ok) {
          if (response.status === 401) {
              window.location.href = '/login?message=Login+expired';
          }
          throw new Error('Failed to mark article as read/unread');
      }
  } catch (error) {
      console.error('Error marking article as read/unread:', error);
      // Revert the item's read state if the backend request fails
      this.setState(prevState => ({
          items: prevState.items.map(item => {
              if (item.articleId === articleId) {
                  return { ...item, read: !status };
              }
              return item;
          })
      }));
      throw error;
  }
};Code language: JavaScript (javascript)
Future Directions
This project started out as an experiment to see if I could build a service that I knew I wanted. In that respect, it has succeeded! Since this project has been online, I’ve stopped using my RSS reader and have seen my use of Twitter/X and the Android Home News feed decline.
But that doesn’t mean there aren’t additional directions I intend to take it.
- Performing lighter-weight training updates more frequently. My current model training setup is too overkill to run too frequently. But, there are some permutations of my current training path that I would like to experiment with which should reduce the compute load while still achieving performance improvements. These include
- Just training updates to user embeddings and article “encoder”
- Creating “dummy users” who are only interested in one topic or source or range of article lengths as a means of rapidly creating more partially relevant user data
- Training a dot product version of the collaborative filter. Another way to potentially increase performance is to train a version of the collaborative filter which does not require a downstream fully connected layer to generate an accurate rating score. While my previous efforts did not succeed, I had much less data at the time and could readily combine this with the “dummy users” idea in the last point. This would allow me to push more of the burden of finding matches to the database’s vector operations instead of an expensive batch compute process that happens after each training.
- Expanding scraper site coverage. My backend is currently only scraping a small handful of sites (mostly those I used to follow via RSS). With the success my rating algorithm has shown, it makes sense to attempt to scrape broader ranges of sites (for instance paywall-limited snippets) to see how it performs.
- Making the scrapers and endpoints fully async. Modal and FastAPI both support async function calls (a type of concurrency that can increase performance when many of the tasks that need to be accomplished have to wait for network latency). Given that much of the time spent by the backend is on waiting for database response, upgrading my Python database driver from the older psycopg2 to the newer, async-compatible psycopg3 should be able to help with performance and load.
- Using the topic information. Currently, topics are distilled by Anthropic’s Claude 3 Haiku model, but, other than being shown next to the article summary, are not really used by the backend. There is an opportunity here to take advantage of those topics as a means of filtering the feed or as a different input into the model training process.
If you are interested, reach out to me at mail-at-this-domain to learn more (especially if you’re interested in using this as a paying customer — I know this is what I want but I am less sure if there are other people who have the same interests).
I’ve also posted the core code to make this work onto GitHub.
Update (2024 Nov 21): Since first writing this, I’ve made a number of updates which I have described in this blog post, which also includes updated priorities for next steps
Leave a Reply