Search results for: “google”

  • Building an AI-powered Metasearch Concept

    Summary

    I built a metasearch engine that:

    • Uses an LLM (OpenAI GPT3.5) to (1) interpret the search intent based on a user supplied topic and then (2) generate service-specific search queries to execute to get the best results
    • Shows results from Reddit, Wikipedia, Unsplash, and Podcast episodes (search powered by Taddy)
    • Surfaces relevant images from a set of crawled images using a vector database (Pinecone) populated with CLIP embeddings
    • Was implemented in a serverless fashion using Modal.com

    The result (using the basic/free tier of many of the connected services) is accessible here (Github repository). While functional, it became apparent during testing that this approach has major limitations, in particular the latency from chaining LLM responses and the dependence on search quality from the respective services. I conclude by discussing some potential future directions.

    Motivation

    Many articles have been written about the decline in Google’s search result quality and the popularity of attempts to fix this by pushing Google to give results from Reddit. This has even resulted in Google attempting to surface authoritative blog/forum-based results in its search results.

    Large language models (LLMs) like OpenAI’s GPT have demonstrated remarkable versatility in handling language and “reasoning” problems. While at Stir, I explored the potential to utilize a large language model as a starting point for metasearch — one that would employ an LLM’s ability to interpret a user query and convert it to queries which would fulfill the user’s intent while also working well with other services (i.e., Reddit, image vector databases, etc.).

    Serverless

    To simplify administration, I employed a serverless implementation powered by Modal.com. Unlike many other serverless technology providers, Modal’s implementation is deeply integrated into Python, making it much easier to:

    1. Define the Python environment needed for an application
    2. Pass data between routines
    3. Create web endpoints
    4. Deploy and test locally
    Define the Python environment needed for an application

    Modal makes it extremely easy to set up a bespoke Python environment / container image through it’s Image API. For my application’s main driver, which required the installation of openai, requests, and beautifulsoup, this was achieved in 2 lines of code:

    image = Image.debian_slim(python_version='3.10') \
                .pip_install('openai', 'requests', 'beautifulsoup4')
    stub = Stub('chain-search', image=image)Code language: JavaScript (javascript)

    Afterwards, functions that are to be run serverless-ly are wrapped in Modal’s Python function decorators (stub.function). These decorators take arguments which allow the developer to configure runtime behavior and pass secrets (like API keys) as environment variables. For example, the first few lines of a function that engages Reddit’s search API:

    @stub.function(secret=Secret.from_name('reddit_secret'))
    def search_reddit(query: str):
        import requests
        import base64 
        import os 
    
        reddit_id = os.environ['REDDIT_USER']
        user_agent = os.environ['REDDIT_AGENT']
        reddit_secret = os.environ['REDDIT_KEY']
        ...
        return resultsCode language: Python (python)

    Modal also provides a means to intelligently prefetch data for an AI/ML-serving function. The Python class decorator stub.cls can wrap any arbitrary class that defines an initiation step method (__enter__ ) as well as actual function logic. In this way, a Modal container that is still warm that is being invoked an additional time need not re-initialize variables or fetch data, as it already did so during initiation.

    Take for instance the following class which (1) loads the SentenceTransformer model stored at cache_path and initializes a connection to a remote Pinecone vector database during initiation and (2) defines a query function which takes a text string, runs it through self.model, and passes it through self.pinecone_index.query:

    # use Modal's class entry trick to speed up initiation
    @stub.cls(secret=Secret.from_name('pinecone_secret'))
    class TextEmbeddingModel:
        def __enter__(self):
            import sentence_transformers
            model = sentence_transformers.SentenceTransformer(cache_path, 
                                                              device='cpu')
            self.model = model 
    
            import pinecone
            import os 
            pinecone.init(api_key=os.environ['PINECONE_API_KEY'], 
                          environment=os.environ['PINECONE_ENVIRONMENT'])
            self.pinecone_index = pinecone.Index(os.environ['PINECONE_INDEX'])
        
        @method()
        def query(self, query: str, num_matches = 10):
            # embed the query 
            vector = self.model.encode(query)
    
            # run the resulting vector through Pinecone
            pinecone_results = self.pinecone_index.query(vector=vector.tolist(), 
                                       top_k=num_matches, 
                                       include_metadata=True
                                       )
            ...
            return results
    Code language: Python (python)
    Transparently Pass data between routines

    Once you’ve deployed a function to Modal, it becomes an invokable remote function. via Modal’s Function API. For example, the code below is from a completely different file from the TextEmbeddingModel class defined above.

    pinecone_query = Function.lookup('text-pinecone-query',
                                     'TextEmbeddingModel.query')Code language: Python (python)

    The remote function can then be called using Function.remote

    return pinecone_query.remote(response[7:], 7)Code language: Python (python)

    The elegance of this is that the parameters (response[7:] and 7) and the result are passed transparently in Python without any need for a special API, allowing your Python code to call upon remote resources at a moment’s notice.

    This ability to seamlessly work with remote functions also makes it possible to invoke the same function several times in parallel. The following code takes the queries generated by the LLM (responses — a list of 6-10 actions) and runs them in parallel (via parse_response) through Function.map which aggregates the results at the end. In a single line of code, as many as 10 separate workers could be acting in parallel (in otherwise completely synchronous Python code)!

    responses = openai_chain_search.remote(query)
    results = parse_response.map(responses)Code language: Python (python)
    Create Web Endpoints

    To make a function accessible through a web endpoint, simply add a web_endpoint Python function decorator. This turns the functions into FastAPI endpoints, removing the need to embed a web server like Flask. This makes it easy to create API endpoints (that return JSON) as well as full web pages & applications (that return HTML and the appropriate HTTP headers).

    from fastapi.responses import HTMLResponse
    
    @stub.function()
    @web_endpoint(label='metasearch')
    def web_search(query: str = None):
        html_string = "<html>"
        ...
        return HTMLResponse(html_string)Code language: Python (python)
    Deploy and test locally

    Finally, Modal has a simple command line interface that makes it extremely easy to deploy and test code. modal deploy <Python file> deploys the serverless functions / web endpoints in the file to the cloud, modal run <Python file> runs a specific function locally (while treating the rest of the code as remote functions), and modal serve <Python file> deploys the web endpoints to a private URL which automatically redeploys every every time the underlying Python file is changes (to better test a web endpoint).

    To designate a particular function for local running via modal run simply involves using the stub.local_entrypoint function decorator. This (and modal serve) makes it much easier to test code prior to deployment.

    # local entrypoint to test
    @stub.local_entrypoint()
    def main(query = 'Mountain sunset'):
        results = []
        seen_urls = []
        seen_thumbnails = []
    
        responses = openai_chain_search.remote(query)
        for response in responses:
            print(response)
        ...Code language: Python (python)

    Applying Large Language Model

    Prompting Approach

    The flexibility of large language models makes determining an optimal path for invoking them and processing their output complex and open-ended. My initial efforts focused around engineering a single prompt which would parse a user query and return queries for other services. However, this ran into two limitations. First, the various responses were structurally similar with one another even if the queries were wildly different. The LLM would supply queries for each API/platform service available even when some of the services were irrelevant. Secondly, the queries themselves were relatively generic. The LLM’s responses did not adapt very well to the individual services (i.e. providing more detail for a Podcast search that indexes podcast episode descriptions vs. something more generic for an image database or Wikipedia).

    To boost the “dynamic range”, I turned to a chained approach where the initial LLM invocation would interpret whether or not a user query is best served with image-centric results or text-centric results. Depending on that answer, a follow-up prompt would be issued to the LLM requesting image-centric OR text-centric queries for the relevant services.

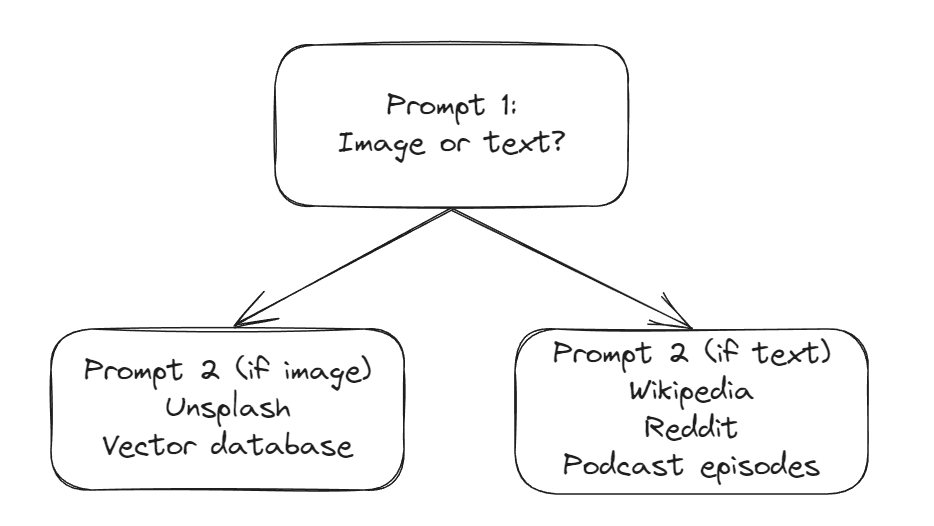
    To design the system prompt (below), I applied the Persona pattern and supplied the LLM with example rationales for user query categorization as a preamble for the initial prompt.

    <strong>*System Prompt*</strong>
    Act as my assistant who's job is to help me understand and derive inspiration around a topic I give you.  Your primary job is to help find the best images, content, and online resources for me. Assume I have entered a subject into a command line on a website and do not have the ability to provide you with follow-up context.
    
    Your first step is to determine what sort of content and resources would be most valuable. For topics such as "wedding dresses" and "beautiful homes" and "brutalist architecture", I am likely to want more visual image content as these topics are design oriented and people tend to want images to understand or derive inspiration. For topics, such as "home repair" and "history of Scotland" and "how to start a business", I am likely to want more text and link content as these topics are task-oriented and people tend to want authoritative information or answers to questions.
    
    <strong>*Initial Prompt*</strong>
    I am interested in the topic:
    {topic}
    
    Am I more interested in visual content or text and link based content? Select the best answer between the available options, even if it is ambiguous. Start by stating the answer to the question plainly. Do not provide the links or resources. That will be addressed in a subsequent question.Code language: plaintext (plaintext)

    Reasonably good results were achieved when asking for queries one service at a time (i.e. “what queries should I use for Reddit” then “what queries should I use for Wikipedia”, etc.), but this significantly increased the time to response and cost. I ultimately settled on combining the follow-up requests, creating one to generate text-based queries and another to generate image-based ones. I also applied the Template Pattern to create a response which could be more easily parsed.

    <strong>*Text-based query generation prompt*</strong>
    You have access to three search engines.
    
    The first will directly query Wikipedia. The second will surface interesting posts on Reddit based on keyword matching with the post title and text. The third will surface podcast episodes based on keyword matching.
    
    Queries to Wikipedia should be fairly direct so as to maximize the likelihood that something relevant will be returned. Queries to the Reddit and podcast search engines should be specific and go beyond what is obvious and overly broad to surface the most interesting posts and podcasts.
    
    What are 2 queries that will yield the most interesting Wikipedia posts, 3 queries that will yield the most valuable Reddit posts, and 3 queries surface that will yield the most insightful and valuable podcast episodes about:
    {topic}
    
    Provide the queries in a numbered list with quotations around the entire query and brackets around which search engine they're intended for (for example: 1. [Reddit] "Taylor Swift relationships". 2. [Podcast] "Impact of Taylor Swift on Music". 3. [Wikipedia] "Taylor Swift albums").
    
    <strong>*Image query generation prompt*</strong>
    You have access to two search engines.
    
    The first a set of high quality images mapped to a vector database. There are only about 30,000 images in the dataset so it is unlikely that it can return highly specific image results so it would be better to use more generic queries and explore a broader range of relevant images.
    
    The second will directly query the free stock photo site Unsplash. There will be a good breadth of photos but the key will be trying to find the highest quality images.
    
    What are 3 great queries to use that will provide good visual inspiration and be different enough from one another so as to provide a broad range of relevant images from the vector database and 3 great queries to use with Unsplash to get the highest quality images on the topic of:
    {topic}
    
    Provide the queries in a numbered list with quotations around the entire query and brackets around which search engine they\'re intended for (for example: 1. [Vector] "Mountain sunset". 2. [Unsplash] "High quality capture of mountain top at sunset".)Code language: plaintext (plaintext)
    invoking openai and parsing the llm’s responses

    I chose OpenAI due to the maturity of their offering and their ability to handle the prompting patterns I used. To integrate OpenAI, I created a Modal function, passing my OpenAI credentials as environment variables. I then created a list of messages to capture the back and forth exchanges with the LLM to pass back to the GPT model as history.

    @stub.function(secret=Secret.from_name('openai_secret'))
    def openai_chain_search(query: str):
        import openai 
        import os 
        import re
        model = 'gpt-3.5-turbo' # using GPT 3.5 turbo model
    
        # Pull Open AI secrets
        openai.organization = os.environ['OPENAI_ORG_ID']
        openai.api_key = os.environ['OPENAI_API_KEY']
    
        # message templates with (some) prompt engineering
        system_message = """Act as my assistant who's job ... """
        initial_prompt_template = 'I am interested in the topic:\n{topic} ...'
        text_template = 'You have access to three search engines ...'
        image_template = 'You have access to two search engines ...'
    
        # create context to send to OpenAI
        messages = []
        messages.append({
            'role': 'user',
            'content': system_message
        })
        messages.append({
            'role': 'user',
            'content': initial_prompt_template.format(topic=query)
        })
    
        # get initial response
        response = openai.ChatCompletion.create(
            model=model,
            messages = messages,
            temperature = 1.0
        )
        messages.append({
            'role': 'assistant',
            'content': response['choices'][0]['message']['content']
        })Code language: Python (python)

    To parse the initial prompt’s response, I did a simple text match with the string "text and link". While crude, this worked well in my tests. If the LLM concluded the user query would benefit more from a text-based set of responses, the followup text-centric prompt text_template was sent to the LLM. If the LLM concluded the user query would benefit more from images, the follow-up image-centric prompt image_template was sent to the LLM instead.

        if 'text and link' in response['choices'][0]['message']['content']:
            # get good wikipedia, reddit, and podcast queries
            messages.append({
                'role': 'user',
                'content': text_template.format(topic=query)
            })
        else:
            ...
    
            # get good image search queries
            messages.append({
                'role': 'user',
                'content': image_template.format(topic=query)
            })
    
        # make followup call to OpenAI
        response = openai.ChatCompletion.create(
            model=model,
            messages = messages,
            temperature = 1.0
        )Code language: Python (python)

    The Template pattern in these prompts pushes the LLM to return numbered lists with relevant services in brackets. These results were parsed with a simple regular expression and then converted into a list of strings (responses, with each entry in the form "<name of service>: <query>") which would later be mapped to specific service functions. (Not shown in the code below: I also added a Wikipedia query to the image-centric results to improve the utility of the image results).

        responses = [] # aggregate list of actions to take
        ...
        # use regex to parse GPT's recommended queries
        for engine, query in re.findall(r'[0-9]+. \[(\w+)\] "(.*)"', 
                                    response['choices'][0]['message']['content']):
            responses.append(engine + ': ' + query)
    
        return responsesCode language: Python (python)

    Building and Querying Image Database

    Update – Apr 2024: Sadly, due to Pinecone aggressively pushing it’s paid plan on me and not providing a way to export vectors / convert a paid vectorstore to a starter/free one, I have lost my Pinecone database and have had to disable the vector search. The service will continue to run on Unsplash and to support the text modalities but it will no longer query the image vector store hosted there.

    Crawling

    To supplement the image results from Unsplash, I crawled a popular high-quality image sharing platform for high quality images we could surface as image search results. To do this, I used the browser automation library Playwright. Used for website and webapp testing automation, it provided very simple APIs to use code to interact with DOM elements on the browser screen. This allowed me to login to the image sharing service.

    While I initially used a combination of Playwright (to scroll and then wait for all the images to load) and the HTML/XML reading Python library BeautifulSoup (to parse the DOM) to gather the images from the service, this approach was slow and unreliable. Seeking greater performance, I looked at the calls the browser made to the service’s backend, and discovered the service would pass all the data the browser would need to render the image results on a page in a JSON blob.

    Leveraging Playwright’s Page.expect_request_finished, Request, and Response APIs, I was able to directly access the JSON and programmatically extracted the data I needed directly (without needing to check what was being rendered in the browser window). This allowed me to quickly and reliably pull the images from the service and their associated metadata.

    approach

    To make it possible to search the images, I needed to find a way to capture the “meaning” of the images as well as the “meaning” of a text query so that they could be easily mapped together. OpenAI published research on a neural network architecture called CLIP which made this relatively straightforward to do. Trained on images paired with image captions on the web, CLIP makes it simple to convert both images and text into vectors (a series of numbers) where the better a match the image and text are, the closer their vectors “multiply” (dot product) to 1.0.

    Procedurally then, if you have the vectors for every image you want to search against, and are given a text-based search query, to find the images that best match you need only to:

    1. Convert the query text into a vector using CLIP
    2. Find the image vectors that get the closest to 1.0 when “multiplied/dot product-ed” with the search string vector
    3. Return the images corresponding to those vectors

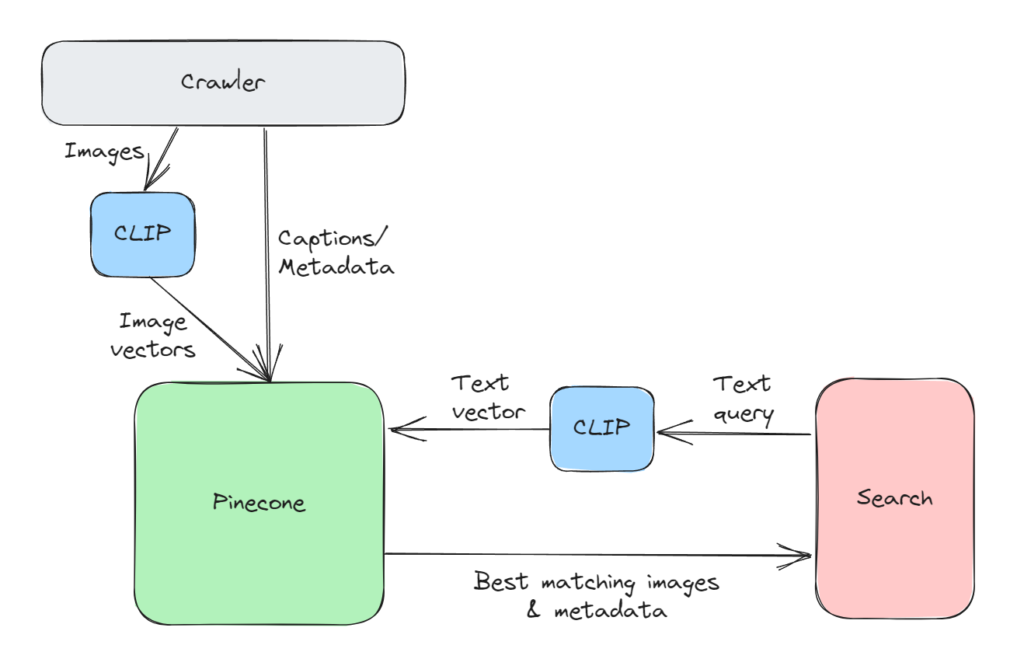
    This type of search has been made much easier with vector databases like Pinecone which make it easy for applications to store vector information and query it with a simple API call. The diagram below shows how the architecture works: (1) the crawler running periodically and pushing new metadata & image vectors into the vector database and (2) whenever a user initiates a search, the search query is converted to a vector which is then passed to Pinecone to return the metadata and URLs corresponding to the best matching images.

    How crawler, image search, and Pinecone vector database work together

    Because of the size of the various CLIP models in use, in a serverless setup, it’s a good idea to intelligently cache and prefetch the model so as to reduce search latency. To do this in Modal, I defined a helper function (i.e. download_models, see below) which initiates and downloads the CLIP model from the SentenceTransformer package and then caches it (with modal.save). This helper function is then passed as part of the Modal container image creation flow with Image.run_function so that it’s called whenever the container image is initiated.

    # define Image for embedding text queries and hitting Pinecone
    # use Modal initiation trick to preload model weights
    cache_path = '/pycache/clip-ViT-B-32' # cache for CLIP model 
    def download_models():
        import sentence_transformers 
    
        model_id = 'sentence-transformers/clip-ViT-B-32' # model ID for CLIP
    
        model = sentence_transformers.SentenceTransformer(
            model_id,
            device='cpu'
        )
        model.save(path=cache_path)
    
    image = (
        Image.debian_slim(python_version='3.10')
        .pip_install('sentence_transformers')
        .run_function(download_models)
        .pip_install('pinecone-client')
    )
    stub = Stub('text-pinecone-query', image=image)Code language: Python (python)

    The stub.cls class decorator I shared before then loads the CLIP model from cache (self.model) if the container image is called again “while warm” (before it shuts down). It also initiates a connection to the appropriate Pinecone database in self.pinecone_index. Note: the code below was shared above in my discussion of intelligent prefetch in Modal

    # use Modal's class entry trick to speed up initiation
    @stub.cls(secret=Secret.from_name('pinecone_secret'))
    class TextEmbeddingModel:
        def __enter__(self):
            import sentence_transformers
            model = sentence_transformers.SentenceTransformer(cache_path, 
                                                              device='cpu')
            self.model = model 
    
            import pinecone
            import os 
            pinecone.init(api_key=os.environ['PINECONE_API_KEY'], 
                          environment=os.environ['PINECONE_ENVIRONMENT'])
            self.pinecone_index = pinecone.Index(os.environ['PINECONE_INDEX'])Code language: Python (python)

    Invoking the CLIP model is done via model.encode (which also works on image data), and querying Pinecone involves passing the vector and number of matches desired to pinecone_index.query. Note: the code below was shared above in my discussion of intelligent prefetch in Modal

    @stub.cls(secret=Secret.from_name('pinecone_secret'))
    class TextEmbeddingModel:
        def __enter__(self):
            ...
        
        @method()
        def query(self, query: str, num_matches = 10):
            # embed the query 
            vector = self.model.encode(query)
    
            # run the resulting vector through Pinecone
            pinecone_results = self.pinecone_index.query(vector=vector.tolist(), 
                                       top_k=num_matches, 
                                       include_metadata=True
                                       )
            ...
            return results
    Code language: Python (python)

    Assembling the Results

    Diagram outlining how a search query is executed
    initiating the service workers

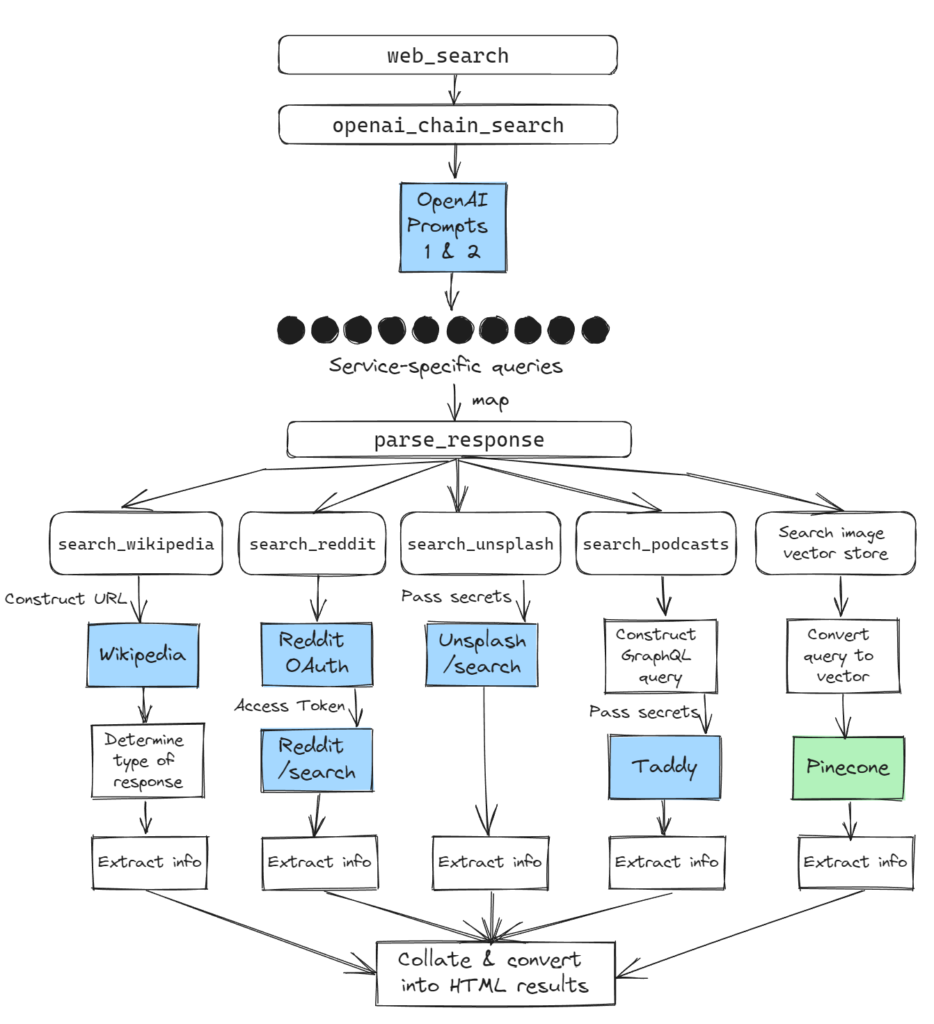
    When the web endpoint receives a search query, it invokes openai_chain_search. This would, as mentioned previously, have the LLM (1) interpret the user query as image or text-centric and then (2) return parsed service-specific queries.

    responses = openai_chain_search.remote(query)Code language: Python (python)

    The resulting responses are handled by parse_response, a function which identifies the service and triggers the appropriate service-specific function (to handle service-specific quirks). Those functions would return a Python dictionary with a consistent set of keys that would be used to construct the search results (e.g. query, source, subsource, subsource_url, url, title, thumbnail, and snippet)

    # function to map against response list
    @stub.function()
    def parse_response(response: str):
        pinecone_query = Function.lookup('text-pinecone-query', 'TextEmbeddingModel.query')
    
        if response[0:11] == 'Wikipedia: ':
            return search_wikipedia.remote(response[11:])
        elif response[0:8] == 'Reddit: ':
            return search_reddit.remote(response[8:])
        elif response[0:9] == 'Podcast: ':
            return search_podcasts.remote(response[9:])
        elif response[0:10] == 'Unsplash: ':
            return search_unsplash.remote(response[10:])
        elif response[0:8] == 'Vector: ':
            return pinecone_query.remote(response[7:], 7)    Code language: Python (python)

    Because Modal functions like parse_response can be invoked remotely, to speed up the overall response time, each call to parse_response was made in parallel rather than sequentially using Modal’s Function.map API.

    results = parse_response.map(responses)Code language: Python (python)

    The results are then collated and rendered into HTML to be returned to the requesting browser.

    Calling The Services

    As mentioned above, the nuances of each service was handled by a dedicated service function. These functions would handle service authentication, would execute the relevant search, and parse the response into a Python dictionary with the appropriate structure.

    Searching Wikipedia (search_wikipedia) involved url-encoding the query and adding it to a base URL (http://www.wikipedia.org/search-redirect.php?search=) that effectively surfaces Wikipedia pages if the query has a good match and conducts keyword searches on Wikipedia if not. (I use that URL as a keyword short cut in my browsers for this purpose)

    Because of the different types of page responses, the resulting page needed to be parsed to determine if the result was a full Wikipedia entry, a Search results page (in which case the top two results were taken), or a disambiguation page (a query that could point to multiple possible pages but which had a different template than the others) before extracting the information needed for presenting the results.

    # handle Wikipedia
    @stub.function()
    def search_wikipedia(query: str):
        import requests
        import urllib.parse
        from bs4 import BeautifulSoup
    
        # base_search_url works well if search string is spot-on, else does search 
        base_search_url = 'https://en.wikipedia.org/w/index.php?title=Special:Search&search={query}'
        base_url = 'https://en.wikipedia.org'
    
        results = []
        r = requests.get(base_search_url.format(query = urllib.parse.quote(query)))
        soup = BeautifulSoup(r.content, 'html.parser') # parse results
    
        if '/wiki/Special:Search' in r.url: # its a search, get top two results
            search_results = soup.find_all('li', class_='mw-search-result')
            for search_result in search_results[0:2]:
                ...
                results.append(result)
        else: # not a search page, check if disambiguation or legit page
            ...
    
        return resultsCode language: Python (python)

    The Reddit API is only accessible via OAuth. This requires an initial authentication token generation step. This generated token can then authenticate subsequent API requests for information. The endpoint of interest (/search) returns a large JSON object encapsulating all the returned results. Trial-and-error helped establish the schema and the rules of thumb needed for extracting the best preview images. Note: the Reddit access token was re-generated for each search because the expiry on each was only one hour

    # handle Reddit
    @stub.function(secret=Secret.from_name('reddit_secret'))
    def search_reddit(query: str):
        import requests
        import base64 
        import os 
    
        reddit_id = os.environ['REDDIT_USER']
        user_agent = os.environ['REDDIT_AGENT']
        reddit_secret = os.environ['REDDIT_KEY']
    
        # set up for auth token request
        auth_string = reddit_id + ':' + reddit_secret
        encoded_auth_string = base64.b64encode(auth_string.encode('ascii')).decode('ascii')
        auth_headers = {
            'Authorization': 'Basic ' + encoded_auth_string,
            'User-agent': user_agent
        }
        auth_data = {
            'grant_type': 'client_credentials'
        }
    
        # get auth token
        r = requests.post('https://www.reddit.com/api/v1/access_token', headers = auth_headers, data = auth_data)
        if r.status_code == 200:
            if 'access_token' in r.json():
                reddit_access_token = r.json()['access_token']
        else:
            return [{'error':'auth token failure'}]
    
        results = []
    
        # set up headers for search requests
        headers = {
            'Authorization': 'Bearer ' + reddit_access_token,
            'User-agent': user_agent
        }
        
        # execute subreddit search
        params = {
            'sort': 'relevance',
            't': 'year',
            'limit': 4,
            'q': query[:512]
        }
        r = requests.get('https://oauth.reddit.com/search', params=params, headers=headers)
        if r.status_code == 200:
            body = r.json()
            ...
    
        return resultsCode language: Python (python)

    Authenticating Unsplash searches was simpler and required passing a client ID as a request header. The results could then be obtained by simply passing the query parameters to https://api.unsplash.com/search/photos

    # handle Unsplash Search
    @stub.function(secret = Secret.from_name('unsplash_secret'))
    def search_unsplash(query: str, num_matches: int = 5):
        import os 
        import requests 
    
        # set up and make request
        unsplash_client = os.environ['UNSPLASH_ACCESS']
        unsplash_url = 'https://api.unsplash.com/search/photos'
    
        headers = {
            'Authorization': 'Client-ID ' + unsplash_client,
            'Accept-Version': 'v1'
        }
        params = {
            'page': 1,
            'per_page': num_matches,
            'query': query
        }
        r = requests.get(unsplash_url, params=params, headers=headers)
    
        # check if request is good 
        if r.status_code == 200:
            ...
            return results
        else:
            return [{'error':'auth failure'}]Code language: Python (python)

    To search podcast episodes, I turned to Taddy’s API. Unlike Reddit and Unsplash, Taddy operates a GraphQL-based query engine where, instead of requesting specific data for specific fields at specific endpoints (i.e. GET api.com/podcastTitle/, GET api.com/podcastDescription/), you request all the data from an endpoint at once by passing the fields of interest (i.e. GET api.com/podcastData/).

    As I did not want the overhead of creating a schema and running a Python GraphQL library, I constructed the request manually.

    # handle Podcast Search via Taddy
    @stub.function(secret = Secret.from_name('taddy_secret'))
    def search_podcasts(query: str):
        import os 
        import requests 
    
        # prepare headers for querying taddy
        taddy_user_id = os.environ['TADDY_USER']
        taddy_secret = os.environ['TADDY_KEY']
        url = 'https://api.taddy.org'
        headers = {
            'Content-Type': 'application/json',
            'X-USER-ID': taddy_user_id,
            'X-API-KEY': taddy_secret
        }
        # query body for podcast search
        queryString = """{
      searchForTerm(
        term: """
        queryString += '"' + query + '"\n'
        queryString += """
        filterForTypes: PODCASTEPISODE
        searchResultsBoostType: BOOST_POPULARITY_A_LOT
        limitPerPage: 3
      ) {
        searchId
        podcastEpisodes {
          uuid
          name
          subtitle
          websiteUrl
          audioUrl
          imageUrl
          description
          podcastSeries {
            uuid
            name
            imageUrl
            websiteUrl
          }
        }
      }
    }
    """
        # make the graphQL request and parse the JSON body
        r = requests.post(url, headers=headers, json={'query': queryString})
        if r.status_code != 200:
            return []
        else:
            responseBody = r.json()
            if 'errors' in responseBody:
                return [{'error': 'authentication issue with Taddy'}]
            else:
                results = []
                ...
                return resultsCode language: Python (python)
    Serving Results

    To keep the architecture and front-end work simple, the entire application is served out of a single endpoint. Queries are passed as simple URL parameters (?query=) which are both easy to handle with FastAPI but are readily generated using HTML <form> elements with method='get' as an attribute and name='query' on the text field.

    The interface is fairly simple: a search bar at the top and search results (if any) beneath (see below)

    Search for “Ocean Sunset” (image-centric)
    Search for “how to plan a wedding” (text-centric)

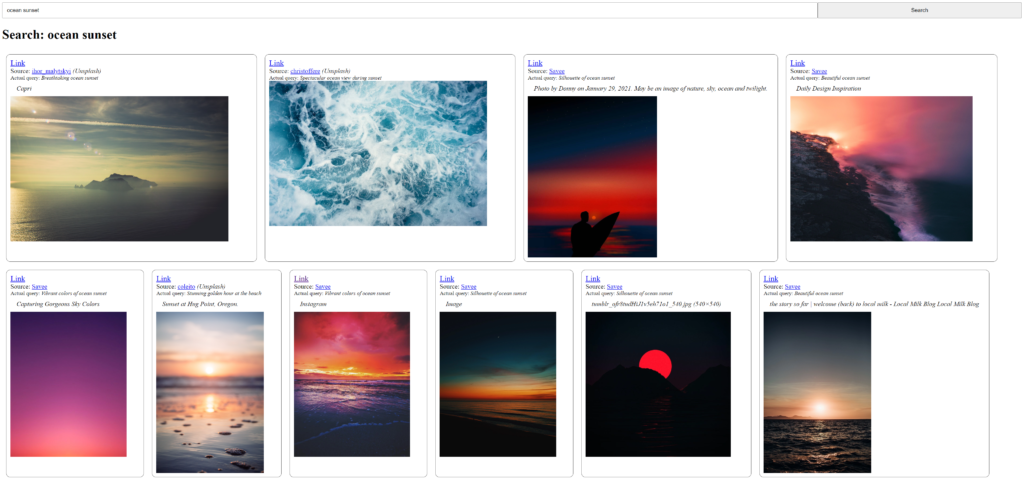
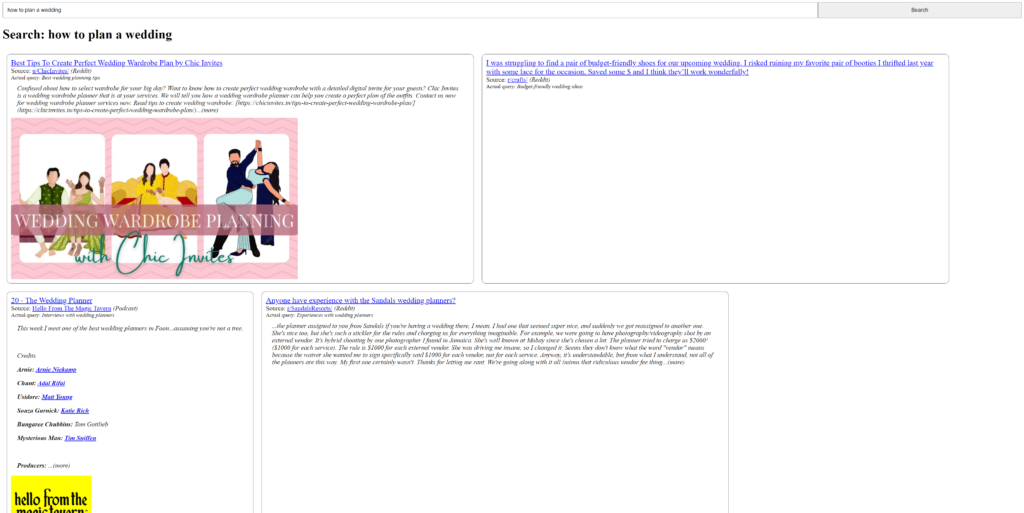
    To get a more flexible layout, each search result (rowchild) is added to a flexbox container (row) configured to “fill up” each horizontal row before proceeding. The search results themselves are also given minimum widths and maximum widths to guarantee at least 2 items per row. To prevent individual results from becoming too tall, maximum heights are applied to image containers (imagecontainer) inside the search results.

    <style type='text/css'>
        .row {
            display: flex; 
            flex-flow: row wrap
        }
        .rowchild {
            border: 1px solid #555555; 
            border-radius: 10px; 
            padding: 10px; 
            max-width: 45%; 
            min-width: 300px; 
            margin: 10px;
        }
        ...
        .imagecontainer {max-width: 90%; max-height: 400px;}
        ....
    </style>Code language: CSS (css)

    Limitations & Future Directions

    Limitations

    While this resulted in a functioning metasearch engine, a number of limitations became obvious as I built and tested it.

    • Latency — Because LLM’s have significant latency, start-to-finish search times will take a meaningful hit, even excluding the time needed to query the additional services. Given the tremendous body of research showing how search latency decreases usage and clickthrough, this poses a significant barrier for this approach to work. At the minimum, the search user interface needs to accommodate for this latency.
    • Result Robustness [LLM] — Because large language models sample over a distribution, the same prompt will result in different responses over time. As a result, this approach will result in large variance in results even with the same user query. While this can help with ideation and exploration for general queries, it is a limiting factor if the expectation is to produce the best results time and time again for specific queries.
    • Dependence on Third Party Search Quality — Even with perfectly tailored queries, metasearch ultimately relies on third party search engines to perform well. Unfortunately, as evidenced in multiple tests, all of the services used here regularly produce irrelevant results. This is likely due to the computational difficulty of going beyond the simple text matching and categorization that is likely used.
    future areas for exporation

    To improve the existing metasearch engine, there are four areas of exploration that are likely to be the most promising:

    1. Caching search results: Given latency inherent to LLMs and metasearch services, caching high quality and frequently searched-for results could drive a significant impact on performance.
    2. Asynchronous searches & load states: While the current engine executes individual sub-queries in parallel, the results are delivered monolithically (in one go). There may be perception and performance gains to be derived by serving results as they come with loading state animations to provide visual feedback to the user as to what is happening. This will be especially necessary if the best results are to be a combination of cached and newly pulled results.
    3. Building scoring engine for search results: One of the big weaknesses of the current engine is that it treats all results equally. Results should be ranked on relevancy or value and should also be pruned of irrelevant content. This can only be done if a scoring engine or model is applied.
    4. Train own models for query optimization: Instead of relying on high-latency LLM requests, it may be possible for some services to generate high quality service-specific queries with smaller sequence to sequence models. This would result in lower latency and possibly better performance due to the focus on the particular task.

    Update – Sep 2024: Updated Wikipedia address due to recent changes; replaced .call with .remote due to Modal deprecation of .call

    Update – Apr 2024: Sadly, due to Pinecone aggressively pushing it’s paid plan on me and not providing a way to export vectors or convert a paid vectorstore to a starter/free one, I have lost my Pinecone database and have had to disable the vector search. The service will continue to run on Unsplash and to support the text modalities but it will no longer query the image vector store hosted there or risk paying exorbitant fees for a hobby project.

  • Setting Up an OpenMediaVault Home Server with Docker, Plex, Ubooquity, and WireGuard

    (Note: this is part of my ongoing series on cheaply selfhosting)

    I spent a few days last week setting up a cheap home server which now serves my family as:

    • a media server — stores and streams media to phones, tablets, computers, and internet-connected TVs (even when I’m out of the house!)
    • network-attached storage (NAS) — lets computers connected to my home network store and share files
    • VPN — lets me connect to my storage and media server when I’m outside of my home

    Until about a week ago, I had run a Plex media server on my aging (8 years old!) NVIDIA SHIELD TV. While I loved the device, it was starting to show it’s age – it would sometimes overheat and not boot for several days. My home technology setup had also shifted. I bought the SHIELD all those years ago to put Android TV functionality onto my “dumb” TV.

    But, about a year ago, I upgraded to a newer Sony TV which had it built-in. Now, the SHIELD felt “extra” and the media server felt increasingly constrained by what it could not do (e.g., slow network access speeds, can only run services that are Android apps, etc.)

    I considered buying a high-end consumer NAS from Synology or QNAP (which would have been much simpler!), but decided to build my own to both get better hardware for less money but also as a fun project which would teach me more about servers and let me configure everything to my heart’s content.

    If you’re interested in doing something similar, let me walk you through my hardware choices and the steps I took to get to my current home server setup.

    Note: on the recommendation of a friend, I’ve since reconfigured how external access works to not rely on a VPN with an open port and Dynamic DNS and instead use Twingate. For more information, refer to my post on Setting Up Pihole, Nginx Proxy, and Twingate with OpenMediaVault

    Hardware

    I purchased a Beelink EQ12 Mini, a “mini PC” (fits in your hand, power-efficient, but still capable of handling a web browser, office applications, or a media server), during Amazon’s Prime Day sale for just under $200.

    Beelink EQ12 Mini
    Beelink EQ12 Mini (Image Source: Chigz Tech Review)

    While I’m very happy with the choice I made, for those of you contemplating something similar, the exact machine isn’t important. Many of the mini PC brands ultimately produce very similar hardware, and by the time you read this, there will probably be a newer and better product. But, I chose this particular model because:

    • It was from one of the more reputable Mini PC brands which gave me more confidence in its build quality (and my ability to return it if something went wrong). Other reputable vendors beyond Beelink include Geekom, Minisforum, Chuwi, etc.
    • It had a USB-C port which helps with futureproofing, and the option to convert this into something else useful if this server experiment doesn’t work out.
    • It had an Intel CPU. While AMD makes excellent CPUs, the benefit of going with Intel is support for Intel Quick Sync, which allows for hardware accelerated video transcode (converting video and audio streams to different formats and resolutions – so that other devices can play them – without overwhelming the system or needing a beefy graphics card). Many popular media servers support Intel Quick Sync-powered transcode.
    • It was not a i3/5/7/9 chip. Intel’s higher end chips have names that include “i3” or “i5” or “i7”. Those are generally overkill on performance, power consumption, and price for a simple file and media server. All I needed for my purposes was a lower-end Celeron-type device.
    • It was the most advanced Intel architecture I could find for ≤$200. While I didn’t need the best performance, there was no reason to avoid more advanced technology. Thankfully, the N100 chip in the EQ12 Mini uses Intel’s 12th Generation Core architecture (Alder Lake). Many of the other mini-PCs at this price range had older (10th and 11th generation) CPUs.
    • I went with the smallest RAM and onboard storage option. I wasn’t planning on putting much on the included storage (because you want to isolate the operating system for the server away from the data) nor did I expect to tax the computer memory for my use case.

    I also considered purchasing a Raspberry Pi, a <$100 low-power device popular with hobbyists, but the lack of transcode and the non-x86 architecture (Raspberry Pi’s use ARM CPUs and won’t be compatible with all server software) pushed me towards an Intel-based mini PC.

    In addition to the mini-PC, I also needed:

    • Storage: a media server / NAS without storage is not very useful. I had a 4 TB USB hard drive (previously connected to my SHIELD TV) which I used here, and I also bought a 4 TB SATA SSD (for ~$150) to mount inside the mini-PC.
      • Note 1: if you decide to go with OpenMediaVault as I have, install the Linux distribution before you install the SATA drive. The installer (foolishly) tries to install itself to the first drive it finds, so don’t give it any bad options.
      • Note 2: most Mini PC manufacturers say their systems only support additional drives up to 2 TB. This appears to be mainly the manufacturers being overly conservative. My 4 TB SATA SSD works like a charm.
    • A USB stick: Most Linux distributions (especially those that power open source NAS solutions) are installed from a bootable USB stick. I used one that was lying around that had 2 GB on it.
    • Ethernet cables and a “dumb” switch: I use Google Wifi in my home and I wanted to connect both my TV and my new media server to the router in my living room. To do that, I bought a simple Ethernet switch (you don’t need anything fancy because it’s just bridging several devices) and 3 Ethernet cables to tie it all together (one to connect the router to the switch, one to connect the TV to the switch, and one to connect the server to the switch). Depending on your home configuration, you may want something different.
    • A Monitor & Keyboard: if you decide to go with OpenMediaVault as I have, you’ll only need this during the installation phase as the server itself is controllable through a web interface. So, I used an old keyboard and monitor (that I’ve since given away).

    OpenMediaVault

    There are a number of open source home server / NAS solutions you can use. But I chose to go with OpenMediaVault because it’s:

    To install OpenMediaVault on the mini PC, you just need to:

    1. Download the installation image ISO and burn it to a bootable USB stick (if you use Windows, you can use Rufus to do so)
    2. Plug the USB stick into the mini PC (and make sure to connect the monitor and keyboard) and then turn the machine on. If it goes to Windows (i.e. it doesn’t boot from your USB stick), you’ll need to restart and go into BIOS (you can usually do this by pressing Delete or F2 or F7 after turning on the machine) to configure the machine to boot from a USB drive.
    3. Follow the on-screen instructions.
      • You should pick a good root password and write it down (it gates administrative access to the machine, and you’ll need it to make some of the changes below).
      • You can pick pretty much any name you want for the hostname and domain name (it shouldn’t affect anything but it will be what your machine calls itself).
      • Make sure to select the right drive for installation
    4. And that should be it! After you complete the installation, you will be prompted to enter the root password you created to login.

    Unfortunately for me, OpenMediaVault did not recognize my mini PC’s ethernet ports or wireless card. If it detects your network adapter just fine, you can skip this next block of steps. But, if you run into this, select the “does not have network card” option and “minimal setup” options during install. You should still be able to get the end of the process. Then, once the OpenMediaVault operating system installs and reboots:

    1. Login by entering the root password you picked during the installation and make sure your system is plugged in to your router via ethernet. Note: Linux is known to have issues recognizing some wireless cards and it’s considered best practice to run a media server off of Ethernet rather than WiFi.
    2. In the command line, enter omv-firstaid. This is a gateway to a series of commonly used tools to fix an OpenMediaVault install. In this case, select the Configure Network Interface option and say yes to all the IPv4 DHCP options (you can decide if you want to set up IPv6).
    3. Step 2 should fix the issue where OpenMediaVault could not see your internet connection. To prove this, you should try two things:
      • Enter ping google.com -c 3 in the command line. You should see 3 lines with something like 64 bytes from random-url.blahurl.net showing that your system could reach Google (and thus the internet). If it doesn’t work, try again in a few minutes (sometimes it takes some time for your router to register a new system).
      • Enter ip addr in the command line. Somewhere on the screen, you should see something that probably looks like inet 192.168.xx.xx/xx. That is your local IP address and it’s a sign that the mini PC has connected to your router.
    4. Now you need to update the Linux operating system so that it knows where to look for updates to Debian. As of this writing, the latest version of OpenMediaVault (6) is based on Debian 11 (codenamed Bullseye), so you may need to replace bullseye with <name of Debian codename that your OpenMediaVault is based on> in the text below if your version is based on a different version of Debian (i.e. Bookworm, Trixie, etc.).

      In the command line, enter nano /etc/apt/sources.list. This will let you edit the file that contains all the information on where your Linux operating system will find valid software updates. Enter the text below underneath all the lines that start with # (replacing bullseye with the name of the Debian version that underlies your version of OpenMediaVault if needed).
      deb http://deb.debian.org/debian bullseye main 
      deb-src http://deb.debian.org/debian bullseye main
      deb http://deb.debian.org/debian-security/ bullseye-security main
      deb-src http://deb.debian.org/debian-security/ bullseye-security main
      deb http://deb.debian.org/debian bullseye-updates main
      deb-src http://deb.debian.org/debian bullseye-updates main
      Then press Ctrl+X to exit, press Y when asked if you want to save your changes, and finally Enter to confirm that you want to overwrite the existing file.
    5. To prove that this worked, in the command line enter apt-get update and you should see some text fly by that includes some of the URLs you entered into sources.list. Next enter apt-get upgrade -y, and this should install all the updates the system found.

    Congratulations, you’ve installed OpenMediaVault!

    Setting up the File Server

    You should now connect any storage (internal or USB) that you want to use for your server. You can turn off the machine if you need to by pulling the plug, or holding the physical power button down for a few seconds, or by entering shutdown now in the command line. After connecting the storage, turn the system back on.

    Once setup is complete, OpenMediaVault can generally be completely controlled and managed from the web. But to do this, you need your server’s local IP address. Log in (if you haven’t already) using the root password you set up during the installation process. Enter ip addr in the command line. Somewhere on the screen, you should see something that looks like inet 192.168.xx.xx/xx. That set of numbers connected by decimal points but before the slash (for example: 192.168.444.23) is your local IP address. Write that down.

    Now, go into any other computer connected to the same network (i.e. on WiFi or plugged into the router) as the media server and enter the local IP address you wrote down into the address bar of a browser. If you configured everything correctly, you should see something like this (you may have to change the language to English by clicking on the globe icon in the upper right):

    The OpenMediaVault administrative panel login

    Congratulations, you no longer need to connect a keyboard or mouse to your server, because you can manage it from any other computer on the network!

    Login using the default username admin and default password openmediavault. Below are the key things to do first. (Note: after hitting Save on a major change, as an annoying extra precaution, OpenMediaVault will ask you to confirm the change again with a bright yellow confirmation banner at the top. You can wait until you have several changes, but you need to make sure you hit the check mark at least once or your changes won’t be reflected):

    • Change your password: This panel controls the configuration for your system, so it’s best not to let it be the default. You can do this by clicking on the (user settings) icon in the upper-right and selecting Change Password
    • Some useful odds & ends:
      • Make auto logout (time before the panel logs you out automatically) longer. You can do this by going to [System > Workbench] in the menu and changing Auto logout to something like 60 minutes
      • Set the system timezone. You can do this by going to [System > Date & Time] and changing the Time zone field.
    • Update the software: On the left-hand side, select [System > Update Management > Updates]. Press the button to search for new updates. If any show up press the button to install everything on the list that it can. (see below, Image credit: OMV-extras Wiki)
    • Mount your storage:
      • From the menu, select [Storage > Disks]. The table that results (see below) shows everything OpenMediaVault sees connected to your server. If you’re missing anything, time to troubleshoot (check the connection and then make sure the storage works on another computer).
      • It’s a good idea (although not strictly necessary) to reformat any un-empty disks before using them with OpenMediaVault for performance. You can do this by selecting the disk entry (marking it yellow) and then pressing the (Wipe) button
      • Go to [Storage > File Systems]. This shows what drives (and what file systems) are accessible to OpenMediaVault. To properly mount your storage:
        • Press the button for every unformatted drive added you may want to mount to OpenMediaVault. This will add a disk with an existing file system to the purview of your file server.
        • Press the button in the upper-left (just to the right of the triangular button) to add a drive that’s just been formatted. Of the file system options that come up, I would choose EXT4 (it’s what modern Linux operating systems tend to use). This will result in your chosen file system being added to the drive before it’s ultimately mounted.
    • Set up your File Server: Ok, you’ve got storage! Now you want to make it available for the computers on your network. To do this, you need to do three things:
      • Enabling SMB/CIFS: Windows, Mac OS, and Linux systems tend to work pretty well with SMB/CIFS for network file shares. From the menu, select [Services > SMB/CIFS > Settings].

        Check the Enabled box. If your LAN workgroup is something other than the default WORKGROUP you should enter it. Now any device on your network that supports SMB/CIFS will be able to see the folders that OpenMediaVault shares. (see below, Image credit: OMV-extras Wiki)
      • Selecting folders to share: On the left-hand-side of the administrative panel, select [Storage > Shared Folders]. This will list all the folders that can be shared.

        To make a folder available to your network, select the button in the upper-left, and fill out the Name (what you want the folder to be called when other’s access it) and select the File System you’ve previously mounted that the folder will connect to. You can write out the name of the directory you want to share and/or use the directory folder icon to the right of the Relative Path field to help select the right folder. Under Permissions, for simplicity I would assign Everyone: read/write. (see below, Image credit: OMV-extras Wiki)


        Hit Save to return to the list of folder shares (see below for what a completed entry looks like, Image credit: OMV-extras Wiki). Repeat the process to add as many Shared Folders as you’d like.
      • Make the shared folders available to SMB/CIFS: To do this go to [Services > SMB/CIFS > Shares]. Hit the button and, in, Shared Folder, select the Shared Folder you configured from the dropdown. Under Public, select Guests allowed – this will allow users on the network to access the folder without supplying a username or password. Check the Inherit Permissions, Extended attributes, and Store DOS attributes boxes as well and then hit Save. Repeat this for all the shared folders you want to make available. (Image credit: OMV-extras Wiki)
    • Set a static local IP: Home networks typically dynamically assign IP addresses to the devices on the network (something called DHCP). As a result, the IP address for your server may suddenly change. To give your server a consistent address to connect to, you should configure your router to assign a static IP to your server. The exact instructions will vary by router so you’ll need to consult your router’s documentation. In my household, we use Google Wifi and, if you do too, here are the instructions for doing so. (Make sure to write down the static IP you assign to the server as you will need it later. If you change the IP from what it already was, make sure to log into the OpenMediaVault panel from that new address before proceeding.)
    • Check that the shared folders show up on your network: Linux, Mac OS, and Windows all have separate ways of mounting a SMB/CIFS file share. The steps above hopefully simplify this by:
      • letting users connect as a Guest (no extra authentication needed)
      • providing a Static IP address for the file share

    Docker and OMV-Extras

    Once upon a time, setting up other software you might want to run on your home server required a lot of command line work. While efficient, it made worse the consequences of entering the wrong command or having two applications with conflicting dependencies. After all, a certain blogger accidentally deleted his entire blog because he didn’t understand what he was doing.

    Enter containers. Containers are “portable environments” for software, first popularized by the company Docker, that gives software a predictable background to run on. This makes it easier to run applications reliably, regardless of machine (because the application only sees what the container shows it). It also means a greatly reduced risk of a misconfigured app affecting another since the application “lives” in its own container.

    While this has tremendous implications for software in general, for our purposes, this just makes it a lot easier to install software … provided you have Docker installed. For OpenMediaVault, the best way to get Docker is to install OMV-extras.

    If you know how to use ssh, go ahead and use it to access your server’s IP address, login as the root user, and skip to Step 4. But, if you don’t, the easiest way to proceed is to set up WeTTY (Steps 1-3):

    1. Install WeTTY: Go to [System > Plugins] and search or scroll until you find the row for openmediavault-wetty. Click on it to mark it yellow and then press the button to install it. WeTTY is a web-based terminal which will let you access the server command line from a browser.
    2. Enable WeTTY: Once the install is complete, go to [Services > WeTTY], check the Enabled box, and hit Save. You’ll be prompted by OpenMediaVault to confirm the pending change.
    3. Press Open UI button on the page to access WeTTY: It should open up a new tab that takes you to your-ip-address:2222 which should open up a black screen which is basically the command line for your server! Enter root when prompted for your username and then your root password that you configured during installation.
    4. Enter this into the command line:
      wget -O - https://github.com/OpenMediaVault-Plugin-Developers/packages/raw/master/install | bash
      Installation will take a while but once it’s complete, you can verify it by going back to your administrative panel, refreshing the page, and seeing if there is a new menu item [System > omv-extras].
    5. Enable the Docker repo: From the administrative panel, go to [System > omv-extras] and check the Docker repo box. Press the apt clean button once you have.
    6. Install the Docker-compose plugin: Go to [System > Plugins] and search or scroll down until you find the entry for openmediavault-compose. Click on it to mark it yellow and then press the button on the upper-left to install it. To confirm that it’s been installed, you should see a new menu item [Services > Compose]
    7. Update the System: As before, select [System > Update Management > Updates]. Press the button to search for new updates. Press the button which will automatically install everything.
    8. Create three shared folders: compose, containers, and config: Just as with setting up the network folder shares, you can do this by going to [Storage > Shared Folders] and pressing the button in the upper left. You can generally pick any location you’d like, but make sure it’s on a file system with a decent amount of storage as media server applications can store quite a bit of configuration and temporary data (e.g. preview thumbnails).

      compose and containers will be used by Docker to store the information it needs to set up and operate the containers you’ll want.

      I would also recommend sharing config on the local network to make it easier to see and change the application configuration files (go to [Services > SMB/CIFS > Shares] and add it in the same way you did for the File Server step). Later below, I use this to add a custom theme to Ubooquity.
    9. Configure Docker Compose: Go to [Services > Compose > Settings]. Where it says Shared folder under Compose Files, select the compose folder you created in Step 8. Where it says Docker storage under Docker, copy the absolute path (not the relative path) for the containers folder (which you can get from [Storage > Shared Folders]). Once that’s all set. Press Reinstall Docker.
    10. Set up a User for Docker: You’ll need to create a separate user for Docker as it is dangerous to give any application full access to your root user. Go to [Users > Users] (yes, that is Users twice). Press the button to create a new user. You can give it whatever name (i.e. dockeruser) and password you want, but under Groups make sure to select both docker and users. Hit Save and once you’re set you should see your new user on the table. Make a note of the UID and GID (they’ll probably be 1000 and 100, respectively, if this is your first user other than the root) as you’ll need it when you install applications.

    That was a lot! But, now you’ve set up Docker Compose. Now let’s use it to install some applications!

    Setting up Media Server(s)

    Before you set up the applications that access your data, you should make sure all of that data (i.e. photos you’ve taken, music you’ve downloaded, movies you’ve ripped / bought, PDFs you’d like to make available, etc.) are on your server and organized.

    My suggestion is to set up a shared folder accessible to the network (mine is called Media) and have subdirectories in that folder corresponding for the different types of files that you may want your media server(s) to handle (for example: Videos, Photos, Files, etc). Then, use the network to move the files over (you should get comparable, if not faster, speeds as a USB transfer on a local area network).

    The two media servers I’ve set up on my system are Plex (to serve videos, photos, and music) and Ubooquity (to serve files and especially ePUB/PDFs). There are other options out there, many of which can be similarly deployed using Docker compose, but I’m just going to cover my setup with Plex and Ubooquity below.

    Plex

    • Why I chose it:
      • I’ve been using Plex for many years now, having set up clients on virtually all of my devices (phones, tablets, computers, and smart TVs).
      • I bought a lifetime Plex Pass a few years back which gives me access to even more functionality (including Intel Quick Sync transcode).
      • It has a wealth of automatic features (i.e. automatic video detection and tagging, authenticated access through the web without needing to configure a VPN, etc.) that have worked reliably over the years.
      • With a for-profit company backing it, (I believe) there’s a better chance that the platform will grow (they built a surprisingly decent free & ad-sponsored Live TV offering a few years ago) and be supported over the long-term
    • How to set up Docker Compose: Go to [Services > Compose > Files] and press the button. Under Name put down Plex and under File, paste the following (making sure the number of spaces are consistent)
      version: "2.1"
      services:
      plex:
      image: lscr.io/linuxserver/plex:latest
      container_name: plex
      network_mode: host
      environment:
      - PUID=<UID of Docker User>
      - PGID=<GID of Docker User>
      - TZ=America/Los_Angeles
      - VERSION=docker
      devices:
      - /dev/dri/:/dev/dri/
      volumes:
      - <absolute path to shared config folder>/plex:/config
      - <absolute path to Media folder>:/media
      restart: unless-stopped
      You need to replace <UID of Docker User> and <GID of Docker User> with the UID and GID of the Docker user you created when you set up Docker Compose (Step 10 above), which will likely be 1000 and 100 if you followed the steps I laid out.

      You can get the the absolute paths to your config folder and the location of your media files by going to [Storage > Shared Folders] in the administrative panel. I added a /plex to the config folder path under volumes:. This way you can install as many apps through Docker as you want and consolidate all of their configuration files in one place, while still keeping them separate.

      If you have an Intel QuickSync CPU, the two lines that start with devices: and /dev/dri/ will allow Plex to use it (provided you also paid for a Plex Pass). If you don’t have a chip with Intel QuickSync, haven’t paid for Plex Pass, or don’t want it, leave out those two lines.

      I live in the Bay Area so I set timezone TZ to America/Los_Angeles. You can find yours here.

      Once you’re done, hit Save and you should be returned to your list of Docker compose files for the next step. Notice that the new Plex entry you created has a Down status, showing the container has yet to be initiated.
    • How to start / update / stop / remove your Plex container: You can manage all of your Docker Compose files by going to [Services > Compose > Files]. Click on the Plex entry (which should turn it yellow) and press the (up) button. This will create the container, download any files needed, and run it.

      And that’s it! To prove it worked, go to http://your-ip-address:32400/web in a browser and you should see a login screen (see image below)


      From time to time, you’ll want to update your software. Docker makes this very easy. Because of the image: lscr.io/linuxserver/plex:latest line, every time you press the (pull) button, Docker will pull the latest version from linuxserver.io (a group that maintains commonly used Linux containers) and, usually, you can get away with an update without needing to stop or restart your container.

      Similarly, to stop the Plex container, simply tap the (stop) button. And to delete the container, tap the (down) button.
    • Getting started with Plex: There are great guides that have been written on the subject but my main recommendations are:
      • Do the setup wizard. It has good default settings (automatic library scans, remote access, etc.) — and I haven’t had to make many tweaks.
      • Take advantage of remote access — You can access your Plex server even when you’re not at home just by going to plex.tv and logging in.
      • Install Plex clients everywhere — It’s available on pretty much everything (Web, iOS, Android) and, with remote access, becomes a pretty easy way to get access to all of your content
      • I hide most of Plex’s default content in the Plex clients I’ve setup. While their ad-sponsored offerings are actually pretty good, I’m rarely consuming those. You can do this by configuring which things are pinned, and I pretty much only leave the things on my media server up.

    Ubooquity

    • Why I chose it: Ubooquity has, sadly, not been updated in almost 5 years as of this writing. But, I still chose it for two reasons. First, unlike many alternatives, it does not require me to create a new file organization structure or manually tag my old files to work. It simply shows me my folder structure, lets me open the files one page at a time, maintains read location across devices, and lets me have multiple users.

      Second, it’s available as a container on linuxserver.io (like Plex) which makes it easy to install and means that the infrastructure (if not the application) will continue to be updated as new container software comes out.

      I may choose to switch (and the beauty of Docker is that it’s very easy to just install another content server to try it out) but for now Ubooquity made the most sense.
    • How to set up the Docker Compose configuration: Like with Plex, go to [Services > Compose > Files] and press the button. Under Name put down Ubooquity and under File, paste the following
      ---
      version: "2.1"
      services:
      ubooquity:
      image: lscr.io/linuxserver/ubooquity:latest
      container_name: ubooquity
      environment:
      - PUID=<UID of Docker User>
      - PGID=<GID of Docker User>
      - TZ=America/Los_Angeles
      - MAXMEM=512
      volumes:
      - <absolute path to shared config folder>/ubooquity:/config
      - <absolute path to shared Media folder>/Books:/books
      - <absolute path to shared Media folder>/Comics:/comics
      - <absolute path to shared Media folder>/Files:/files
      ports:
      - 2202:2202
      - 2203:2203
      restart: unless-stopped
      You need to replace <UID of Docker User> and <GID of Docker User> with the UID and GID of the Docker user you created when you set up Docker Compose (Step 10 above), which will likely be 1000 and 100 if you followed the steps I laid out.

      You can get the the absolute paths to your config folder and the location of your media files by going to [Storage > Shared Folders] in the administrative panel. I added a /ubooquity to the config folder path under volumes:. This way you can install as many apps through Docker as you want and consolidate all of their configuration files in one place, while still keeping them separate.

      I live in the Bay Area so I set timezone TZ to America/Los_Angeles. You can find yours here.

      Once you’re done, hit Save and you should be returned to your list of Docker compose files for the next step. Notice that the Ubooquity entry you created has a Down status, showing it has yet to be initiated.
    • How to start / update / stop / remove your Ubooquity container: You can manage all of your Docker Compose files by going to [Services > Compose > Files]. Click on the Ubooquity entry (which should turn it yellow) and press the (up) button. This will create the container, download any files needed, and run the system.

      And that’s it! To prove it worked, go to your-ip-address:2202/ubooquity in a browser and you should see the user interface (image credit: Ubooquity)


      From time to time, you’ll want to update your software. Docker makes this very easy. Because of the image: lscr.io/linuxserver/ubooquity:latest line, every time you press the (pull) button, Docker will pull the latest version from linuxserver.io (a group that maintains commonly used Linux containers) and, usually, you can get away with an update without needing to stop or restart your container.

      Similarly, to stop the Ubooquity container, simply tap the (stop) button. And to remove the container, tap the (down) button.
    • Getting started with Ubooquity: While Ubooquity will more or less work out of the box, if you want to really configure your setup you’ll need to go to the admin panel at your-ip-address:2203/ubooquity/admin (you will be prompted to create a password the first time)
      • In the General tab, you can see how many files are tracked in the table at the top, configure how frequently Ubooquity scans your folders for new files under Automatic scan period, manually launch a scan if you just added files with Launch New Scan, and select a theme for the interface.
      • If you want to create User accounts to have separate read state management or to segment which users can access specific content, you can create these users in the Security tab of the administrative panel. By doing so, you’ll need to manually go into the content type tabs (i.e. Comics, Books, Raw Files) and manually configure which users have access to which shared folders.
      • The base Ubooquity interface is pretty dated so I am using a Plex-inspired theme.

        The easiest way to do this is to download the ZIP file at the link I gave. Unzip it on your computer (in this case it will result in the creation of a directory called plextheme-reading). Then, assuming the config shared folder you set up previously is shared across the network, take the unzipped directory and put it into the /ubooquity/themes subdirectory of the config folder.

        Lastly, go back to the General tab in Ubooquity admin and, next to Current theme select plextheme-reading
      • Edit (10-Aug-2023): I’ve since switched to using a Local DNS service powered by Pihole to access Ubooquity using a human readable web address ubooquity.home that every device on my network can access. For information on how to do this, refer to my post on Setting Up Pihole, Nginx Proxy, and Twingate with OpenMediaVault
        Because entering in a local ip address and remembering 2202 or 2203 and the folders afterwards is a pain, I created keyword shortcuts for these in Chrome. The instructions for doing this will vary by browser, but to do this in Chrome, go to chrome://settings/searchEngines. There is a section of the page called Site search. Press the Add button next to it. Even though the dialog box says Add Search Engine, in practice you can use this to add keywords to any URL, just put a name for the shortcut in the Search Engine field, the shortcut you want to use in Shortcut (I used ubooquity for the core application and ubooquityadmin for the administrative console) and the URLs in URL with %s in place of query (i.e. http://your-ip-address:2202/ubooquity and http://your-ip-address:2203/ubooquity/admin).

        Now to get to Ubooquity, I simply type in ubooquity in the Chrome address bar rather than a hodge podge of numbers and slashes that I’ll probably forget

    External Access

    One of Plex’s best features is making it very easy to access your media server even when you’re not on your home network. Having experienced that, I wanted the same level of access when I was out of the house to my network file share and applications like Ubooquity.

    Edit (10-Aug-2023): I’ve since switched my method of granting external access to Twingate. This provides secure access to network resources without needing to configure Dynamic DNS, a VPN, or open up a port. For more information on how to do this, refer to my post on Setting Up Pihole, Nginx Proxy, and Twingate with OpenMediaVault

    There are a few ways to do this, but the most secure path is through a VPN (virtual private network). VPNs are secure connections between computers that mimic actually being directly networked together. In our case, it lets a device securely access local network resources (like your server) even when it’s not on the home network.

    OpenMediaVault makes it relatively easy to use Wireguard, a fast and popular VPN technology with support for many different types of devices. To set up Wireguard for your server for remote access, you’ll need to do six things:

    1. Get a domain name and enable Dynamic DNS on it Most residential internet customers do not have a static IP. This means that the IP address for your home, as the rest of the world sees it, can change without warning. This makes it difficult to access externally (in much the same way that DHCP makes it hard to access your home server internally).

      To address this, many domain providers offer Dynamic DNS, where a domain name (for example: myurl.com) can point to a different IP address depending on when you access it, so long as the domain provider is told what the IP address should be whenever it changes.

      The exact instructions for how to do this will vary based on who your domain provider is. I use Namecheap and took an existing domain I owned and followed their instructions for enabling Dynamic DNS on it. I personally configured mine to use my vpn. subdomain, but you should use the setup you’d like, so long as you make a note of it for step 3 below.

      If you don’t want to buy your own domain and are comfortable using someone else’s, you can also sign up for Duck DNS which is a free Dynamic DNS service tied to a Duck DNS subdomain.
    2. Set up DDClient. To update the IP address your domain provider maps the domain to, you’ll need to run a background service on your server that will regularly check its IP address. One common way to do this is a software package called DDClient.

      Thankfully, setting up DDClient is fairly easy thanks (again!) to a linuxserver.io container. Like with Plex & Ubooquity, go to [Services > Compose > Files] and press the button. Under Name put down DDClient and under File, paste the following
      ---
      version: "2.1"
      services:
      ddclient:
      image: lscr.io/linuxserver/ddclient:latest
      container_name: ddclient
      environment:
      - PUID=<UID of Docker User>
      - PGID=<GID of Docker User>
      - TZ=America/Los_Angeles
      volumes:
      - <absolute path to shared config folder>/ddclient:/config
      restart: unless-stopped
      You need to replace <UID of Docker User> and <GID of Docker User> with the UID and GID of the Docker user you created when you set up Docker Compose (Step 10 above), which will likely be 1000 and 100 if you followed the steps I laid out.

      You can get the the absolute path to your config folder by going to [Storage > Shared Folders] in the administrative panel. I added a /ddclient to the config folder path. This way you can install as many apps through Docker as you want and consolidate all of their configuration files in one place, while still keeping them separate.

      I live in the Bay Area so I set timezone TZ to America/Los_Angeles. You can find yours here.

      Once you’re done, hit Save and you should be returned to your list of Docker compose files. Click on the DDClient entry (which should turn it yellow) and press the (up) button. This will create the container, download any files needed, and run DDClient. Now, it is ready for configuration.
    3. Configure DDClient to work with your domain provider. While the precise configuration of DDClient will vary by domain provider, the process will always involve editing a text file. To do this, login to your server using SSH or WeTTy (see the section above on Installing OMV-Extras) and enter into the command line:
      nano <absolute path to shared config folder>/ddclient/ddclient.conf
      Remember to substitute <absolute path to shared config folder> with the absolute path to the config folder you set up for your applications (which you can access by going to [Storage > Shared Folders] in the administrative panel).

      This will open up Linux’s native text editor. Scroll to the very bottom and enter the configuration information that your domain provider requires for DynamicDNS to work. As I use Namecheap, I followed these instructions. In general, you’ll need to supply some type of information about the protocol, the server, your login / password for the domain provider, and the subdomain you intend to map to your IP address.

      Then press Ctrl+X to exit, press Y when asked if you want to save, and finally Enter to confirm that you want to overwrite the old file.
    4. Set up Port Forwarding on your router. Dynamic DNS gives devices outside of your network a consistent “address” to get to your server but it won’t do any good if your router doesn’t pass those external requests through. In this case, you’ll need to tell your router to let incoming UDP requests from port 51820 through to your server to line up with Wireguard’s defaults.

      The exact instructions will vary by router so you’ll need to consult your router’s documentation. In my household, we use Google Wifi and, if you do too, here are the instructions for doing so.
    5. Enable Wireguard. If you installed OMV-Extras above as I suggested, you’ll have access to a Plugin that turns on Wireguard. Go to [System > Plugins] on the administrative panel and then search or scroll down until you find the entry for openmediavault-wireguard. Click on it to mark it yellow and then press the button to install it.

      Now go to [Services > Wireguard > Tunnels] and press the (create) button to set up a VPN tunnel. You can give it any Name you want (i.e. omv-vpn). Select your server’s main network connection for Network adapter. But, most importantly, under Endpoint, add the domain you just configured for DynamicDNS/DDClient (for example, vpn.myurl.com). Press Save
    6. Set up Wireguard on your devices. With a Wireguard tunnel configured, your next step is to set up the devices (called clients or peers) to connect. This has two parts.

      First, install the Wireguard applications on the devices themselves. Go to wireguard.com/install and download or set up the Wireguard apps. There are apps for Windows, MacOS, Android, iOS, and many flavors of Linux

      Then, go back into your administrative panel and go to [Services > Wireguard > Clients] and press the (create) button to create a valid client for the VPN. Check the box next to Enable, select the tunnel you just created under Tunnel number, put a name for the device you’re going to connect under Name, and assign a unique (or it will not work) client number in Client Number . Press Save and you’ll be brought back to the Client list. Make sure to approve the change and then press the (client config) button. What you should do next depends on what kind of client device you’re configuring.

      If the device you’re configuring is not a smartphone (i.e. a computer), copy the text that shows up in the Client Config popup that comes up and save that as a .conf file (for example: work_laptop_wireguard.conf). Send that file to the device in question as that file will be used by the Wireguard app on that device to configure and access the VPN. Hit Close when you’re done

      If the device you’re configuring is a smartphone, hit Close button on the Client Config popup that comes up as you will be presented with a QR code that your smartphone Wireguard app can capture to configure the VPN connection.

      Now go into your Wireguard app on the client device and use it to either take a picture of the QR code when prompted or load the .conf file. Your device is now configured to connect to your server securely no matter where you are. A good test of this is to disconnect a set up smartphone from your home WiFi and enable the VPN. Since you’re no longer on WiFi you should not be on the same network as your server. If you can enter http://your-ip-address in this mode into a browser and still reach the administrative panel for OpenMediaVault, you’re home free!

      One additional note: by default, Wireguard also acts as a proxy, meaning all internet traffic you send from the device will be routed through the server. This can be valuable if you’re trying to access a blocked website or pretend to be from a different location, but it can also be unnecessarily slow (and bandwidth consuming). I have my Wireguard configured to only route traffic that is going to my server’s local IP address through Wireguard. You can do this by configuring your client device’s Allowed IPs to your-ip-address (for example: 192.168.99.99) from the Wireguard app.

    Congratulations, you have now configured a file server and media server that you can securely access from anywhere!

    Concluding Thoughts

    A few concluding thoughts:

    1. This was probably way too complicated for most people. Believe it or not, what was written above is a shortened version of what I went through. Even holding aside that use of the command line and Docker automatically makes this hard for many consumers, I still had to deal with missing drivers, Linux not recognizing my USB drive through the USB C port (but through the USB A one?), puzzling over different external access configurations (VPN vs Let’s Encrypt SSL on my server vs self-sign certificate), and minimal feedback when my initial attempts to use Wireguard failed. While I learned a great deal, for most people, it makes more sense to go completely third party (i.e. use Google / Amazon / Apple for everything) or, if you have some pain tolerance, with a high-end NAS.
    2. Docker/containerization is extremely powerful. Prior to this, I had thought of Docker as just a “flavor” of virtual machine, a software technology underlying cloud computing which abstracts server software from server hardware. And, while there is some overlap, I completely misunderstood why containers were so powerful for software deployment. By using 3 fairly simple blocks of text, I was able to deploy 3 complicated applications which needed different levels of hardware and network access (Ubooquity, DDClient, Plex) in minutes without issue.
    3. I was pleasantly surprised by how helpful the blogs and forums were. While the amount of work needed to find the right advice can be daunting, every time I ran into an issue, I was able to find some guidance online (often in a forum or subreddit). While there were certainly … abrasive personalities, by in large many of the questions being asked were by non-experts and they were answered by experts showing patience and generosity of spirit. Part of the reason I wrote this is to pay this forward for the next set of people who want to experiment with setting up their own server.
    4. I am excited to try still more applications. Lists about what hobbyists are running on their home servers like this and this and this make me very intrigued by the possibilities. I’m currently considering a network-wide adblocker like Pi-Hole and backup tools like BorgBackup. There is a tremendous amount of creativity out there!

    For more help on setting any of this stuff up, here are a few additional resources that proved helpful to me:

    (If you’re interested in how to setup a home server on OpenMediaVault or how to self-host different services, check out all my posts on the subject)

  • It’s not just the GOP who misunderstands Section 230

    Source: NPR

    Section 230 of the Communications Decency Act has been rightfully called “the twenty-six words that created the Internet.” It is a valuable legal shield which allows internet hosts and platforms the ability to distribute user-generated content and practice moderation without unreasonable fear of being sued, something which forms the basis of all social media, user review, and user forum, and internet hosting services.

    In recent months, as big tech companies have drawn greater scrutiny for the role they play in shaping our discussions, Section 230 has become a scapegoat for many of the ills of technology. Until 2021, much of that criticism has come from the Republican Party who argue incorrectly that it promotes bias on platforms with President Trump even vetoing unrelated defense legislation because it did not repeal Section 230.

    So, it’s refreshing (and distressing) to see the Democrats now take their turn in misunderstanding what Section 230 does for the internet. This critique is based mainly on Senator Mark Warner’s proposed changes to Section 230 and the FAQ his office posted about the SAFE TECH act he (alongside Senators Hirono and Klobuchar) is proposing but apply to many commentators from the Democratic Party and the press which seems to have misunderstood the practical implications and have received this positively.

    While I think it’s reasonable to modify Section 230 to obligate platforms to help victims of clearly heinous acts like cyberstalking, swatting, violent threats, and human rights violations, what the Democratic Senators are proposing goes far beyond that in several dangerous ways.

    First, Warner and his colleagues have proposed carving out from Section 230 all content which accompanies payment (see below). While I sympathize with what I believe was the intention (to put a different bar on advertisements), this is remarkably short-sighted, because Section 230 applies to far more than companies with ad / content moderation policies Democrats dislike such as Facebook, Google, and Twitter.

    Source: Mark Warner’s “redlines” of Section 230; highlighting is mine

    It also encompasses email providers, web hosts, user generated review sites, and more. Any service that currently receives payment (for example: a paid blog hosting service, any eCommerce vendor who lets users post reviews, a premium forum, etc) could be made liable for any user posted content. This would make it legally and financially untenable to host any potentially controversial content.

    Secondly, these rules will disproportionately impact smaller companies and startups. This is because these smaller companies lack the resources that larger companies have to deal with the new legal burdens and moderation challenges that such a change to Section 230 would call for. It’s hard to know if Senator Warner’s glip answer in his FAQ that people don’t litigate small companies (see below) is ignorance or a willful desire to mislead, but ask tech startups how they feel about patent trolls and whether or not being small protects them from frivolous lawsuits

    Source: Mark Warner’s FAQ on SAFE TECH Act; highlighting mine

    Third, the use of the language “affirmative defense” and “injunctive relief” may have far-reaching consequences that go beyond minor changes in legalese (see below). By reducing Section 230 from an immunity to an affirmative defense, it means that companies hosting content will cease to be able to dismiss cases that clearly fall within Section 230 because they now have a “burden of [proof] by a preponderance of the evidence.”

    Source: Mark Warner’s “redlines” of Section 230; highlighting is mine

    Similarly, carving out “injunctive relief” from Section 230 protections (see below) means that Section 230 doesn’t apply if the party suing is only interested in taking something down (but not financial damages)

    Source: Mark Warner’s “redlines” of Section 230

    I suspect the intention of these clauses is to make it harder for large tech companies to dodge legitimate concerns, but what this practically means is that anyone who has the money to pursue legal action can simply tie up any internet company or platform hosting content that they don’t like.

    That may seem like hyperbole, but this is what happened in the UK until 2014 where libel / slander laws making it easy for wealthy individuals and corporations to sue anyone for negative press due to weak protections. Imagine Jeffrey Epstein being able to sue any platform for carrying posts or links to stories about his actions or any individual for forwarding an unflattering email about him.

    There is no doubt that we need new tools and incentives (both positive and negative) to tamp down on online harms like cyberbullying and cyberstalking, and that we need to come up with new and fair standards for dealing with “fake news”. But, it is distressing that elected officials will react by proposing far-reaching changes that show a lack of thoughtfulness as it pertains to how the internet works and the positives of existing rules and regulations.

    It is my hope that this was only an early draft that will go through many rounds of revisions with people with real technology policy and technology industry expertise.

  • Mea Culpa

    Mea culpa.

    I’ve been a big fan of moving my personal page over to AWS Lightsail. But, if I had one complaint, it’s the dangerous combination of (1) their pre-packaged WordPress image being hard to upgrade software on and (2) the training-wheel-lacking full root access that Lightsail gives to its customers. That combination led me to make some regrettable mistakes yesterday which resulted in the complete loss of my old blog posts and pages.

    It’s the most painful when you know your problems are your own fault. Thankfully, with the very same AWS Lightsail, it’s easy enough to start up a new WordPress instance. With the help of site visit and search engine analytics, I’ve prioritized the most popular posts and pages to resurrect using Google’s cache.

    Unfortunately, that process led to my email subscribers receiving way too many emails from me as I recreated each post. For that, I’m sorry — mea culpa — it shouldn’t happen again.

    I’ve come to terms with the fact that I’ve lost the majority of the 10+ years of content I’ve created. But, I’ve now learned the value of systematically backing up things (especially my AWS Lightsail instance), and hopefully I’ll write some good content in the future to make up for what was lost.

  • Using AI to Predict if a Paper will be in a Top-Tier Journal

    (Image credit: Intel)

    I have been doing some work in recent months with Dr. Sophia Wang at Stanford applying deep learning/AI techniques to make predictions using notes written by doctors in electronic medical records (EMR). While the mathematics behind the methods can be very sophisticated, tools like Tensorflow and Keras make it possible for people without formal training to apply them more broadly. I wanted to share some of what I’ve learned to help out those who want to start with similar work but are having trouble with getting started.

    For this tutorial (all code available on Github), we’ll write a simple algorithm to predict if a paper, based solely on its abstract and title, is one published in one of the ophthalmology field’s top 15 journals (as gauged by h-index from 2014-2018). It will be trained and tested on a dataset comprising every English-language ophthalmology-related article with an abstract in Pubmed (the free search engine operated by NIH covering practically all life sciences-related papers) published from 2010 to 2019. It will also incorporate some features I’ve used on multiple projects but which seem to be lacking in good tutorials online such as using multiple input models with tf.keras and tf.data, using the same embedding layer on multiple input sequences, and using padded batches with tf.data to incorporate sequence data. This piece also assumes you know the basics of Python 3 (and Numpy) and have installed Tensorflow 2 (with GPU support), BeautifulSoup, lxml, and Tensorflow Datasets.

    Ingesting Data from Pubmed

    Update: 21 Jul 2020 – It’s recently come to my attention that Pubmed turned on a new interface starting May 18 where the ability to download XML records in bulk for a query has been disabled. As a result the instructions below will no longer work to pull the data necessary for the analysis. I will need to do some research on how to use the E-utilities API to get the same data and will update once I’ve figured that out. The model code (provided you have the titles and abstracts and journal names extracted in text files) will still work, however.

    To train an algorithm like this one, we need a lot of data. Thankfully, Pubmed makes it easy to build a fairly complete dataset of life sciences-related language content. Using the National Library of Medicine’s MeSH Browser, which maintains a “knowledge tree” showing how different life sciences subjects are related, I found four MeSH terms which covered the Ophthalmology literature: “Eye Diseases“, “Ophthalmology“, “Ocular Physiological Phenomena“, and “Ophthalmologic Surgical Procedures“. These can be entered into the Pubmed advanced search interface and the search filters on the left can be used narrow down to the relevant criteria (English language, Human species, published from Jan 2010 to Dec 2019, have Abstract text, and a Journal Article or a Review paper):

    We can download the resulting 138,425 abstracts (and associated metadata) as a giant XML file using the “Send To” in the upper-right (see screenshot below). The resulting file is ~1.9 GB (so give it some time)

    A 1.9 GB XML file is unwieldy and not in an ideal state for use in a model, so we should first pre-process the data to create smaller text files that will only have the information we need to train and test the model. The Python script below reads each line of the XML file, one-by-one, and each time it sees the beginning of a new entry, it will parse the previous entry using BeautifulSoup (and the lxml parser that it relies on) and extract the abstract, title, and journal name as well as build up a list of words (vocabulary) for the model.

    The XML format that Pubmed uses is relatively basic (article metadata is wrapped in <PubmedArticle> tags, titles are wrapped in <ArticleTitle> tags, abbreviated journal names are in <MedlineTA> tags, etc.). However, the abstracts are not always stored in the exact same way (sometimes in <Abstract> tags, sometimes in <OtherAbstract> tags, and sometimes divided between multiple <AbstractText> tags), so much of the code is designed to handle those different cases:

    After parsing the XML, every word in the corpus that shows up at least 25 times (smallestfreq) is stored in a vocabulary list (which will be used later to convert words into numbers that a machine learning algorithm can consume), and the stored abstracts, titles, and journal names are shuffled before being written (one per line) to different text files.

    Looking at the resulting files, its clear that the journals Google Scholar identified as a top 15 journal in ophthalmology are some of the more prolific journals in the dataset (making up 8 of the 10 journals with the most entries). Of special note, ~21% of all articles in the dataset were published in one of the top 15 journals:

    JournalShort NameTop 15 Journal?Articles as % of Dataset
    Investigative Ophthalmology & Visual ScienceInvest Ophthalmol Vis SciYes3.63%
    PLoS ONEPLoS OneNo2.84%
    OphthalmologyOphthalmologyYes1.99%
    American Journal of OphthalmologyAm J OphthalmolYes1.99%
    British Journal of OphthalmologyBr J OphthalmolYes1.95%
    CorneaCorneaYes1.90%
    RetinaRetinaYes1.75%
    Journal of Cataract & Refractive SurgeryJ Cataract Refract SurgYes1.64%
    Graefe’s Archive for Clinical and Experimental Ophthalmology
    Graefes Arch Clin Exp OphthalmolNo1.59%
    Acta OphthalmologicaActa OphthalmolYes1.40%
    All Top 15 Journals~21.3%
    10 Most Prolific Journals in Pubmed query and Total % of Articles from Top 15 (by H-index) Ophthalmology Journals

    Building a Model Using Tensorflow and Keras

    Translating even a simple deep learning idea into code can be a nightmare with all the matrix calculus that needs to done. Luckily, the AI community has developed tools like Tensorflow and Keras to make this much easier (doubly so now that Tensorflow has chosen to adopt Keras as its primary API in tf.keras). It’s now possible for programmers without formal training (let alone knowledge of what matrix calculus is or how it works) to apply deep learning methods to a wide array of problems. While the quality of documentation is not always great, the abundance of online courses and tutorials (I personally recommend DeepLearning.ai’s Coursera specialization) bring these methods within reach for a self-learner willing to “get their hands dirty.”

    As a result, while we could focus on all the mathematical details of how the model architecture we’ll be using works, the reality is its unnecessary. What we need to focus on are what the main components of the model are and what they do:

    Model Architecture
    1. The model converts the words in the title into vectors of numbers called Word Embeddings using the Keras Embedding layer. This provides the numerical input that a mathematical model can understand.
    2. The sequence of word embeddings representing the abstract is then fed to a bidirectional recurrent neural network based on Gated Recurrent Units (enabled by using a combination of the Keras Bidirectional layer wrapper and the Keras GRU layer). This is a deep learning architecture that is known to be good at understanding sequences of things, something which is valuable in language tasks (where you need to differentiate between “the dog sat on the chair” and “the chair sat on the dog” even though they both use the same words).
    3. The Bidirectional GRU layer outputs a single vector of numbers (actually two which are concatenated but that is done behind the scenes) which is then fed through a Dropout layer to help reduce overfitting (where an algorithm learns to “memorize” the data it sees instead of a relationship).
    4. The result of step 3 is then fed through a single layer feedforward neural network (using the Keras Dense layer) which results in another vector which can be thought of as “the algorithm’s understanding of the title”
    5. Repeat steps #1-4 (using the same embedding layer from #1) with the words in the abstract
    6. Combine the outputs for the abstract (step 4) and title (step 5) by literally sticking the two vectors together to make one larger vector — and then run this combination through a 2-layer feedforward neural network (which will “combine” the “understanding” the algorithm has developed of both the abstract and the title) with an intervening Dropout layer (to guard against overfitting).
    7. The final layer should output a single number using a sigmoid activation because the model is trying to learn to predict a binary outcome (is this paper in a top-tier journal [1] or not [0])

    The above description skips a lot of the mathematical detail (i.e. how does a GRU work, how does Dropout prevent overfitting, what mathematically happens in a feedforward neural network) that other tutorials and papers cover at much greater length. It also skims over some key implementation details (what size word embedding, what sort of activation functions should we use in the feedforward neural network, what sort of random variable initialization, what amount of Dropout to implement).

    But with a high level framework like tf.keras, those details become configuration variables where you either accept the suggested defaults (as we’ve done with random variable initialization and use of biases) or experiment with values / follow convention to find something that works well (as we’ve done with embedding dimension, dropout amount, and activation function). This is illustrated by how relatively simple the code to outline the model is (just 22 lines if you leave out the comments and extra whitespace):

    Building a Data Pipeline Using tf.data

    Now that we have a model, how do we feed the data previously parsed from Pubmed into it? To handle some of the complexities AI researchers regularly run into with handling data, Tensorflow released tf.dataa framework for building data pipelines to handle datasets that are too large to fit in memory and/or where there is significant pre-processing work that needs to happen.

    We start by creating two functions

    1. encode_journal which takes a journal name as an input and returns a 1 if its a top ophthalmology journal and a 0 if it isn’t (by doing a simple comparison with the right list of journal names)
    2. encode_text which takes as inputs the title and the abstract for a given journal article and converts them into a list of numbers which the algorithm can handle. It does this by using the TokenTextEncoder function that is provided by the Tensorflow Datasets library which takes as an input the vocabulary list which we created when we initially parsed the Pubmed XML

    These methods will be used in our data pipeline to convert the inputs into something usable by the model (as an aside: this is why you see the .numpy() in encode_text — its used to convert the tensor objects that tf.data will pass to them into something that can be used by the model)

    Because of the way that Tensorflow operates, encode_text and encode_journal need to be wrapped in tf.py_function calls (which let you run “normal” Python code on Tensorflow graphs) which is where encode_text_map_fn and encode_journal_map_fn (see code snippet below) come in.

    Finally, to round out the data pipeline, we:

    1. Use tf.data.TextLineDataset to ingest the text files where the parsed titles, abstracts, and journal names reside
    2. Use the tf.data.Dataset.zip method to combine the title and abstract datasets into a single input dataset (input_dataset).
    3. Use input_dataset‘s map method to apply encode_text_map_fn so that the model will consume the inputs as lists of numbers
    4. Take the journal name dataset (journal_dataset) and apply its map method to apply encode_journal_map_fn so that the model will consume the inputs as 1’s or 0’s depending on if the journal is one of the top 15
    5. Use the tf.data.Dataset.zip method to combine the input (input_dataset) with the output (journal_dataset) in a single dataset that our model can use

    To help the model generalize, its a good practice to split the data into four groups to avoid biasing the algorithm training or evaluation on data it has already seen (i.e. why a good teacher makes the tests related to but not identical to the homework), mainly:

    1. The training set is the data our algorithm will learn from (and, as a result, should be the largest of the four).
    2. (I haven’t seen a consistent name for this, but I create) a stoptrain set to check on the training process after each epoch (a complete run through of the training set) so as to stop training if the resulting model starts to overfit the training set.
    3. The validation set is the data we’ll use to compare how different model architectures and configurations are doing once they’ve completed training.
    4. The hold-out set or test set is what we’ll use to gauge how our final algorithm performs. It is called a hold-out set because its not to be used until the very end so as to make it a truly fair benchmark.

    tf.data makes this step very simple (using skip — to skip input entries — and take which, as its name suggests, takes a given number of entries). Lastly, tf.data also provides batching methods like padded_batch to normalize the length of the inputs (since the different abstracts and titles will have different lengths, we will truncating or pad each title to be 72 words and 200 words long, respectively) between the batches of 100 articles that the algorithm will train on successively:

    Training and Testing the Model

    Now that we have both a model and a data pipeline, training and evaluation is actually relatively straightforward and involves specifying which metrics to track as well as specifics on how the training should take place:

    • Because the goal is to gauge how good the model is, I’ve asked the model to report on four metrics (Sensitivity/Recall [what fraction of journal articles from the top 15 did you correctly get], Precision [what fraction of the journal articles that you predicted would be in the top 15 were actually correct], Accuracy [how often did the model get the right answer], and AUROC [a measure of how good your model trades off between sensitivity and precision]) as the algorithm trains
    • The training will use the Adam optimizer (a popular, efficient training approach) applied to a binary cross-entropy loss function (which makes sense as the algorithm is making a yes/no binary prediction).
    • The model is also set to stop training once the stoptrain set shows signs of overfitting (using tf.keras.callbacks.EarlyStopping in callbacks)
    • The training set (train_dataset), maximum number of epochs (complete iterations through the training set), and the stoptrain set (stoptrain_dataset) are passed to model.fit to start the training
    • After training, the model can be evaluated on the validation set (validation_dataset) using model.evaluate:

    After several iterations on model architecture and parameters to find a good working model, the model can finally be evaluated on the holdout set (test_dataset) to see how it would perform:

    Results

    Your results will vary based on the exact shuffle of the data, which initial random variables your algorithm started training with, and a host of other factors, but when I ran it, training usually completed in 2-3 epochs, with performance resembling the data table below:

    StatisticValue
    Accuracy87.2%
    Sensitivity/Recall64.9%
    Precision72.7%
    AUROC91.3%

    A different way of assessing the model is by showing its ROC (Receiver Operating Characteristic) curve, the basis for the AUROC (area under the ROC curve) number and a visual representation of the tradeoff the model can make between True Positives (on the y-axis) and False Positives (on the x-axis) as compared with a purely random guess (blue vs red). At >91% AUROC (max: 100%, min: 50%), the model outperforms many common risk scores, let alone a random guess:

    Interestingly, despite the model’s strong performance (both AUROC and the point estimates on sensitivity, precision, and accuracy), it wasn’t immediately apparent to me, or a small sample of human scientists who I polled, what the algorithm was looking for when I shared a set of very high scoring and very low scoring abstracts and titles. This is one of the quirks and downsides of many AI approaches — their “black box” nature — and one in which followup analysis may reveal more.

    Special thanks to Sophia Wang and Anthony Phan for reviewing abstracts and reading an early version of this!

    Link to GitHub page with all code

  • Calculating the Financial Returns to College

    Despite the recent spotlight on the staggering $1.5 trillion in student debt that 44 million Americans owe in 2019, there has been surprisingly little discussion on how to measure the value of a college education relative to its rapidly growing price tag (which is the reason so many take on debt to pay for it).

    Source: US News

    While it’s impossible to quantify all the intangibles of a college education, the tools of finance offers a practical, quantitative way to look at the tangible costs and benefits which can shed light on (1) whether to go to college / which college to go to, (2) whether taking on debt to pay for college is a wise choice, and (3) how best to design policies around student debt.

    The below briefly walks through how finance would view the value of a college education and the soundness of taking on debt to pay for it and how it can help guide students / families thinking about applying and paying for colleges and, surprisingly, how there might actually be too little college debt and where policy should focus to address some of the issues around the burden of student debt.

    The Finance View: College as an Investment

    Through the lens of finance, the choice to go to college looks like an investment decision and can be evaluated in the same way that a company might evaluate investing in a new factory. Whereas a factory turns an upfront investment of construction and equipment into profits on production from the factory, the choice to go to college turns an upfront investment of cash tuition and missed salary while attending college into higher after-tax wages.

    Finance has come up with different ways to measure returns for an investment, but one that is well-suited here is the internal rate of return (IRR). The IRR boils down all the aspects of an investment (i.e., timing and amount of costs vs. profits) into a single percentage that can be compared with the rates of return on another investment or with the interest rate on a loan. If an investment’s IRR is higher than the interest rate on a loan, then it makes sense to use the loan to finance the investment (i.e., borrowing at 5% to make 8%), as it suggests that, even if the debt payments are relatively onerous in the beginning, the gains from the investment will more than compensate for it.

    To gauge what these returns look like, I put together a Google spreadsheet which generated the figures and charts below (this article in Investopedia explains the math in greater detail). I used publicly available data around wages (from the 2017 Current Population SurveyGoBankingRate’s starting salaries by school, and National Association of Colleges and Employer’s starting salaries by major), tax brackets (using the 2018 income tax), and costs associated with college (from College Board’s statistics [PDF] and the Harvard admissions website). To simplify the comparisons, I assumed a retirement age of 65, and that nobody gets a degree more advanced than a Bachelor’s.

    To give an example: if Sally Student can get a starting salary after college in line with the average salary of an 18-24 year old Bachelor’s degree-only holder ($47,551), would have earned the average salary of an 18-24 year old high school diploma-only holder had she not gone to college ($30,696), and expects wage growth similar to what age-matched cohorts saw from 1997-2017, then the IRR of a 4-year degree at a non-profit private school if Sally pays the average net (meaning after subtracting grants and tax credits) tuition, fees, room & board ($26,740/yr in 2017, or a 4-year cost of ~$106,960), the IRR of that investment in college would be 8.1%.

    How to Benchmark Rates of Return

    Is that a good or a bad return? Well, in my opinion, 8.1% is pretty good. Its much higher than what you’d expect from a typical savings account (~0.1%) or a CD or a Treasury Bond (as of this writing), and is also meaningfully higher than the 5.05% rate charged for federal subsidized loans for 2018-2019 school year — this means borrowing to pay for college would be a sensible choice. That being said, its not higher than the stock market (the S&P500 90-year total return is ~9.8%) or the 20% that you’d need to get into the top quartile of Venture Capital/Private Equity funds [PDF].

    What Drives Better / Worse Rates of Return

    Playing out different scenarios shows which factors are important in determining returns. An obvious factor is the cost of college:

    T&F: Tuition & Fees; TFR&B: Tuition, Fees, Room & Board
    List: Average List Price; Net: Average List Price Less Grants and Tax Benefits
    Blue: In-State Public; Green: Private Non-Profit; Red: Harvard

    As evident from the chart, there is huge difference between the rate of return Sally would get if she landed the same job but instead attended an in-state public school, did not have to pay for room & board, and got a typical level of financial aid (a stock-market-beating IRR of 11.1%) versus the world where she had to pay full list price at Harvard (IRR of 5.3%). In one case, attending college is a fantastic investment and Sally borrowing money to pay for it makes great sense (investors everywhere would love to borrow at ~5% and get ~11%). In the other, the decision to attend college is less straightforward (financially), and it would be very risky for Sally to borrow money at anything near subsidized rates to pay for it.

    Some other trends jump out from the chart. Attending an in-state public university improves returns for the average college wage-earner by 1-2% compared with attending private universities (comparing the blue and green bars). Getting an average amount of financial aid (paying net vs list) also seems to improve returns by 0.7-1% for public schools and 2% for private.

    As with college costs, the returns also understandably vary by starting salary:

    There is a night and day difference between the returns Sally would see making $40K per year (~$10K more than an average high school diploma holder) versus if she made what the average Caltech graduate does post-graduation (4.6% vs 17.9%), let alone if she were to start with a six-figure salary (IRR of over 21%). If Sally is making six figures, she would be making better returns than the vast majority of venture capital firms, but if she were starting at $40K/yr, her rate of return would be lower than the interest rate on subsidized student loans, making borrowing for school financially unsound.

    Time spent in college also has a big impact on returns:

    Graduating sooner not only reduces the amount of foregone wages, it also means earning higher wages sooner and for more years. As a result, if Sally graduates in two years while still paying for four years worth of education costs, she would experience a higher return (12.6%) than if she were to graduate in three years and save one year worth of costs (11.1%)! Similarly, if Sally were to finish school in five years instead of four, this would lower her returns (6.3% if still only paying for four years, 5.8% if adding an extra year’s worth of costs). The result is that an extra / less year spent in college is a ~2% hit / boost to returns!

    Finally, how quickly a college graduate’s wages grow relative to a high school diploma holder’s also has a significant impact on the returns to a college education:

    Census/BLS data suggests that, between 1997 and 2017, wages of bachelor’s degree holders grew faster on an annualized basis by ~0.7% per year than for those with only a high school diploma (6.7% vs 5.8% until age 35, 4.0% vs 3.3% for ages 35-55, both sets of wage growth appear to taper off after 55).

    The numbers show that if Sally’s future wages grew at the same rate as the wages of those with only a high school diploma, her rate of return drops to 5.3% (just barely above the subsidized loan rate). On the other hand, if Sally’s wages end up growing 1% faster until age 55 than they did for similar aged cohorts from 1997-2017, her rate of return jumps to a stock-market-beating 10.3%.

    Lessons for Students / Families

    What do all the charts and formulas tell a student / family considering college and the options for paying for it?

    First, college can be an amazing investment, well worth taking on student debt and the effort to earn grants and scholarships. While there is well-founded concern about the impact that debt load and debt payments can have on new graduates, in many cases, the financial decision to borrow is a good one. Below is a sensitivity table laying out the rates of return across a wide range of starting salaries (the rows in the table) and costs of college (the columns in the table) and color codes how the resulting rates of return compare with the cost of borrowing and with returns in the stock market (red: risky to borrow at subsidized rates; white: does make sense to borrow at subsidized rates but it’s sensible to be mindful of the amount of debt / rates; green: returns are better than the stock market).

    Except for graduates with well below average starting salaries (less than or equal to $40,000/yr), most of the cells are white or green. At the average starting salary, except for those without financial aid attending a private school, the returns are generally better than subsidized student loan rates. For those attending public schools with financial aid, the returns are better than what you’d expect from the stock market.

    Secondly, there are ways to push returns to a college education higher. They involve effort and sometimes painful tradeoffs but, financially, they are well worth considering. Students / families choosing where to apply or where to go should keep in mind costs, average starting salaries, quality of career services, and availability of financial aid / scholarships / grants, as all of these factors will have a sizable impact on returns. After enrollment, student choices / actions can also have a meaningful impact: graduating in fewer semesters/quarters, taking advantage of career resources to research and network into higher starting salary jobs, applying for scholarships and grants, and, where possible, going for a 4th/5th year masters degree can all help students earn higher returns to help pay off any debt they take on.

    Lastly, use the spreadsheet*! The figures and charts above are for a very specific set of scenarios and don’t factor in any particular individual’s circumstances or career trajectory, nor is it very intelligent about selecting what the most likely alternative to a college degree would be. These are all factors that are important to consider and may dramatically change the answer.

    *To use the Google Sheet, you must be logged into a Google account; use the “Make a Copy” command in the File menu to save a version to your Google Drive and edit the tan cells with red numbers in them to whatever best matches your situation and see the impact on the yellow highlighted cells for IRR and the age when investment pays off

    Implications for Policy on Student Debt

    Given the growing concerns around student debt and rising tuitions, I went into this exercise expecting to find that the rates of return across the board would be mediocre for all but the highest earners. I was (pleasantly) surprised to discover that a college graduate earning an average starting salary would be able to achieve a rate of return well above federal loan rates even at a private (non-profit) university.

    While the rate of return is not a perfect indicator of loan affordability (as it doesn’t account for how onerous the payments are compared to early salaries), the fact that the rates of return are so high is a sign that, contrary to popular opinion, there may actually be too little student debt rather than too much, and that the right policy goal may actually be to find ways to encourage the public and private sector to make more loans to more prospective students.

    As for concerns around affordability, while proposals to cancel all student debt plays well to younger voters, the fact that many graduates are enjoying very high returns suggests that such a blanket policy is likely unnecessary, anti-progressive (after all, why should the government zero out the costs on high-return investments for the soon-to-be upper and upper-middle-classes), and fails to address the root cause of the issue (mainly that there shouldn’t be institutions granting degrees that fail to be good financial investments). Instead, a more effective approach might be:

    • Require all institutions to publish basic statistics (i.e. on costs, availability of scholarships/grants, starting salaries by degree/major, time to graduation, etc.) to help students better understand their own financial equation
    • Hold educational institutions accountable when too many students graduate with unaffordable loan burdens/payments (i.e. as a fraction of salary they earn and/or fraction of students who default on loans) and require them to make improvements to continue to qualify for federally subsidized loans
    • Making it easier for students to discharge student debt upon bankruptcy and increasing government oversight of collectors / borrower rights to prevent abuse
    • Government-supported loan modifications (deferrals, term changes, rate modifications, etc.) where short-term affordability is an issue (but long-term returns story looks good); loan cancellation in cases where debt load is unsustainable in the long-term (where long-term returns are not keeping up) or where debt was used for an institution that is now being denied new loans due to unaffordability
    • Making the path to public service loan forgiveness (where graduates who spend 10 years working for non-profits and who have never missed an interest payment get their student loans forgiven) clearer and addressing some of the issues which have led to 99% of applications to date being rejected

    Special thanks Sophia Wang, Kathy Chen, and Dennis Coyle for reading an earlier version of this and sharing helpful comments!

    Thought this was interesting or helpful? Check out some of my other pieces on investing / finance.

  • Lyft vs Uber: A Tale of Two S-1’s

    You can learn a great deal from reading and comparing the financial filings of two close competitors. Tech-finance nerd that I am, you can imagine how excited I was to see Lyft’s and Uber’s respective S-1’s become public within mere weeks of each other.

    While the general financial press has covered a lot of the top-level figures on profitability (or lack thereof) and revenue growth, I was more interested in understanding the unit economics — what is the individual “unit” (i.e. a user, a sale, a machine, etc.) of the business and what does the history of associated costs and revenues say about how the business will (or will not) create durable value over time.

    For two-sided regional marketplaces like Lyft and Uber, an investor should understand the full economic picture for (1) the users/riders, (2) the drivers, and (3) the regional markets. Sadly, their S-1’s don’t make it easy to get much on (2) or (3) — probably because the companies consider the pertinent data to be highly sensitive information. They did, however, provide a fair amount of information on users/riders and rides and, after doing some simple calculations, a couple of interesting things emerged

    Uber’s Users Spend More, Despite Cheaper Rides

    As someone who first knew of Uber as the UberCab “black-car” service, and who first heard of Lyft as the Zimride ridesharing platform, I was surprised to discover that Lyft’s average ride price is significantly more expensive than Uber’s and the gap is growing! In Q1 2017, Lyft’s average bookings per ride was $11.74 and Uber’s was $8.41, a difference of $3.33. But, in Q4 2018, Lyft’s average bookings per ride had gone up to $13.09 while Uber’s had declined to $7.69, increasing the gap to $5.40.

    Sources: Lyft S-1Uber S-1

    This is especially striking considering the different definitions that Lyft and Uber have for “bookings” — Lyft excludes “ pass-through amounts paid to drivers and regulatory agencies, including sales tax and other fees such as airport and city fees, as well as tips, tolls, cancellation, and additional fees” whereas Uber’s includes “ applicable taxes, tolls, and fees “. This gap is likely also due to Uber’s heavier international presence (where they now generate 52% of their bookings). It would be interesting to see this data on a country-by-country basis (or, more importantly, a market-by-market one as well).

    Interestingly, an average Uber rider appears to also take ~2.3 more rides per month than an average Lyft rider, a gap which has persisted fairly stably over the past 3 years even as both platforms have boosted the number of rides an average rider takes. While its hard to say for sure, this suggests Uber is either having more luck in markets that favor frequent use (like dense cities), with its lower priced Pool product vs Lyft’s Line product (where multiple users can share a ride), or its general pricing is encouraging greater use.

    Sources: Lyft S-1Uber S-1

    Note: the “~monthly” that you’ll see used throughout the charts in this post are because the aggregate data — rides, bookings, revenue, etc — given in the regulatory filings is quarterly, but the rider/user count provided is monthly. As a result, the figures here are approximations based on available data, i.e. by dividing quarterly data by 3

    What does that translate to in terms of how much an average rider is spending on each platform? Perhaps not surprisingly, Lyft’s average rider spend has been growing and has almost caught up to Uber’s which is slightly down.

    Sources: Lyft S-1Uber S-1

    However, Uber’s new businesses like UberEats are meaningfully growing its share of wallet with users (and nearly perfectly dollar for dollar re-opens the gap on spend per user that Lyft narrowed over the past few years). In 2018 Q4, the gap between the yellow line (total bookings per user, including new businesses) and the red line (total bookings per user just for rides) is almost $10 / user / month! Its no wonder that in its filings, Lyft calls its users “riders”, but Uber calls them “Active Platform Consumers”.

    Despite Pocketing More per Ride, Lyft Loses More per User

    Long-term unit profitability is more than just how much an average user is spending, its also how much of that spend hits a company’s bottom line. Perhaps not surprisingly, because they have more expensive rides, a larger percent of Lyft bookings ends up as gross profit (revenue less direct costs to serve it, like insurance costs) — ~13% in Q4 2018 compared with ~9% for Uber. While Uber’s has bounced up and down, Lyft’s has steadily increased (up nearly 2x from Q1 2017). I would hazard a guess that Uber’s has also increased in its more established markets but that their expansion efforts into new markets (here and abroad) and new service categories (UberEats, etc) has kept the overall level lower.

    Sources: Lyft S-1Uber S-1

    Note: the gross margin I’m using for Uber adds back a depreciation and amortization line which were separated to keep the Lyft and Uber numbers more directly comparable. There may be other variations in definitions at work here, including the fact that Uber includes taxes, tolls, and fees in bookings that Lyft does not. In its filings, Lyft also calls out an analogous “Contribution Margin” which is useful but I chose to use this gross margin definition to try to make the numbers more directly comparable.

    The main driver of this seems to be higher take rate (% of bookings that a company keeps as revenue) — nearly 30% in the case of Lyft in Q4 2018 but only 20% for Uber (and under 10% for UberEats)

    Sources: Lyft S-1Uber S-1

    Note: Uber uses a different definition of take rate in their filings based on a separate cut of “Core Platform Revenue” which excludes certain items around referral fees and driver incentives. I’ve chosen to use the full revenue to be more directly comparable

    The higher take rate and higher bookings per user has translated into an impressive increase in gross profit per user. Whereas Lyft once lagged Uber by almost 50% on gross profit per user at the beginning of 2017, Lyft has now surpassed Uber even after adding UberEats and other new business revenue to the mix.

    Sources: Lyft S-1Uber S-1

    All of this data begs the question, given Lyft’s growth and lead on gross profit per user, can it grow its way into greater profitability than Uber? Or, to put it more precisely, are Lyft’s other costs per user declining as it grows? Sadly, the data does not seem to pan out that way

    Sources: Lyft S-1Uber S-1

    While Uber had significantly higher OPEX (expenditures on sales & marketing, engineering, overhead, and operations) per user at the start of 2017, the two companies have since reversed positions, with Uber making significant changes in 2018 which lowered its OPEX per user spend to under $9 whereas Lyft’s has been above $10 for the past two quarters. The result is Uber has lost less money per user than Lyft since the end of 2017

    Sources: Lyft S-1Uber S-1

    The story is similar for profit per ride. Uber has consistently been more profitable since 2017, and they’ve only increased that lead since. This is despite the fact that I’ve included the costs of Uber’s other businesses in their cost per ride.

    Sources: Lyft S-1Uber S-1

    Does Lyft’s Growth Justify Its Higher Spend?

    One possible interpretation of Lyft’s higher OPEX spend per user is that Lyft is simply investing in operations and sales and engineering to open up new markets and create new products for growth. To see if this strategy has paid off, I took a look at the Lyft and Uber’s respective user growth during this period of time.

    Sources: Lyft S-1Uber S-1

    The data shows that Lyft’s compounded quarterly growth rate (CQGR) from Q1 2016 to Q4 2018 of 16.4% is only barely higher than Uber’s at 15.3% which makes it hard to justify spending nearly $2 more per user on OPEX in the last two quarters.

    Interestingly, despite all the press and commentary about #deleteUber, it doesn’st seem to have really made a difference in their overall user growth (its actually pretty hard to tell from the chart above that the whole thing happened around mid-Q1 2017).

    How are Drivers Doing?

    While there is much less data available on driver economics in the filings, this is a vital piece of the unit economics story for a two-sided marketplace. Luckily, Uber and Lyft both provide some information in their S-1’s on the number of drivers on each platform in Q4 2018 which are illuminating.

    Image for post
    Sources: Lyft S-1Uber S-1

    The average Uber driver on the platform in Q4 2018 took home nearly double what the average Lyft driver did! They were also more likely to be “utilized” given that they handled 136% more rides than the average Lyft driver and, despite Uber’s lower price per ride, saw more total bookings.

    It should be said that this is only a point in time comparison (and its hard to know if Q4 2018 was an odd quarter or if there is odd seasonality here) and it papers over many other important factors (what taxes / fees / tolls are reflected, none of these numbers reflect tips, are some drivers doing shorter shifts, what does this look like specifically in US/Canada vs elsewhere, are all Uber drivers benefiting from doing both UberEats and Uber rideshare, etc). But the comparison is striking and should be alarming for Lyft.

    Closing Thoughts

    I’d encourage investors thinking about investing in either to do their own deeper research (especially as the competitive dynamic is not over one large market but over many regional ones that each have their own attributes). That being said, there are some interesting takeaways from this initial analysis

    • Lyft has made impressive progress at increasing the value of rides on its platform and increasing the share of transactions it gets. One would guess that, Uber, within established markets in the US has probably made similar progress.
    • Despite the fact that Uber is rapidly expanding overseas into markets that face more price constraints than in the US, it continues to generate significantly better user economics and driver economics (if Q4 2018 is any indication) than Lyft.
    • Something happened at Uber at the end of 2017/start of 2018 (which looks like it coincides nicely with Dara Khosrowshahi’s assumption of CEO role) which led to better spending discipline and, as a result, better unit economics despite falling gross profits per user
    • Uber’s new businesses (in particular UberEats) have had a significant impact on Uber’s share of wallet.
    • Lyft will need to find more cost-effective ways of growing its business and servicing its existing users & drivers if it wishes to achieve long-term sustainability as its current spend is hard to justify relative to its user growth.

    Special thanks to Eric Suh for reading and editing an earlier version!

    Thought this was interesting or helpful? Check out some of my other pieces on investing / finance.

  • How to Regulate Big Tech

    There’s been a fair amount of talk lately about proactively regulating — and maybe even breaking up — the “Big Tech” companies.

    Full disclosure: this post discusses regulating large tech companies. I own shares in several of these both directly (in the case of Facebook and Microsoft) and indirectly (through ETFs that own stakes in large companies)

    Source: MIT Sloan

    Like many, I have become increasingly uneasy over the fact that a small handful of companies, with few credible competitors, have amassed so much power over our personal data and what information we see. As a startup investor and former product executive at a social media startup, I can especially sympathize with concerns that these large tech companies have created an unfair playing field for smaller companies.

    At the same time, though, I’m mindful of all the benefits that the tech industry — including the “tech giants” — have brought: amazing products and services, broader and cheaper access to markets and information, and a tremendous wave of job and wealth creation vital to may local economies. For that reason, despite my concerns of “big tech”‘s growing power, I am wary of reaching for “quick fixes” that might change that.

    As a result, I’ve been disappointed that much of the discussion has centered on knee-jerk proposals like imposing blanket stringent privacy regulations and forcefully breaking up large tech companies. These are policies which I fear are not only self-defeating but will potentially put into jeopardy the benefits of having a flourishing tech industry.

    The Challenges with Regulating Tech

    Technology is hard to regulate. The ability of software developers to collaborate and build on each other’s innovations means the tech industry moves far faster than standard regulatory / legislative cycles. As a result, many of the key laws on the books today that apply to tech date back decades — before Facebook or the iPhone even existed, making it important to remember that even well-intentioned laws and regulations governing tech can cement in place rules which don’t keep up when the companies and the social & technological forces involved change.

    Another factor which complicates tech policy is that the traditional “big is bad” mentality ignores the benefits to having large platforms. While Amazon’s growth has hurt many brick & mortar retailers and eCommerce competitors, its extensive reach and infrastructure enabled businesses like Anker and Instant Pot to get to market in a way which would’ve been virtually impossible before. While the dominance of Google’s Android platform in smartphones raised concerns from European regulators, its hard to argue that the companies which built millions of mobile apps and tens of thousands of different types of devices running on Android would have found it much more difficult to build their businesses without such a unified software platform. Policy aimed at “Big Tech” should be wary of dismantling the platforms that so many current and future businesses rely on.

    Its also important to remember that poorly crafted regulation in tech can be self-defeating. The most effective way to deal with the excesses of “Big Tech”, historically, has been creating opportunities for new market entrants. After all, many tech companies previously thought to be dominant (like Nokia, IBM, and Microsoft) lost their positions, not because of regulation or antitrust, but because new technology paradigms (i.e. smartphones, cloud), business models (i.e. subscription software, ad-sponsored), and market entrants (i.e. Google, Amazon) had the opportunity to flourish. Because rules (i.e. Article 13/GDPR) aimed at big tech companies generally fall hardest on small companies (who are least able to afford the infrastructure / people to manage it), its important to keep in mind how solutions for “Big Tech” problems affect smaller companies and new concepts as well.

    Framework for Regulating “Big Tech”

    If only it were so easy… Source: XKCD

    To be 100% clear, I’m not saying that the tech industry and big platforms should be given a pass on rules and regulation. If anything, I believe that laws and regulation play a vital role in creating flourishing markets.

    But, instead of treating “Big Tech” as just a problem to kill, I think we’d be better served by laws / regulations that recognize the limits of regulation on tech and, instead, focus on making sure emerging companies / technologies can compete with the tech giants on a level playing field. To that end, I hope to see more ideas that embrace the following four pillars:

    I. Tiering regulation based on size of the company

    Regulations on tech companies should be tiered based on size with the most stringent rules falling on the largest companies. Size should include traditional metrics like revenue but also, in this age of marketplace platforms and freemium/ad-sponsored business models, account for the number of users (i.e. Monthly Active Users) and third party partners.

    In this way, the companies with the greatest potential for harm and the greatest ability to bear the costs face the brunt of regulation, leaving smaller companies & startups with greater flexibility to innovate and iterate.

    II. Championing data portability

    One of the reasons it’s so difficult for competitors to challenge the tech giants is the user lock-in that comes from their massive data advantage. After all, how does a rival social network compete when a user’s photos and contacts are locked away inside Facebook?

    While Facebook (and, to their credit, some of the other tech giants) does offer ways to export user data and to delete user data from their systems, these tend to be unwieldy, manual processes that make it difficult for a user to bring their data to a competing service. Requiring the largest tech platforms to make this functionality easier to use (i.e., letting others import your contact list and photos with the ease in which you can login to many apps today using Facebook) would give users the ability to hold tech companies accountable for bad behavior or not innovating (by being able to walk away) and fosters competition by letting new companies compete not on data lock-in but on features and business model.

    III. Preventing platforms from playing unfairly

    3rd party platform participants (i.e., websites listed on Google, Android/iOS apps like Spotify, sellers on Amazon) are understandably nervous when the platform owners compete with their own offerings (i.e., Google Places, Apple Music, Amazon first party sales)As a result, some have even called for banning platform owners from offering their own products and services.

    I believe that is an overreaction. Platform owners offering attractive products and services (i.e., Google offering turn-by-turn navigation on Android phones) can be a great thing for users (after all, most prominent platforms started by providing compelling first-party offerings) and for 3rd party participants if these offerings improve the attractiveness of the platform overall.

    What is hard to justify is when platform owners stack the deck in their favor using anti-competitive moves such as banning or reducing the visibility of competitors, crippling third party offeringsmaking excessive demands on 3rd parties, etc. Its these sorts of actions by the largest tech platforms that pose a risk to consumer choice and competition and should face regulatory scrutiny. Not just the fact that a large platform exists or that the platform owner chooses to participate in it.

    IV. Modernizing how anti-trust thinks about defensive acquisitions

    The rise of the tech giants has led to many calls to unwind some of the pivotal mergers and acquisitions in the space. As much as I believe that anti-trust regulators made the wrong calls on some of these transactions, I am not convinced, beyond just wanting to punish “Big Tech” for being big, that the Pandora’s Box of legal and financial issues (for the participants, employees, users, and for the tech industry more broadly) that would be opened would be worthwhile relative to pursuing other paths to regulate bad behavior directly.

    That being said, its become clear that anti-trust needs to move beyond narrow revenue share and pricing-based definitions of anti-competitiveness (which do not always apply to freemium/ad-sponsored business models). Anti-trust prosecutors and regulators need to become much more thoughtful and assertive around how some acquisitions are done simply to avoid competition (i.e., Google’s acquisition of Waze and Facebook’s acquisition of WhatsApp are two examples of landmark acquisitions which probably should have been evaluated more closely).

    Wrap-Up

    Source: OECD Forum Network

    This is hardly a complete set of rules and policies needed to approach growing concerns about “Big Tech”. Even within this framework, there are many details (i.e., who the specific regulators are, what specific auditing powers they have, the details of their mandate, the specific thresholds and number of tiers to be set, whether pre-installing an app counts as unfair, etc.) that need to be defined which could make or break the effort. But, I believe this is a good set of principles that balances both the need to foster a tech industry that will continue to grow and drive innovation as well as the need to respond to growing concerns about “Big Tech”.

    Special thanks to Derek Yang and Anthony Phan for reading earlier versions and giving me helpful feedback!

  • Migrating WordPress to AWS Lightsail and Going with Let’s Encrypt!

    (Update Jan 2021: Bitnami has made available a new tool bncert which makes it even easier to enable HTTPS with a Let’s Encrypt certificate; the instructions below using Let’s Encrypt’s certbot still work but I would recommend people looking to enable HTTPS to use Bitnami’s new bncert process)

    I recently made two big changes to the backend of this website to keep up with the times as internet technology continues to evolve.

    First, I migrated from my previous web hosting arrangements at WebFaction to Amazon Web Services’s new Lightsail offering. I have greatly enjoyed WebFaction’s super simple interface and fantastic documentation which seemed tailored to amateur coders like myself (having enough coding and customization chops to do some cool projects but not a lot of confidence or experience in dealing with the innards of a server). But, the value for money that AWS Lightsail offers ($3.50/month for Linux VPS including static IP vs. the $10/month I would need to pay to eventually renew my current setup) ultimately proved too compelling to ignore (and for a simple personal site, I didn’t need the extra storage or memory). This coupled with the deterioration in service quality I have been experiencing with WebFaction (many more downtime email alerts from WordPress’s Jetpack plugin and the general lagginess in the WordPress administrative panel) and the chance to learn more about the world’s pre-eminent cloud services provider made this an easy decision.

    Given how Google Chrome now (correctly) marks all websites which don’t use HTTPS/SSL as insecure and Let’s Encrypt has been offering SSL certificates for free for several years, the second big change I made was to embrace HTTPS to partially modernize my website and make it at least not completely insecure. Along the way, I also tweaked my URLs so that all my respective subdomains and domain variants would ultimately point to https://benjamintseng.com/.

    For anyone who is also interested in migrating an existing WordPress deployment on another host to AWS Lightsail and turning on HTTPS/SSL, here are the steps I followed (gleamed from some online research and a bit of trial & error). Its not as straightforward as some other setups, but its very do-able if you are willing to do a little bit of work in the AWS console:

    • Follow the (fairly straightforward) instructions in the AWS Lightsail tutorial around setting up a clean WordPress deploymentI would skip sub-step 3 of step 6 (directing your DNS records to point to the Lightsail nameservers) until later (when you’re sure the transfer has worked so your domain continues to point to a functioning WordPress deployment).
    • Unless you are currently not hosting any custom content (no images, no videos, no Javascript files, etc) on your WordPress deployment, I would ignore the WordPress migration tutorial at the AWS Lightsail website (which won’t show you how to transfer this custom content over) in favor of this Bitnami how-to-guide (Bitnami provides the WordPress server image that Lightsail uses for its WordPress instance) which takes advantage of the fact that the Bitnami WordPress includes the All-in-One WP Migration plugin which, for free, can do single file backups of your WordPress site up to 512 MB (larger sites will need to pay for the premium version of the plugin).
      • If, like me, you have other content statically hosted on your site outside of WordPress, I’d recommend storing it in WordPress as part of the Media Library which has gotten a lot more sophisticated over the past few years. Its where I now store the files associated with my Projects
      • Note: if, like me, you are using Jetpack’s site accelerator to cache your images/static file assets, don’t worry if upon visiting your site some of the images appear broken. Jetpack relies on the URL of the asset to load correctly. This should get resolved once you point your DNS records accordingly (literally the next step) and any other issues should go away after you mop up any remaining references to the wrong URLs in your database (see the bullet below where I reference the Better Search Replace plugin).
    • If you followed my advice above, now would be the time to change your DNS records to point to the Lightsail nameservers (sub-step 3 of step 6 of the AWS Lightsail WordPress tutorial) — wait a few hours to make sure the DNS settings have propagated and then test out your domain and make sure it points to a page with the Bitnami banner in the lower right (sign that you’re using the Bitnami server image, see below)
    The Bitnami banner in the lower-right corner of the page you should see if your DNS propagated correctly and your Lightsail instance is up and running
    • To remove that ugly banner, follow the instructions in this tutorial (use the AWS Lightsail panel to get to the SSH server console for your instance and, assuming you followed the above instructions, follow the instructions for Apache)
    • Assuming your webpage and domain all work (preferably without any weird uptime or downtime issues), you can proceed with this tutorial to provision a Let’s Encrypt SSL certificate for your instance. It can be a bit tricky as it entails spending a lot of time in the SSH server console (which you can get to from the AWS Lightsail panel) and tweaking settings in the AWS Lightsail DNS Zone manager, but the tutorial does a good job of walking you through all of it. (Update Jan 2021: Bitnami has made available a new tool bncert which makes it even easier to enable HTTPS. While the link above using Let’s Encrypt’s certbot still works, I would recommend people use Bitnami’s new bncert process going forward)
      • I would strongly encourage you to wait to make sure all the DNS settings have propagated and that your instance is not having any strange downtime (as mine did when I first tried this) as if you have trouble connecting to your page, it won’t be immediately clear what is to blame and you won’t be able to take reactive measures.
    • I used the plugin Better Search Replace to replace all references to intermediate domains (i.e. the IP addresses for your Lightsail instance that may have stuck around after the initial step in Step 1) or the non-HTTPS domains (i.e. http://yourdomain.com or http://www.yourdomain.com) with your new HTTPS domain in the MySQL databases that power your WordPress deployment (if in doubt, just select the wp_posts table). You can also take this opportunity to direct all your yourdomain.com traffic to www.yourdomain.com (or vice versa). You can also do this directly in MySQL but the plugin allows you to do this across multiple tables very easily and allows you to do a “dry run” first where it finds and counts all the times it will make a change before you actually execute it.
    • If you want to redirect all the traffic to www.yourdomain.com to yourdomain.com, you have two options. If your domain registrar is forward thinking and does simple redirects for you like Namecheap does, that is probably the easiest path. That is sadly not the path I took because I transferred my domain over to AWS’s Route 53 which is not so enlightened. If you also did the same thing / have a domain registrar that is not so forward thinking, you can tweak the Apache server settings to achieve the same effect. To do this, go into the SSH server console for your Lightsail instance and:
      • Run cd ~/apps/wordpress/conf
      • To make a backup which you can restore (if you screw things up) run mv httpd-app.conf httpd-app.conf.old
      • I’m going to use the Nano editor because its the easiest for a beginner (but feel free to use vi or emacs if you prefer), but run nano httpd-app.conf
      • Use your cursor and find the line that says RewriteEngine On that is just above the line that says #RewriteBase /wordpress/
      • Enter the following lines
        • # begin www to non-www
        • RewriteCond %{HTTP_HOST} ^www\.(.*)$ [NC]
        • RewriteRule ^(.*)$ https://%1/$1 [R=permanent,L]
        • # end www to non-www
        • The first and last line are just comments so that you can go back and remind yourself of what you did and where. The middle two lines are where the server recognizes incoming URL requests and redirects them accordingly
        • With any luck, your file will look like the image below — hit ctrl+X to exit, and hit ‘Y’ when prompted (“to save modified buffer”) to save your work
      • Run sudo /opt/bitnami/ctlscript.sh restart to restart your server and test out the domain in a browser to make sure everything works
        • If things go bad, run mv httpd-app.conf.old httpd-app.conf and then restart everything by running sudo /opt/bitnami/ctlscript.sh restart
    What httpd-app.conf should look like in your Lightsail instance SSH console after the edits

    I’ve only been using AWS Lightsail for a few days, but my server already feels much more responsive. It’s also nice to go to my website and not see “not secure” in my browser address bar (its also apparently an SEO bump for most search engines). Its also great to know that Lightsail is integrated deeply into AWS which makes the additional features and capabilities that have made AWS the industry leader (i.e. load balancers, CloudFront as CDN, scaling up instance resources, using S3 as a datastore, or even ultimately upgrading to full-fledged EC2 instances) are readily available.

  • Snap Inc by the Numbers

    A look at what Snap’s S-1 reveals about their growth story and unit economics

    If you follow the tech industry at all, you will have heard that consumer app darling Snap Inc. (makers of the app Snapchat) has filed to go public. The ensuing Form S-1 that has recently been made available has left tech-finance nerds like yours truly drooling over the until-recently-super-secretive numbers behind their business.

    Oddly apt banner; Source: Business Insider

    Much of the commentary in the press to date has been about how unprofitable the company is (having lost over $500M in 2016 alone). I have been unimpressed with that line of thinking — as what the bottom line is in a given year is hardly the right measure for assessing a young, high-growth company.

    While full-time Wall Street analysts will pour over the figures and comparables in much greater detail than I can, I decided to take a quick peek at the numbers to gauge for myself how the business is doing as a growth investment, looking at:

    • What does the growth story look like for the business?
    • Do the unit economics allow for a path to profitability?

    What does the growth story look like for the business?

    As I’ve noted before, consumer media businesses like Snap have two options available to grow: (1) increase the number of users / amount of time spent and/or (2) better monetize users over time

    A quick peek at the DAU (Daily Active Users) counts of Snap reveal that path (1) is troubled for them. Using Facebook as a comparable (and using the midpoint of Facebook’s quarter-end DAU counts to line up with Snap’s average DAU over a quarter) reveals not only that Snap’s DAU numbers aren’t growing so much, their growth outside of North America (where they should have more room to grow) isn’t doing that great either (which is especially alarming as the S-1 admits Q4 is usually seasonally high for them).

    Last 3 Quarters of DAU growth, by region

    A quick look at the data also reveals why Facebook prioritizes Android development and low-bandwidth-friendly experiences — international remains an area of rapid growth which is especially astonishing considering how over 1 billion Facebook users are from outside of North America. This contrasts with Snap which, in addition to needing a huge amount of bandwidth (as a photo and video intensive platform) also (as they admitted in their S-1) de-emphasizes Android development. Couple that with Snap’s core demographic (read: old people can’t figure out how to use the app), reveals a challenge to where quick short-term user growth can come from.

    As a result, Snap’s growth in the near term will have to be driven more by path (2). Here, there is a lot more good news. Snap’s quarterly revenue per user more than doubled over the last 3 quarters to $1.029/DAU. While its a long way off from Facebook’s whopping $7.323/DAU (and over $25 if you’re just looking at North American users), it suggests that there is plenty of opportunity for Snap to increase monetization, especially overseas where its currently able to only monetize about 1/10 as effectively as they are in North America (compared to Facebook which is able to do so 1/5 to 1/6 of North America depending on the quarter).

    2016 and 2015 Q2-Q4 Quarterly Revenue per DAU, by region

    Considering Snap has just started with its advertising business and has already convinced major advertisers to build custom content that isn’t readily reusable on other platforms and Snap’s low revenue per user compared even to Facebook’s overseas numbers, I think its a relatively safe bet that there is a lot of potential for the number to go up.

    Do the unit economics allow for a path to profitability?

    While most folks have been (rightfully) stunned by the (staggering) amount of money Snap lost in 2016, to me the more pertinent question (considering the over $1 billion Snap still has in its coffers to weather losses) is whether or not there is a path to sustainable unit economics. Or, put more simply, can Snap grow its way out of unprofitability?

    Because neither Facebook nor Snap provide regional breakdowns of their cost structure, I’ve focused on global unit economics, summarized below:

    2016 and 2015 Q2-Q4 Quarterly Financials per DAU

    What’s astonishing here is that neither Snap nor Facebook seem to be gaining much from scale. Not only are their costs of sales per user (cost of hosting infrastructure and advertising infrastructure) increasing each quarter, but the operating expenses per user (what they spend on R&D, sales & marketing, and overhead — so not directly tied to any particular user or dollar of revenue) don’t seem to be shrinking either. In fact, Facebook’s is over twice as large as Snap’s — suggesting that its not just a simple question of Snap growing a bit further to begin to experience returns to scale here.

    What makes the Facebook economic machine go, though, is despite the increase in costs per user, their revenue per user grows even faster. The result is profit per user is growing quarter to quarter! In fact, on a per user basis, Q4 2016 operating profit exceeded Q2 2015 gross profit(revenue less cost of sales, so not counting operating expenses)! No wonder Facebook’s stock price has been on a tear!

    While Snap has also been growing its revenue per user faster than its cost of sales (turning a gross profit per user in Q4 2016 for the first time), the overall trendlines aren’t great, as illustrated by the fact that its operating profit per user has gotten steadily worse over the last 3 quarters. The rapid growth in Snap’s costs per user and the fact that Facebook’s costs are larger and still growing suggests that there are no simple scale-based reasons that Snap will achieve profitability on a per user basis. As a result, the only path for Snap to achieve sustainability on unit economics will be to pursue huge growth in user monetization.

    Tying it Together

    The case for Snap as a good investment really boils down to how quickly and to what extent one believes that the company can increase their monetization per user. While the potential is certainly there (as is being realized as the rapid growth in revenue per user numbers show), what’s less clear is whether or not the company has the technology or the talent (none of the key executives named in the S-1 have a particular background building advertising infrastructure or ecosystems that Google, Facebook, and even Twitter did to dominate the online advertising businesses) to do it quickly enough to justify the rumored $25 billion valuation they are striving for (a whopping 38x sales multiple using 2016 Q4 revenue as a run-rate [which the S-1 admits is a seasonally high quarter]).

    What is striking to me, though, is that Snap would even attempt an IPO at this stage. In my mind, Snap has a very real shot at being a great digital media company of the same importance as Google and Facebook and, while I can appreciate the hunger from Wall Street to invest in a high-growth consumer tech company, not having a great deal of visibility / certainty around unit economics and having only barely begun monetization (with your first quarter where revenue exceeds cost of sales is a holiday quarter) poses challenges for a management team that will need to manage public market expectations around forecasts and capitalization.

    In any event, I’ll be looking forward to digging in more when Snap reveals future figures around monetization and advertising strategy — and, to be honest, Facebook’s numbers going forward now that I have a better appreciation for their impressive economic model.

    Thought this was interesting or helpful? Check out some of my other pieces on investing / finance.

  • Dr. Machine Learning

    How to realize the promise of applying machine learning to healthcare

    Not going to happen anytime soon, sadly: the Doctor from Star Trek: Voyager; Source: TrekCore

    Despite the hype, it’ll likely be quite some time before human physicians will be replaced with machines (sorry, Star Trek: Voyager fans).

    While “smart” technology like IBM’s Watson and Alphabet’s AlphaGo can solve incredibly complex problems, they are probably not quite ready to handle the messiness of qualitative unstructured information from patients and caretakers (“it kind of hurts sometimes”) that sometimes lie (“I swear I’m still a virgin!”) or withhold information (“what does me smoking pot have to do with this?”) or have their own agendas and concerns (“I just need some painkillers and this will all go away”).

    Instead, machine learning startups and entrepreneurs interested in medicine should focus on areas where they can augment the efforts of physicians rather than replace them.

    One great example of this is in diagnostic interpretation. Today, doctors manually process countless X-rays, pathology slides, drug adherence records, and other feeds of data (EKGs, blood chemistries, etc) to find clues as to what ails their patients. What gets me excited is that these tasks are exactly the type of well-defined “pattern recognition” problems that are tractable for an AI / machine learning approach.

    If done right, software can not only handle basic diagnostic tasks, but to dramatically improve accuracy and speed. This would let healthcare systems see more patients, make more money, improve the quality of care, and let medical professionals focus on managing other messier data and on treating patients.

    As an investor, I’m very excited about the new businesses that can be built here and put together the following “wish list” of what companies setting out to apply machine learning to healthcare should strive for:

    • Excellent training data and data pipeline: Having access to large, well-annotated datasets today and the infrastructure and processes in place to build and annotate larger datasets tomorrow is probably the main defining . While its tempting for startups to cut corners here, that would be short-sighted as the long-term success of any machine learning company ultimately depends on this being a core competency.
    • Low (ideally zero) clinical tradeoffs: Medical professionals tend to be very skeptical of new technologies. While its possible to have great product-market fit with a technology being much better on just one dimension, in practice, to get over the innate skepticism of the field, the best companies will be able to show great data that makes few clinical compromises (if any). For a diagnostic company, that means having better sensitivty and selectivity at the same stage in disease progression (ideally prospectively and not just retrospectively).
    • Not a pure black box: AI-based approaches too often work like a black box: you have no idea why it gave a certain answer. While this is perfectly acceptable when it comes to recommending a book to buy or a video to watch, it is less so in medicine where expensive, potentially life-altering decisions are being made. The best companies will figure out how to make aspects of their algorithms more transparent to practitioners, calling out, for example, the critical features or data points that led the algorithm to make its call. This will let physicians build confidence in their ability to weigh the algorithm against other messier factors and diagnostic explanations.
    • Solve a burning need for the market as it is today: Companies don’t earn the right to change or disrupt anything until they’ve established a foothold into an existing market. This can be extremely frustrating, especially in medicine given how conservative the field is and the drive in many entrepreneurs to shake up a healthcare system that has many flaws. But, the practical reality is that all the participants in the system (payers, physicians, administrators, etc) are too busy with their own issues (i.e. patient care, finding a way to get everything paid for) to just embrace a new technology, no matter how awesome it is. To succeed, machine diagnostic technologies should start, not by upending everything with a radical solution, but by solving a clear pain point (that hopefully has a lot of big dollar signs attached to it!) for a clear customer in mind.

    Its reasons like this that I eagerly follow the development of companies with initiatives in applying machine learning to healthcare like Google’s DeepMind, Zebra Medical, and many more.

  • Why VR Could be as Big as the Smartphone Revolution

    Technology in the 1990s and early 2000s marched to the beat of an Intel-and-Microsoft-led drum.

    Source: IT Portal

    Intel would release new chips at a regular cadence: each cheaper, faster, and more energy efficient than the last. This would let Microsoft push out new, more performance-hungry software, which would, in turn, get customers to want Intel’s next, more awesome chip. Couple that virtuous cycle with the fact that millions of households were buying their first PCs and getting onto the Internet for the first time — and great opportunities were created to build businesses and products across software and hardware.

    But, over time, that cycle broke down. By the mid-2000s, Intel’s technological progress bumped into the limits of what physics would allow with regards to chip performance and cost. Complacency from its enviable market share coupled with software bloat from its Windows and Office franchises had a similar effect on Microsoft. The result was that the Intel and Microsoft drum stopped beating as they became unable to give the mass market a compelling reason to upgrade to each subsequent generation of devices.

    The result was a hollowing out of the hardware and semiconductor industries tied to the PC market that was only masked by the innovation stemming from the rise of the Internet and the dawn of a new technology cycle in the late 2000s in the form of Apple’s iPhone and its Android competitors: the smartphone.

    Source: Mashable

    A new, but eerily familiar cycle began: like clockwork, Qualcomm, Samsung, and Apple (playing the part of Intel) would devise new, more awesome chips which would feed the creation of new performance-hungry software from Google and Apple (playing the part of Microsoft) which led to demand for the next generation of hardware. Just as with the PC cycle, new and lucrative software, hardware, and service businesses flourished.

    But, just as with the PC cycle, the smartphone cycle is starting to show signs of maturity. Apple’s recent slower than expected growth has already been blamed on smartphone market saturation. Users are beginning to see each new generation of smartphone as marginal improvements. There are also eery parallels between the growing complaints over Apple software quality from even Apple fans and the position Microsoft was in near the end of the PC cycle.

    While its too early to call the end for Apple and Google, history suggests that we will eventually enter a similar phase with smartphones that the PC industry experienced. This begs the question: what’s next? Many of the traditional answers to this question — connected cars, the “Internet of Things”, Wearables, Digital TVs — have not yet proven themselves to be truly mass market, nor have they shown the virtuous technology upgrade cycle that characterized the PC and smartphone industries.

    This brings us to Virtual Reality. With VR, we have a new technology paradigm that can (potentially) appeal to the mass market (new types of games, new ways of doing work, new ways of experiencing the world, etc.). It also has a high bar for hardware performance that will benefit dramatically from advances in technology, not dissimilar from what we saw with the PC and smartphone.

    Source: Forbes

    The ultimate proof will be whether or not a compelling ecosystem of VR software and services emerges to make this technology more of a mainstream “must-have” (something that, admittedly, the high price of the first generation Facebook/OculusHTC/Valve, and Microsoft products may hinder).

    As a tech enthusiast, its easy to get excited. Not only is VR just frickin’ cool (it is!), its probably the first thing since the smartphone with the mass appeal and virtuous upgrade cycle that can bring about the huge flourishing of products and companies that makes tech so dynamic to be involved with.

    Thought this was interesting? Check out some of my other pieces on Tech industry

  • What Happens After the Tech Bubble Pops

    In recent years, it’s been the opposite of controversial to say that the tech industry is in a bubble. The terrible recent stock market performance of once high-flying startups across virtually every industry (see table below) and the turmoil in the stock market stemming from low oil prices and concerns about the economies of countries like China and Brazil have raised fears that the bubble is beginning to pop.

    While history will judge when this bubble “officially” bursts, the purpose of this post is to try to make some predictions about what will happen during/after this “correction” and pull together some advice for people in / wanting to get into the tech industry. Starting with the immediate consequences, one can reasonably expect that:

    • Exit pipeline will dry up: When startup valuations are higher than what the company could reasonably get in the stock market, management teams (who need to keep their investors and employees happy) become less willing to go public. And, if public markets are less excited about startups, the price acquirers need to pay to convince a management team to sell goes down. The result is fewer exits and less cash back to investors and employees for the exits that do happen.
    • VCs become less willing to invest: VCs invest in startups on the promise that future IPOs and acquisitions will make them even more money. When the exit pipeline dries up, VCs get cold feet because the ability to get a nice exit seems to fade away. The result is that VCs become a lot more price-sensitive when it comes to investing in later stage companies (where the dried up exit pipeline hurts the most).
    • Later stage companies start cutting costs: Companies in an environment where they can’t sell themselves or easily raise money have no choice but to cut costs. Since the vast majority of later-stage startups run at a loss to increase growth, they will find themselves in the uncomfortable position of slowing down hiring and potentially laying employees off, cutting back on perks, and focusing a lot more on getting their financials in order.

    The result of all of this will be interesting for folks used to a tech industry (and a Bay Area) flush with cash and boundlessly optimistic:

    1. Job hopping should slow: “Easy money” to help companies figure out what works or to get an “acquihire” as a soft landing will be harder to get in a challenged financing and exit environment. The result is that the rapid job hopping endemic in the tech industry should slow as potential founders find it harder to raise money for their ideas and as it becomes harder for new startups to get the capital they need to pay top dollar.
    2. Strong companies are here to stay: While there is broad agreement that there are too many startups with higher valuations than reasonable, what’s also become clear is there are a number of mature tech companies that are doing exceptionally well (i.e. Facebook, Amazon, Netflix, and Google) and a number of “hotshots” which have demonstrated enough growth and strong enough unit economics and market position to survive a challenged environment (i.e. Uber, Airbnb). This will let them continue to hire and invest in ways that weaker peers will be unable to match.
    3. Tech “luxury money” will slow but not disappear: Anyone who lives in the Bay Area has a story of the ridiculousness of “tech money” (sky-high rents, gourmet toast,“its like Uber but for X”, etc). This has been fueled by cash from the startup world as well as free flowing VC money subsidizing many of these new services . However, in a world where companies need to cut costs, where exits are harder to come by, and where VCs are less willing to subsidize random on-demand services, a lot of this will diminish. That some of these services are fundamentally better than what came before (i.e. Uber) and that stronger companies will continue to pay top dollar for top talent will prevent all of this from collapsing (and lets not forget San Francisco’s irrational housing supply policies). As a result, people expecting a reversal of gentrification and the excesses of tech wealth will likely be disappointed, but its reasonable to expect a dramatic rationalization of the price and quantity of many “luxuries” that Bay Area inhabitants have become accustomed to soon.

    So, what to do if you’re in / trying to get in to / wanting to invest in the tech industry?

    • Understand the business before you get in: Its a shame that market sentiment drives fundraising and exits, because good financial performance is generally a pretty good indicator of the long-term prospects of a business. In an environment where its harder to exit and raise cash, its absolutely critical to make sure there is a solid business footing so the company can keep going or raise money / exit on good terms.
    • Be concerned about companies which have a lot of startup exposure: Even if a company has solid financial performance, if much of that comes from selling to startups (especially services around accounting, recruiting, or sales), then they’re dependent on VCs opening up their own wallets to make money.
    • Have a much higher bar for large, later-stage companies: The companies that will feel the most “pain” the earliest will be those with with high valuations and high costs. Raising money at unicorn valuations can make a sexy press release but it doesn’t amount to anything if you can’t exit or raise money at an even higher valuation.
    • Rationalize exposure to “luxury”: Don’t expect that “Uber but for X” service that you love to stick around (at least not at current prices)…
    • Early stage companies can still be attractive: Companies that are several years from an exit & raising large amounts of cash will be insulated in the near-term from the pain in the later stage, especially if they are committed to staying frugal and building a disruptive business. Since they are already relatively low in valuation and since investors know they are discounting off a valuation in the future (potentially after any current market softness), the downward pressures on valuation are potentially lighter as well.

    Thought this was interesting or helpful? Check out some of my other pieces on investing / finance.

  • Web vs Native

    When Steve Jobs first launched the iPhone in 2007, Apple’s perception of where the smartphone application market would move was in the direction of web applications. The reasons for this are obvious: people are familiar with how to build web pages and applications, and it simplifies application delivery.

    Yet in under a year, Apple changed course, shifting the focus of iPhone development from web applications to building native applications custom-built (by definition) for the iPhone’s operating system and hardware. While I suspect part of the reason this was done was to lock-in developers, the main reason was certainly the inadequacy of available browser/web technology. While we can debate the former, the latter is just plain obvious. In 2007, the state of web development was relatively primitive relative to today. There was no credible HTML5 support. Javascript performance was paltry. There was no real way for web applications to access local resources/hardware capabilities. Simply put, it was probably too difficult for Apple to kludge together an application development platform based solely on open web technologies which would get the sort of performance and functionality Apple wanted.

    But, that was four years ago, and web technology has come a long way. Combine that with the tech commentator-sphere’s obsession with hyping up a rivalry between “native vs HTML5 app development”, and it begs the question: will the future of application development be HTML5 applications or native?

    There are a lot of “moving parts” in a question like this, but I believe the question itself is a red herring. Enhancements to browser performance and the new capabilities that HTML5 will bring like offline storage, a canvas for direct graphic manipulation, and tools to access the file system, mean, at least to this tech blogger, that “HTML5 applications” are not distinct from native applications at all, they are simply native applications that you access through the internet. Its not a different technology vector – it’s just a different form of delivery.

    Critics of this idea may cite that the performance and interface capabilities of browser-based applications lag far behind those of “traditional” native applications, and thus they will always be distinct. And, as of today, they are correct. However, this discounts a few things:

    • Browser performance and browser-based application design are improving at a rapid rate, in no small part because of the combination of competition between different browsers and the fact that much of the code for these browsers is open source. There will probably always be a gap between browser-based apps and native, but I believe this gap will continue to narrow to the point where, for many applications, it simply won’t be a deal-breaker anymore.
    • History shows that cross-platform portability and ease of development can trump performance gaps. Once upon a time, all developers worth their salt coded in low level machine language. But this was a nightmare – it was difficult to do simple things like showing text on a screen, and the code written only worked on specific chips and operating systems and hardware configurations. I learned C which helped to abstract a lot of that away, and, keeping with the trend of moving towards more portability and abstraction, the mobile/web developers of today develop with tools (Python, Objective C, Ruby, Java, Javascript, etc) which make C look pretty low-level and hard to work with. Each level of abstraction adds a performance penalty, but that has hardly stopped developers from embracing them, and I feel the same will be true of “HTML5”.
    • Huge platform economic advantages. There are three huge advantages today to HTML5 development over “traditional native app development”. The first is the ability to have essentially the same application run across any device which supports a browser. Granted, there are performance and user experience issues with this approach, but when you’re a startup or even a corporate project with limited resources, being able to get wide distribution for earlier products is a huge advantage. The second is that HTML5 as a platform lacks the control/economic baggage that iOS and even Android have where distribution is controlled and “taxed” (30% to Apple/Google for an app download, 30% cut of digital goods purchases). I mean, what other reason does Amazon have to move its Kindle application off of the iOS native path and into HTML5 territory? The third is that web applications do not require the latest and greatest hardware to perform amazing feats. Because these apps are fundamentally browser-based, using the internet to connect to a server-based/cloud-based application allows even “dumb devices” to do amazing things by outsourcing some of that work to another system. The combination of these three makes it easier to build new applications and services and make money off of them – which will ultimately lead to more and better applications and services for the “HTML5 ecosystem.”

    Given Google’s strategic interest in the web as an open development platform, its no small wonder that they have pushed this concept the furthest. Not only are they working on a project called Native Client to let users achieve “native performance” with the browser, they’ve built an entire operating system centered entirely around the browser, Chrome OS, and were the first to build a major web application store, the Chrome Web Store to help with application discovery.

    While it remains to be seen if any of these initiatives will end up successful, this is definitely a compelling view of how the technology ecosystem evolves, and, putting on my forward-thinking cap on, I would not be surprised if:

    1. The major operating systems became more ChromeOS-like over time. Mac OS’s dashboard widgets and Windows 7’s gadgets are already basically HTML5 mini-apps, and Microsoft has publicly stated that Windows 8 will support HTML5-based application development. I think this is a sign of things to come as the web platform evolves and matures.
    2. Continued focus on browser performance may lead to new devices/browsers focused on HTML5 applications. In the 1990s/2000s, there was a ton of attention focused on building Java accelerators in hardware/chips and software platforms who’s main function was to run Java. While Java did not take over the world the way its supporters had thought, I wouldn’t be surprised to see a similar explosion just over the horizon focused on HTML5/Javascript performance – maybe even HTML5 optimized chips/accelerators, additional ChromeOS-like platforms, and potentially browsers optimized to run just HTML5 games or enterprise applications?
    3. Web application discovery will become far more important. The one big weakness as it stands today for HTML5 is application discovery. Its still far easier to discover a native mobile app using the iTunes App Store or the Android Market than it is to find a good HTML5 app. But, as platform matures and the platform economics shift, new application stores/recommendation engines/syndication platforms will become increasingly critical.

    Thought this was interesting? Check out some of my other pieces on Tech industry

  • The “Strangest Biotech Company of All” Issues Their Annual Report as a Comic Book

    This seems almost made for me: I’m into comic books. I do my own “corporate style” annual and quarterly reports to track how my finances and goals are going. And, I follow the biopharma industry.

    Source: United Therapeutics 2010 Annual Report

    So, when I found out that a biotech company issued its latest annual report in the form of a comic book, I knew I had to talk about it!

    The art style is not all that bad, and the bulk of the comic is told from the first person perspective of Martin Auster, head of business development at the company (that’s Doctor Auster to you, pal!). We get an interesting look at Auster’s life, how he was a medical student who didn’t really want to do a residency, and how and why he ultimately joins the company.

    Source: United Therapeutics 2010 Annual Report
    Source: United Therapeutics 2010 Annual Report
    Source: United Therapeutics 2010 Annual Report

    And, of course, what annual report wouldn’t be complete without some financial charts – and yes, this particular chart was intended to be read with 3D glasses (which were apparently shipped with paper copies of the report):

    Source: United Therapeutics 2010 Annual Report

    Interestingly, the company in question – United Therapeutics — is not a tiny company either: its worth roughly $3 billion (as of when this was written) and is also somewhat renowned for its more unusual practices (meetings have occurred in the virtual world Second Life and employees are all called “Unitherians”) as well as its brilliant and eccentric founder, Dr. Martine Rothblatt. Rothblatt is a very accomplished modern-day polymath:

    • She was an early pioneer in communication satellite law
    • She helped launch a number of communication satellite technologies and companies
    • She founded and was CEO of Geostar Corporation, an early GPS satellite company
    • She founded and was CEO of Sirius Satellite Radio
    • She led the International Bar Association’s efforts to draft a Universal Declaration on the Human Genome and Human Rights
    • She is a pre-eminent proponent for xenotransplantation
    • She is also one of the most vocal advocates of transgenderism and transgender rights, having been born as Martin Rothblatt (Howard Stern even referred to her as the “Martine Luther Queen” of the movement)
    • She is a major proponent of the interesting philosophy that one might achieve technological immortality by digitizing oneself (having created an interesting robot version of her wife, Bina).
    • She started United Therapeutics because her daughter was diagnosed with Pulmonary Arterial Hypertension, a fatal condition which, at the time of diagnosis, there was no effective treatment for

    You got to have a lot of love and respect for a company that not only seems to have delivered an impressive financial outcome ($600 million in sales a year and $3 billion in market cap is not bad!) and can still maintain what looks like a very fun and unique culture (in no small part, I’m sure, because of their CEO).

  • The Goal is Not Profitability

    I’ve blogged before about how the economics of the venture industry affect how venture capitalists evaluate potential investments, the main conclusion of which is that VCs are really only interested in companies that could potentially IPO or sell for at least several hundred million dollars.

    One variation on that line of logic which I think startups/entrepreneurs oftentimes fail to grasp is that profitability is not the number one goal.

    Now, don’t get me wrong. The reason for any business to exist is to ultimately make profit. And, all things being equal, investors certainly prefer more profitable companies to less/unprofitable ones. But, the truth of the matter is that things are rarely all equal and, at the end of the day, your venture capital investors aren’t necessarily looking for profit, they are looking for a large outcome.

    Before I get accused of being supportive of bubble companies (I’m not), let me explain what this seemingly crazy concept means in practice. First of all, short-term profitability can conflict with rapid growth. This will sound counter-intuitive, but its the very premise for venture capital investment. Think about it: Facebook could’ve tried much harder to make a profit in its early years by cutting salaries and not investing in R&D, but that would’ve killed Facebook’s ability to grow quickly. Instead, they raised venture capital and ignored short-term profitability to build out the product and aggressively market. This might seem simplistic, but I oftentimes receive pitches/plans from entrepreneurs who boast that they can achieve profitability quickly or that they don’t need to raise another round of investment because they will be making a profit soon, never giving any thought to what might happen with their growth rate if they ignored profitability for another quarter or year.

    Secondly, the promise of growth and future profitability can drive large outcomesPandora, Groupon, Enphase, TeslaA123, and Solazyme are among some of the hottest venture-backed IPOs in recent memory and do you know what they all also happen to share? They are very unprofitable and, to the best of my knowledge, have not yet had a single profitable year. However, the investment community has strong faith in the ability of these businesses to continue to grow rapidly and, eventually, deliver profitability. Whether or not that faith is well-placed is another question (and I have my doubts on some of the companies on that list), but as these examples illustrate, you don’t necessarily need to be profitable to be able to get a large venture-sized outcome.

    Of course, it’d be a mistake to take this logic and assume that you never need to achieve or think about profitability. After all, a company that is bleeding cash unnecessarily is not a good company by any definition, regardless of whether or not the person evaluating it is in venture capital. Furthermore, while the public market may forgive Pandora and Groupon’s money-losing, there’s also no guarantee that they will be so forgiving of another company’s or even of Pandora/Groupons a few months from now.

    But what I am saying is that entrepreneurs need to be more thoughtful when approaching a venture investor with a plan to achieve profitability/stop raising money more quickly, because the goal of that investor is not necessarily short-term profits.

    Thought this was interesting? Check out some of my other pieces on how VC works / thinks

  • Our Job is Not to Make Money

    Let’s say you pitch a VC and you’ve got a coherent business plan and some thoughtful perspectives on how your business scales. Does that mean you get the venture capital investment that you so desire?

    Not necessarily. There could be many reasons for a rejection, but one that crops up a great deal is not anything intrinsically wrong with a particular idea or team, but something which is an intrinsic issue with the venture capital model.

    One of our partners put it best when he pointed out, “Our job is not to make money, it’s to make a lot of money.”

    What that means is that venture capitalists are not just looking for a business that can make money. They are really looking for businesses which have the potential to sell for or go public (sell stock on NYSE/NASDAQ/etc) and yield hundreds of millions, if not billions of dollars.

    Why? It has to do with the way that venture capital funds work.

    • Venture capitalists raise large $100M+ funds. This is a lot of money to work with, but its also a burden in that the venture capital firm also has to deliver a large return on that large initial amount. If you start with a $100M fund, its not unheard of for investors in that fund to expect $300-400M back – and you just can’t get to those kinds of returns unless you bet on companies that sell for/list on a public market for a lot of money.
    • Although most investments fail, big outcomes can be *really* big. For every Facebook, there are dozens of wannabe copycats that fall flat – so there is a very high risk that a venture investment will not pan out as one hopes. But, the flip side to this is that Facebook will likely be an outcome dozens upon dozens of times larger than its copycats. The combination of the very high risk but very high reward drive venture capitalists to chase only those which have a shot at becoming a *really* big outcome – doing anything else basically guarantees that the firm will not be able to deliver a large enough return to its investors.
    • Partners are busy people. A typical venture capital fund is a partnership, consisting of a number of general partners who operate the fund. A typical general partner will, in addition to look for new deals, be responsible for/advise several companies at once. This is a fair amount of work for each company as it involves helping companies recruit, develop their strategy, connect with key customers/partners/influencers, deal with operational/legal issues, and raise money. As a result, while the amount of work can vary quite a bit, this basically limits the number of companies that a partner can commit to (and, hence, invest in). This limit encourages partners to favor companies which could end up with a larger outcome than a smaller, because below a certain size, the firm’s return profile and the limits on a partner’s time just don’t justify having a partner get too involved.

    The result? Venture capitalists have to turn down many pitches, not because they don’t like the idea or the team and not even necessarily because they don’t think the company will make money in a reasonably short time, but because they didn’t think the idea had a good shot at being something as big and game-changing as Google, Genentech, and VMWare were. And, in fact, the not often heard truth is that a lot of the endings which entrepreneurs think of as great and which are frequently featured on tech blogs like VentureBeat and TechCrunch (i.e. selling your company to Google for $10M) are actually quite small (and possibly even a failure) when it comes to how a large venture capital firm views it.

    Thought this was interesting? Check out some of my other pieces on how VC works / thinks

  • Why Smartphones are a Big Deal

    A cab driver the other day went off on me with a rant about how new smartphone users were all smug, arrogant gadget snobs for using phones that did more than just make phone calls. “Why you gotta need more than just the phone?”, he asked.

    While he was probably right on the money with the “smug”, “arrogant”, and “snob” part of the description of smartphone users (at least it accurately describes yours truly), I do think he’s ignoring a lot of the important changes which the smartphone revolution has made in the technology industry and, consequently, why so many of the industry’s venture capitalists and technology companies are investing so heavily in this direction. This post will be the first of two posts looking at what I think are the four big impacts of smartphones like the Blackberry and the iPhone on the broader technology landscape:

    1. It’s the software, stupid
    2. Look ma, no <insert other device here>
    3. Putting the carriers in their place
    4. Contextuality

    I. It’s the software, stupid!

    You can find possibly the greatest impact of the smartphone revolution in the very definition of smartphone: phones which can run rich operating systems and actual applications. As my belligerent cab-driver pointed out, the cellular phone revolution was originally about being able to talk to other people on the go. People bought phones based on network coverage, call quality, the weight of a phone, and other concerns primarily motivated by call usability.

    Smartphones, however, change that. Instead of just making phone calls, they also do plenty of other things. While a lot of consumers focus their attention on how their phones now have touchscreens, built-in cameras, GPS, and motion-sensors, the magic change that I see is the ability to actually run programs.

    Why do I say this software thing more significant than the other features which have made their ways on to the phone? There are a number of reasons for this, but the big idea is that the ability to run software makes smartphones look like mobile computers. We have seen this pan out in a number of ways:

    • The potential uses for a mobile phone have exploded overnight. Whereas previously, they were pretty much limited to making phone calls, sending text messages/emails, playing music, and taking pictures, now they can be used to do things like play games, look up information, and even be used by doctors to help treat and diagnose patients. In the same way that a computer’s usefulness extends beyond what a manufacturer like Dell or HP or Apple have built into the hardware because of software, software opens up new possibilities for mobile phones in ways which we are only beginning to see.
    • Phones can now be “updated”. Before, phones were simply replaced when they became outdated. Now, some users expect that a phone that they buy will be maintained even after new models are released. Case in point: Users threw a fit when Samsung decided not to allow users to update their Samsung Galaxy’s operating system to a new version of the Android operating system. Can you imagine 10 years ago users getting up in arms if Samsung didn’t ship a new 2 MP mini-camera to anyone who owned an earlier version of the phone which only had a 1 MP camera?
    • An entire new software industry has emerged with its own standards and idiosyncrasies. About four decades ago, the rise of the computer created a brand new industry almost out of thin air. After all, think of all the wealth and enabled productivity that companies like Oracle, Microsoft, and Adobe have created over the past thirty years. There are early signs that a similar revolution is happening because of the rise of the smartphone. Entire fortunes have been created “out of thin air” as enterprising individuals and companies move to capture the potential software profits from creating software for the legions of iPhones and Android phones out there. What remains to be seen is whether or not the mobile software industry will end up looking more like the PC software industry, or whether or not the new operating systems and screen sizes and technologies will create something that looks more like a distant cousin of the first software revolution.

    II. Look ma, no <insert other device here>

    One of the most amazing consequences of Moore’s Law is that devices can quickly take on a heckuva lot more functionality then they used to. The smartphone is a perfect example of this Swiss-army knife mentality. The typical high-end smartphone today can:

    • take pictures
    • use GPS
    • play movies
    • play songs
    • read articles/books
    • find what direction its being pointed in
    • sense motion
    • record sounds
    • run software

    … not to mention receive and make phone calls and texts like a phone.

    But, unlike cameras, GPS devices, portable media players, eReaders, compasses, Wii-motes, tape recorders, and computers, the phone is something you are likely to keep with you all day long. And, if you have a smartphone which can double as a camera, GPS, portable media player, eReaders, compass, Wii-mote, tape recorder, and computer all at once – tell me why you’re going to hold on to those other devices?

    That is, of course, a dramatic oversimplification. After all, I have yet to see a phone which can match a dedicated camera’s image quality or a computer’s speed, screen size, and range of software, so there are definitely reasons you’d pick one of these devices over a smartphone. The point, however, isn’t that smartphones will make these other devices irrelevant, it is that they will disrupt these markets in exactly the way that Clayton Christensen described in his book The Innovator’s Dilemma, making business a whole lot harder for companies who are heavily invested in these other device categories. And make no mistake: we’re already seeing this happen as GPS companies are seeing lower prices and demand as smartphones take on more and more sophisticated functionality (heck, GPS makers like Garmin are even trying to get into the mobile phone business!). I wouldn’t be surprised if we soon see similar declines in the market growth rates and profitability for all sorts of other devices.

    III. Putting the carriers in their place

    Throughout most of the history of the phone industry, the carriers were the dominant power. Sure, enormous phone companies like Nokia, Samsung, and Motorola had some clout, but at the end of the day, especially in the US, everybody felt the crushing influence of the major wireless carriers.

    In the US, the carriers regulated access to phones with subsidies. They controlled which functions were allowed. They controlled how many texts and phone calls you were able to make. When they did let you access the internet, they exerted strong influence on which websites you had access to and which ringtones/wallpapers/music you could download. In short, they managed the business to minimize costs and risks, and they did it because their government-granted monopolies (over the right to use wireless spectrum) and already-built networks made it impossible  for a new guy to enter the market.

    But this sorry state of affairs has already started to change with the advent of the smartphone. RIM’s Blackberry had started to affect the balance of power, but Apple’s iPhone really shook things up – precisely because users started demanding more than just a wireless service plan – they wanted a particular operating system with a particular internet experience and a particular set of applications – and, oh, it’s on AT&T? That’s not important, tell me more about the Apple part of it!

    What’s more, the iPhone’s commercial success accelerated the change in consumer appetites. Smartphone users were now picking a wireless service provider not because of coverage or the cost of service or the special carrier-branded applications  – that was all now secondary to the availability of the phone they wanted and what sort of applications and internet experience they could get over that phone. And much to the carriers’ dismay, the wireless carrier was becoming less like the gatekeeper who got to charge crazy prices because he/she controlled the keys to the walled garden and more like the dumb pipe that people connected to the web on their iPhone with.

    Now, it would be an exaggeration to say that the carriers will necessarily turn into the “dumb pipes” that today’s internet service providers are (remember when everyone in the US used AOL?) as these large carriers are still largely immune to competitors. But, there are signs that the carriers are adapting to their new role. The once ultra-closed Verizon now allows Palm WebOS and Google Android devices to roam free on its network as a consequence of AT&T and T-Mobile offering devices from Apple and Google’s partners, respectively, and has even agreed to allow VOIP applications like Skype access to its network, something which jeopardizes their former core voice revenue stream.

    As for the carriers, as they begin to see their influence slip over basic phone experience considerations, they will likely shift their focus to finding ways to better monetize all the traffic that is pouring through their networks. Whether this means finding a way to get a cut of the ad/virtual good/eCommerce revenue that’s flowing through or shifting how they charge for network access away from unlimited/“all you can eat” plans is unclear, but it will be interesting to see how this ecosystem evolves.

    IV. Contextuality

    There is no better price than the amazingly low price of free. And, in my humble opinion, it is that amazingly low price of free which has enabled web services to have such a high rate of adoption. Ask yourself, would services like Facebook and Google have grown nearly as fast without being free to use?

    How does one provide compelling value to users for free? Before the age of the internet, the answer to that age-old question was simple: you either got a nice government subsidy, or you just didn’t. Thankfully, the advent of the internet allowed for an entirely new business model: providing services for free and still making a decent profit by using ads. While over-hyping of this business model led to the dot com crash in 2001 as countless websites found it pretty difficult to monetize their sites purely with ads, services like Google survived because they found that they could actually increase the value of the advertising on their pages not only because they had a ton of traffic, but because they could use the content on the page to find ads which visitors had a significantly higher probability of caring about.

    The idea that context could be used to increase ad conversion rates (the percent of people who see an ad and actually end up buying) has spawned a whole new world of web startups and technologies which aim to find new ways to mine context to provide better ad targeting. Facebook is one such example of the use of social context (who your friends are, what your interests are, what your friends’ interests are) to serve more targeted ads.

    So, where do smartphones fit in? There are two ways in which smartphones completely change the context-to-advertising dynamic:

    • Location-based services: Your phone is a device which not only has a processor which can run software, but is also likely to have GPS built-in, and is something which you carry on your person at all hours of the day. What this means is that the phone not only know what apps/websites you’re using, it also knows where you are and if you’re on a vehicle (based on how fast you are moving) when you’re using them. If that doesn’t let a merchant figure out a way to send you a very relevant ad, I don’t know what will. The Yowza iPhone application is an example of how this might shape out in the future, where you can search for mobile coupons for local stores all on your phone.
    • Augmented reality: In the same way that the GPS lets mobile applications do location-based services, the camera, compass, and GPS in a mobile phone lets mobile applications do something called augmented reality. The concept behind augmented reality (AR) is that, in the real world, you and I are only limited by what our five senses can perceive. If I see an ad for a book, I can only perceive what is on the advertisement. I don’t necessarily know much about how much it costs on Amazon.com or what my friends on Facebook have said about it. Of course, with a mobile phone, I could look up those things on the internet, but AR takes this a step further. Instead of merely looking something up on the internet, AR will actually overlay content and information on top of what you are seeing on your phone screen. One example of this is the ShopSavvy application for Android which allows you to scan product barcodes to find product review information and even information on pricing from online and other local stores! Google has taken this a step further with Google Goggles which can recognize pictures of landmarks, books, and even bottles of wine! For an advertiser or a store, the ability to embed additional content through AR technology is the ultimate in providing context but only to those people who want it. Forget finding the right balance between putting too much or too little information on an ad, use AR so that only the people who are interested will get the extra information.

    Thought this was interesting? Check out some of my other pieces on Tech industry

  • Seed the Market

    In my Introduction to Tech Strategy post, I mentioned that one of the most important aspects of the technology industry is the importance of ecosystem linkages. There are several ways to think about ecosystem linkages. The main linkages I mentioned in my previous post was influence over technology standards. But, there is another very important ecosystem effect for technology companies to think about: encouraging demand.

    For Microsoft to be successful, for instance, they must make sure that consumers and businesses are buying new and more powerful computers. For Google to be successful, they must make sure that people are actively using the internet to find information. For Cisco to be successful, they must make sure that people are actively downloading and sharing information over networks.

    Is it any wonder, then, that Microsoft develops business software (e.g. Microsoft Office) and games? Or that Google has pushed hard to encourage more widespread internet use by developing an easy-to-use web browser and two internet-centric operating systems (Android and ChromeOS)? Or that Cisco entered the set top box business (to encourage more network traffic) by acquiring Scientific Atlanta and is pushing for companies to adopt web conferencing systems (which consume a lot of networking capacity) like WebEx?

    These examples hopefully illustrate that for leading tech companies, it is not sufficient just to develop a good product. It is also important that you move to make sure that customers will continue to demand your product, and a lot more of it.

    This is something that Dogbert understands intuitively as this comic strip points out:

    Source: Dilbert

    To be a leading executive recruiter, its not sufficient just to find great executives – you have to make sure there is demand for new executives. No wonder Dogbert is such a successful CEO. He grasps business strategy like no other.

    Thought this was interesting? Check out some of my other pieces on Tech industry

  • Tech Strategy 101

    Working on tech strategy consulting case for 18 months ingrains a thing or two in your head about strategy for tech companies, so I thought I’d lay out, in one blog post the major lessons I’ve learned about how strategy in the technology sector works.

    To understand that, it’s important to first understand what makes technology special? From that perspective, there are three main things which drive tech strategy:

    1. Low cost of innovation – Technology companies need to be innovative to be successful, duh. But, the challenge with handling tech strategy is not innovation but that innovation in technology is cheap. Your product can be as easily outdone by a giant with billions of dollars like Google as it can be outdone by a couple of bright guys in a garage who still live with their parents.
    2. Moore’s Law – When most technologists think of Moore’s Law, they think of its academic consequences (mainly that chip technology doubles every two years). This is true (and has been for over 50 years), but the strategic consequence of Moore’s Law can be summed up in six words: “Tomorrow will be better, faster, cheaper.” Can you think of any other industry which has so quickly and consistently increased quality while lowering cost?
    3. Ecosystem linkages – No technology company stands alone. They are all inter-related and inter-dependent. Facebook may be a giant in the Web world, but it’s success depends on a wide range of relationships: it depends on browser makers adhering to web standards, on Facebook application developers wanting to use the Facebook platform, on hardware providers selling the right hardware to let Facebook handle the millions of users who want to use it, on CDNs/telecom companies providing the right level of network connectivity, on internet advertising standards, etc. This complex web of relationships is referred to by many in the industry as the ecosystem. A technology company must learn to understand and shape its ecosystem in order to succeed.

    Put it all together, what does it all mean? Four things:

    Source: the book

    I. Only the paranoid survive
    This phrase, popularized by ex-Intel CEO Andy Grove, is very apt for describing the tech industry. The low cost of innovation means that your competition could come from anywhere: well-established companies, medium-sized companies, hot new startups, enterprising university students, or a legion of open source developers. The importance of ecosystem linkages means that your profitability is dependent not only on what’s going on with your competitors, but also about the broader ecosystem. If you’re Microsoft, you don’t only have to think about what competitors like Apple and Linux are doing, you also need to think about the health of the overall PC market, about how to connect your software to new smartphones, and many other ecosystem concerns which affect your profitability. And the power of Moore’s Law means that new products need to be rolled out quickly, as old products rapidly turn into antiques from the advance of technology. The result of all of this is that only the technology companies which are constantly fearful of emerging threats will succeed.

    II. To win big, you need to change the rules
    The need to be constantly innovative (Moore’s Law and low cost of innovation) and the importance of ecosystem linkages favors large, incumbent companies, because they have the resources/manpower to invest in marketing, support, and R&D and they are the ones with the existing ecosystem relationships. As a result, the only way for a little startup to win big, or for a large company to attack another large company is to change the rules of competition. For Apple, to win in a smartphone market dominated by Nokia and RIM required changing the rules of the “traditional” smartphone competition by:

    • Building a new type of user-interface driven by accelerometer and touchscreen unlike anything seen before
    • Designing in a smartphone web browser actually comparable to what you’d expect on a PC as opposed to a pale imitation
    • Building an application store to help establish a new definition of smartphone – one that runs a wide range of software rather than one that runs only software from the carrier/phone manufacturer
    • Bringing the competition back to Apple’s home turf of making complete hardware and software solutions which tie together well, rather than just competing on one or the other

    Apple’s iPhone not only provided a tidy profit for Apple, it completely took RIM, which had been betting on taking its enterprise features into the consumer smartphone market, and Nokia, which had been betting on its services strategy, by surprise. Now, Nokia and every other phone manufacturer is desperately trying to compete in a game designed by Apple – no wonder Nokia recently forecasted that it expected its market share to continue to drop.

    But it’s not just Apple that does this. Some large companies like Microsoft and Cisco are masters at this game, routinely disrupting new markets with products and services which tie back to their other product offerings – forcing incumbents to compete not only with a new product, but with an entire “platform”. Small up-and-comers can also play this game. MySQL is a great example of a startup which turned the database market on its head by providing access to its software and source code for free (to encourage adoption) in return for a chance to sell services.

    III. Be a good ecosystem citizen
    Successful tech companies cannot solely focus on their specific markets and product lines. The importance of ecosystem linkages forces tech companies to look outward.

    • They must influence industry standards, oftentimes working with their competitors (case in point: look at the corporate membership in the Khronos Group which controls the OpenGL graphics standard), to make sure their products are supported by the broader industry.
    • They oftentimes have to give away technology and services for free to encourage the ecosystem to work with them. Even mighty Microsoft, who’s CEO had once called Linux “a cancer”, has had to open source 20,000 lines of operating system code in an attempt to increase the attractiveness of the Microsoft server platform to Linux technology. Is anyone surprised that Google and Nokia have open sourced the software for their Android and Symbian mobile phone operating systems and have gone to great lengths to make it easy for software developers to design software for them?
    • They have to work collaboratively with a wide range of partners and providers. Intel and Microsoft work actively with PC manufacturers to help with marketing and product targeting. Mobile phone chip manufacturers invest millions in helping mobile phone makers and mobile software developers build phones with their chip technology. Even “simple” activities like outsourcing manufacturing requires a strong partnership in order to get things done properly.
    • The largest of companies (e.g. Cisco, Intel, Qualcomm, etc) takes this whole influence thing a whole step further by creating corporate venture groups to invest in startups, oftentimes for the purpose of influencing the ecosystem in their favor.

    The technology company that chooses not to play nice with the rest of the ecosystem will rapidly find itself alone and unprofitable.

    IV. Never stop overachieving
    There are many ways to screw up in the technology industry. You might not be paranoid enough and watch as a new competitor or Moore’s Law eats away at your profits. You might not present a compelling enough product and watch as your partners and the industry as a whole shuns your product. But the terrifying thing is that this is true regardless of how well you were doing a few months ago — it could just as easily happen to a market leader as a market follower (i.e. Polaroid watching its profits disappear when digital cameras entered the scene).
    As a result, it’s important for every technology company to keep their eye on the ball in two key areas, so as to reduce the chance of misstep and increase the chance that you recover when you eventually do:

    • Stay lean – I am amazed at how many observers of the technology industry (most often the marketing types) seem to think that things like keeping costs low, setting up a good IT system, and maintaining a nimble yet deliberate decision process are unimportant as long as you have an innovative design or technology. This is very short-sighted especially when you consider how easy it is for a company to take a wrong step. Only the lean and nimble companies will survive the inevitable hard times, and, in good times, it is the lean and nimble companies which can afford to cut prices and offer more services better than their competitors.
    • Invest in innovation – At the end of the day, technology is about innovation, and the companies which consistently grow and turn a profit are the ones who invest in that. If your engineers and scientists aren’t getting the resources it needs, no amount of marketing or “business development” will save you from oblivion. And, if your engineers/scientists are cranking out top notch research and development, then even if you make a mistake, there’s a decent chance you’ll be ready to bounce right back.

    Obviously, each of these four “conclusions” needs to be fleshed out further with details and concrete analyses before they can be truly called a “strategy”. But, I think they are a very useful framework for understanding how to make a tech company successful (although they don’t give any magic answers), and any exec who doesn’t understand these will eventually learn them the hard way.

    Thought this was interesting? Check out some of my other pieces on Tech industry